Rabbits in a Thicket
For this tutorial you will need the materials in the zip file below.

For an Italian, Danish, French, Spanish, Dutch and German translation click on the flags.


Unzip the materials into a working folder you have created on your desktop named Rabbits in a Thicket. Please duplicate and close original tubes using the copies for your work so you will not lose the originals. This tutorial was written using AAA Frames/Foto Frame, Penta/ColorDot, Xero/Radiance and effects of PSP. Animation Shop program was also used. To work this tutorial, it is assumed you have some working knowledge of Paint Shop Pro. I used PSP2020 for this tutorial.
Thanks go to Outlawbydesign, Photo by Mabfoto, EileenSorgImage, Angie and Marif/oefentube for the beautiful tubes used.
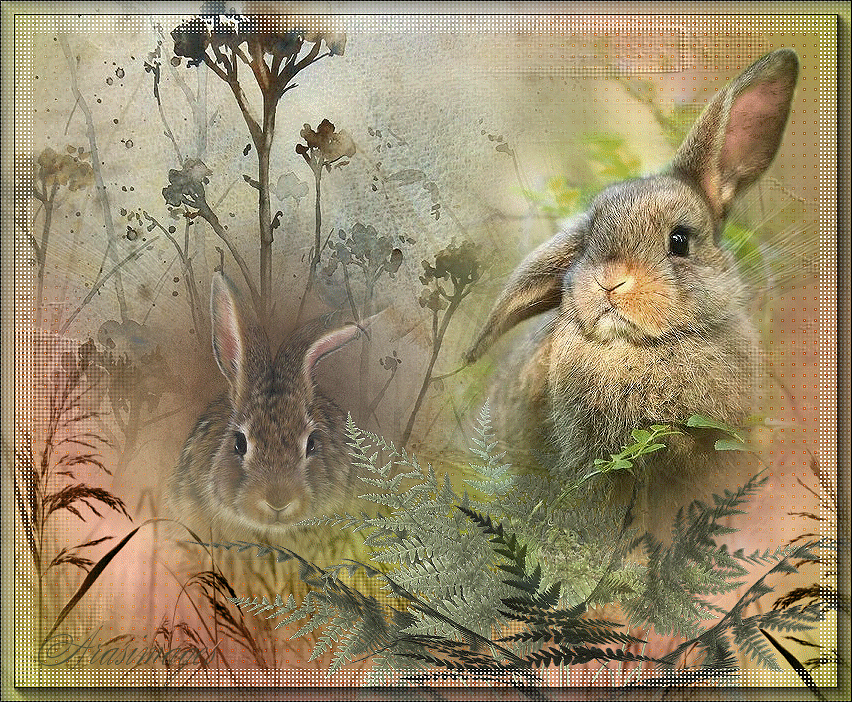
Use the bunny below to mark your place along the way.

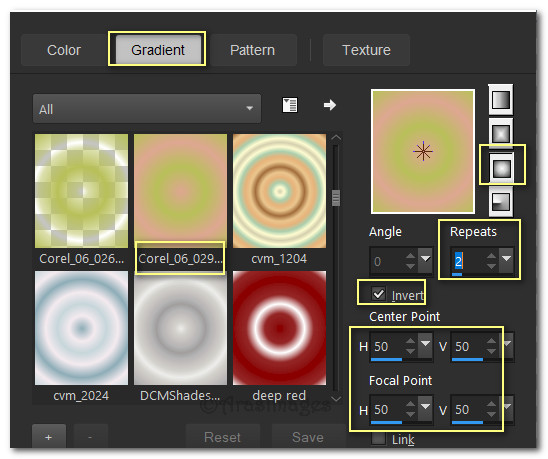
1. In Materials Palette, set Foreground to #b2ba4e and Background to #da9f88. Create a Gradient using these colors, Sunburst/Corel_06_029 Gradient/Invert checked, Angle set to Null/Repeats set at 2. Center Point/Focal Point all set to 50.
2. New/New Image 850px by 700px. Flood fill new image with Gradient.
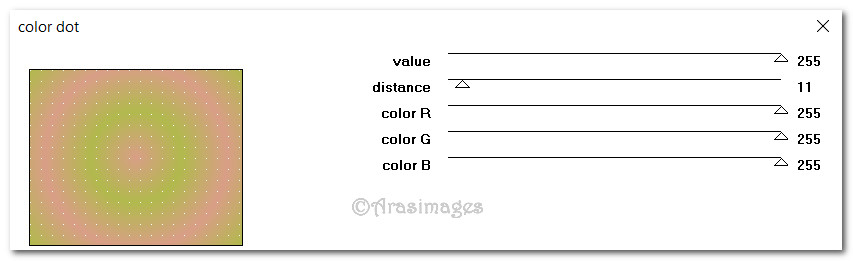
3. Effects/Penta/Color Dots.
4. Effects/Edge Effects/Enhance More.
5. Layers/New Raster Layer.
6. Open 268052e1107d5979e36ea825ee3e31c6.jpg. Copy.
7. On main image, Selections/Select All. Paste into Selection. Selections/Select None.
8. Layers/Drop Opacity down to 50. Luminance (L).
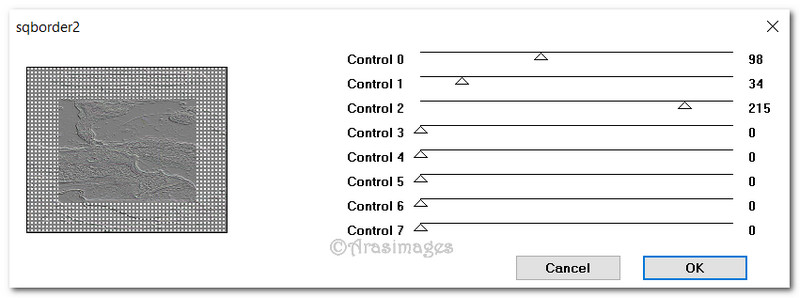
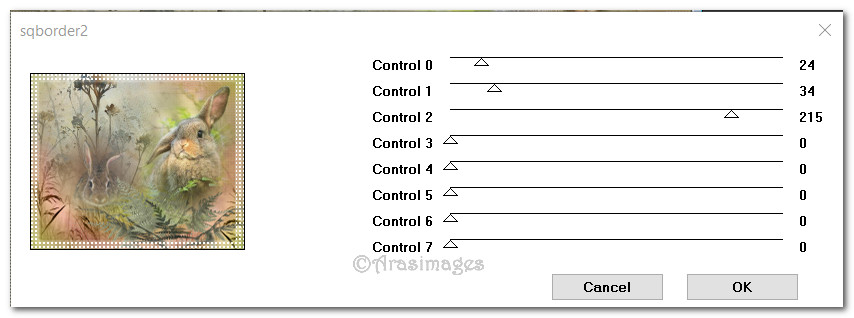
9. Effects/[AFS IMPORT]/sqborder2.
10. Effects/Texture Effects/Emboss.
11. Open oefentube.pspimage. Copy/Paste as New Layer.
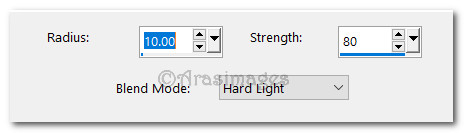
12. Adjust/Sharpness/High Pass Sharpen.
13. Move oefentube to right side of image.
14. Duplicate. Image/Mirror/Mirror Horizontal.
15. Open T2009_angie080.pspimage. Copy/Paste as New Layer.
16. Place in bottom left corner. Blend Mode set to Luminance (L).
17. Duplicate. Image/Mirror/Mirror Horizontal. Move down into right corner further than left corner.
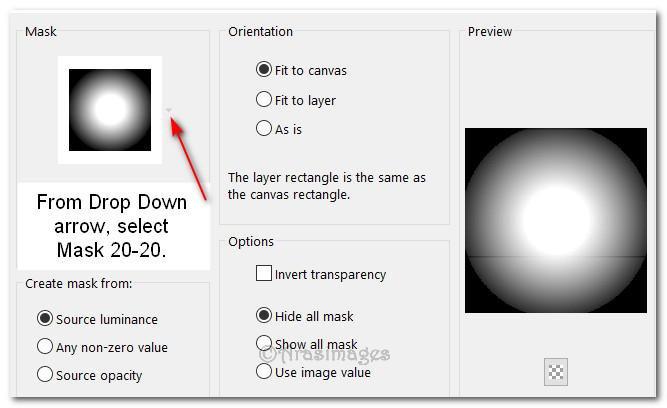
18. Open d738e14284dc70fa3decaf5f2332138c.pspimage of weeds.
19. Layers/Load/Save Mask/Load Mask from Disk. From Drop Down select Mask 20-20. Load. Merge/Merge Group.
20. Duplicate twice. Merge/Merge Visible.
21. Repeat Step #19, #20.
22. Drop Opacity down to 93. Copy/Paste as New Layer. Place weeds in upper left of main image.
23. Open EileenSorgImage.png of rabbit. Layers/Load/Save Mask/Load Mask from Disk. From Drop Down select Mask 20-20. Load.
24. Merge/Merge Group. Image/Resize/Resize by 65%/Resize all layers unchecked.
25. Adjust/Sharpness/Sharpen.
26. Copy/Paste as New Layer. Place to center left below weeds.
27. Open outlawbydesignft125.psp of fern. Copy/Paste as New Layer.
28. Move into bottom right of main image.
29. Adjust/Sharpness/Sharpen.
30. Open Photo by Mabfoto.png of large rabbit. Using the Clone brush, clone out the text on the bottom of image.
31. Layers/Load/Save Mask/Save from Disk. Load. (Same mask as in Step 23.) Merge/Merge Group.
32. Copy/Paste as New Layer. Place large rabbit in right side of image above fern.
33. Open RabbitEar.pspimage. Copy/Paste as New Layer.
34. Place over large Rabbit's ear matching edges. Merge/Merge Down.
35. Adjust/Sharpness/Sharpen.
36. Image/Add Borders/Add 1px border, Symmetric checked, color #434733.
37. Effects/[AFS IMPORT]/sqborder2.
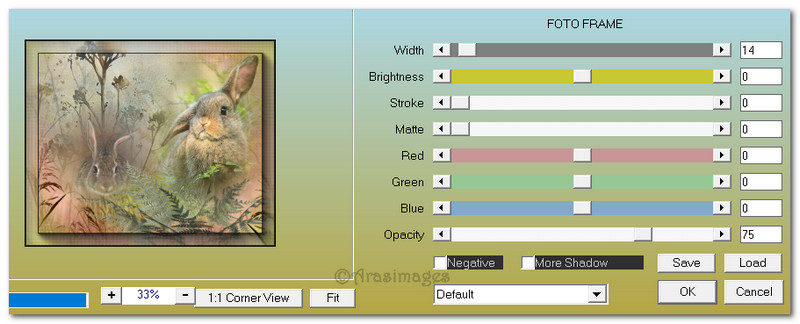
38. Effects/AAA Frames/FotoFrame.
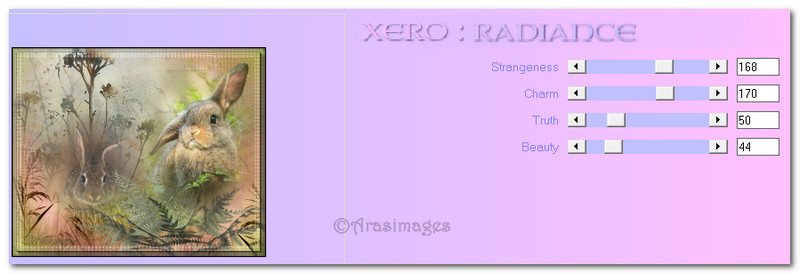
39. Effects/Xero/Radiance.
40. Adjust/Sharpness/Sharpen.
41. Sign your name or watermark and save.
42. Animation Directions: Open Animation Shop.
43. Copy the file you just saved. Go to Animation Shop and Paste as New Animation. Repeat Paste as New Animation and minimize.
44. Effects/Insert Image Transition. Select Page Turn under Effect. Click on Customize and set to Top Right. Click OK. Then click OK on Insert Image Transition.

![]()
45. You now have 35 frames. Highlight the empty last frame/Right click/Delete. Highlight the first frame of the 34 remaining frames. Edit/Select All. Copy.
46. Bring up the minimized New Animation. Duplicate until you have 34 frames. Click in first frame. Edit/Select All.
47. Right click in first frame/Paste/Into Selected Frame. Left click to set in place. Test the placement by clicking on View Animation button at top in tool bar. If you are not satisfied with the placement, undo and using directions, retry.
48. When you are satisfied with placement, we will save. File/Save As. When Save As box appears, Save in: RabbitsinaThicket/Filename: RabbitsinaThicket, Save as type: leave as (*gif). Click on Save.
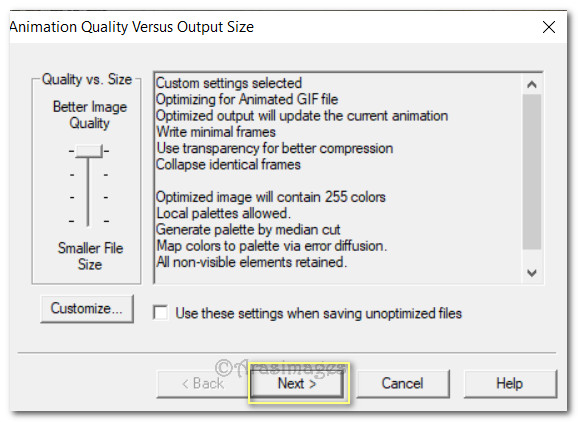
49. As the boxes appear, click on Next, Next, Next then Finish. We are now done!
Thanks PamelaD and EvaTexas for testing this tutorial. March 24, 2020.
If you are going to use this tutorial for stationery, cards or place the tutorial/tag on another site, I would appreciate you contacting me for permission, giving Arasimages credit for the original tutorial and if possible, a link back to my site. Thank you.
Copyright © Arasimages All Rights Reserved