
Playing with Dolphins
For this tutorial you will need the materials in the zip file below.

For an Italian, Danish, French, Spanish and Dutch translation click on the flags.


Unzip the materials into a working folder you have created on your desktop named Playing with Dolphins. Please duplicate and close original tubes using the copies for your work so you will not lose the originals. Place the Arasimages Drops 3 Selections into your PSP Files/Selections folder. Place q-to-t.cfg File into the Dragonfly/SinedotsII folder. Place the H Sparkle-White.tub in your PSP Files/Picture Tubes folder. Place the 20-20 Mask in your PSP Files/Masks Folder. Place diamonds and silverpunk Patterns in your PSP Files/Patterns Folder. It is assumed you have a working knowledge of PSP to follow these directions. I have used Dragonfly/SinedotsII and Filter Forge 6/Misc/Sea level in this tutorial along with effects from PSP. I have used PSP2020 for this tutorial but other versions may be used. Note: If you do not have Sea Level in your Filter Forge, go to their main site, Filter Library to download any of their 13,126 free Plugins. You will find Sea level there along with a ton of other wonderful plugins!
Thanks go to Silvie for the tubed Dolphins, to Maryse for the lady, SDT for the night scene and JHanna for the lovely backgrounds
Use the bookmark below to mark your place along the way.

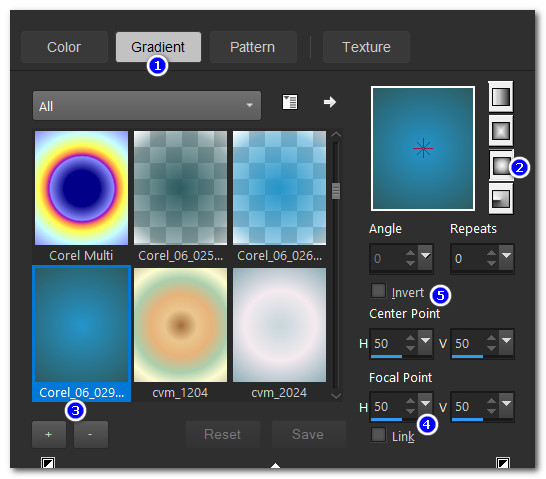
1. In Materials Palette, set the Foreground to #188cc4 and Background to #205055. Set to Gradient to Sunburst, Angle/Repeats null, Corel_06_029 foreground/background, Center and Focal Points all to 50, Invert unchecked.
2. New/New Image. 900px by 750px. Flood fill with Gradient.
3. Layers/New Raster Layer. Selections/Select All.
4. Open JHanna_288-1.pspimage (Recolored). Copy/Paste into Selection. Selections/Select None.
5. Image/Mirror/Mirror Horizontal. Drop Opacity down to 45.
6. Using Selections tool set to Rectangle, Feather 0, Select inside the rough edges of the image. Selections/Invert.
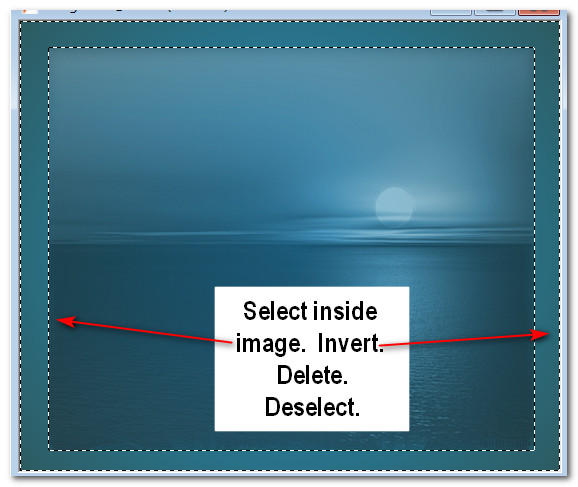
7. Press Delete key once.
8. Selections/Invert. Using Pick tool, pull nodes so image fits on all sides. Set back to Move tool.
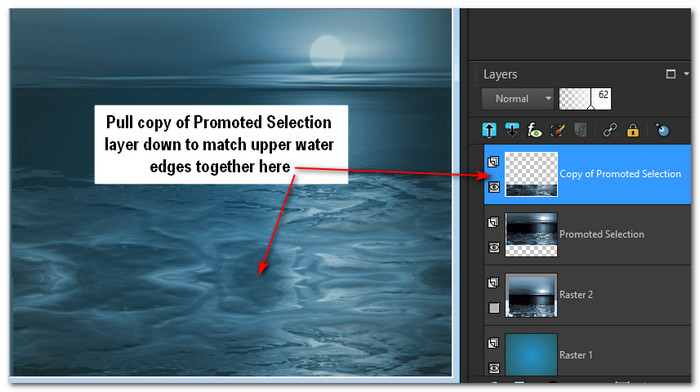
9. Close off Raster 2. Set Promoted Selection/Opacity to 62.
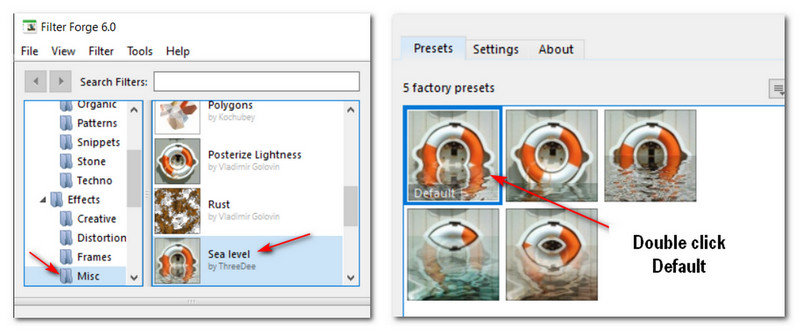
10. Effects/Filter Forge/Filter Forge 6/Miscellaneous/SeaLevel/Default Preset. Apply.
11. View/Check Ruler. Pull image upwards so horizon sets at 160px. Duplicate.
12. Image/Flip. Flip Vertical.
13. Using Move tool, pull Copy of Promoted Selection layer down to match upper water edges together.
14. Duplicate Promoted Selection layer. Image/Mirror. Mirror Horizontal. Set Opacity to 80. Pull into upper right corner. Moon over moon for placement.
15. Go to top layer and activate. Layers/New Raster Layer.
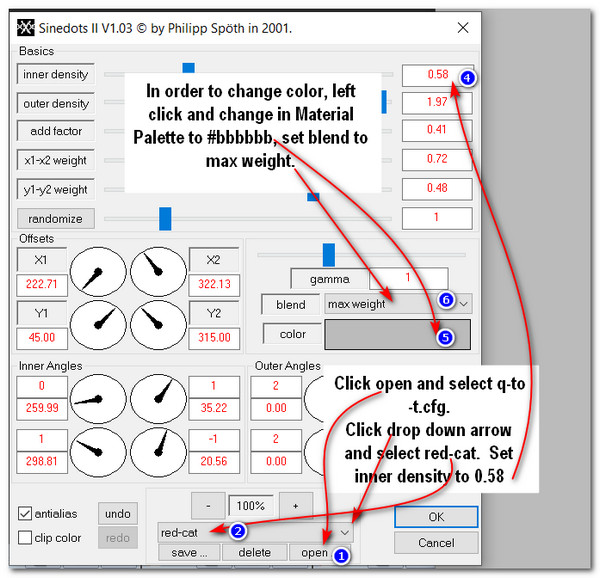
16. Effects/Dragonfly/SinedotsII. Click on Open and choose q-to-g.cfg and from Drop Down arrow, select Red Cat. Change color to #bbbbbb, Blend to Max Weight. Change Inner Density to 0.58. Click OK.
17. Lower Opacity to 75. Use Pick tool to stretch outward to edges.
18. Open Dolphins4_5.09/2018.pspimage. Copy/Paste as New Layer.
19. Image/Resize/Resize by 42%/Resize all layers unchecked.
20. Set to Luminance (Legacy). Drop Opacity to 85.
21. Move to left side.

22. Adjust/Sharpness/Sharpen.
23. Drop down in Layers Palette to Sinedots layer and erase Sinedots off small Dolphins on left. Go back to top layer to continue.
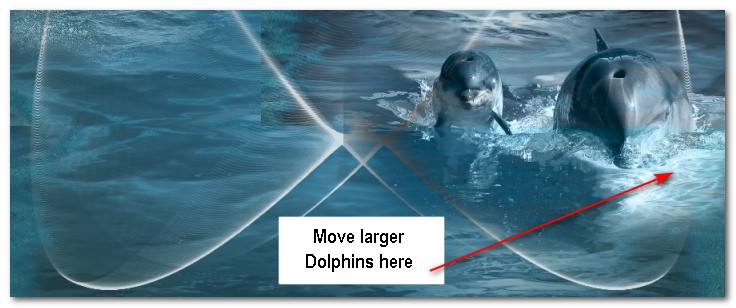
24. Open Dolphins1_05.09.2018.pspimage. Copy/Paste as New Layer.
25. Image/Resize/Resize by 66%/Resize all layers unchecked.
26. Set Blend Mode to Luminance (Legacy). Move to right side toward bottom.
27. Adjust/Sharpness/Sharpen.
28. Layers/New Raster Layer.
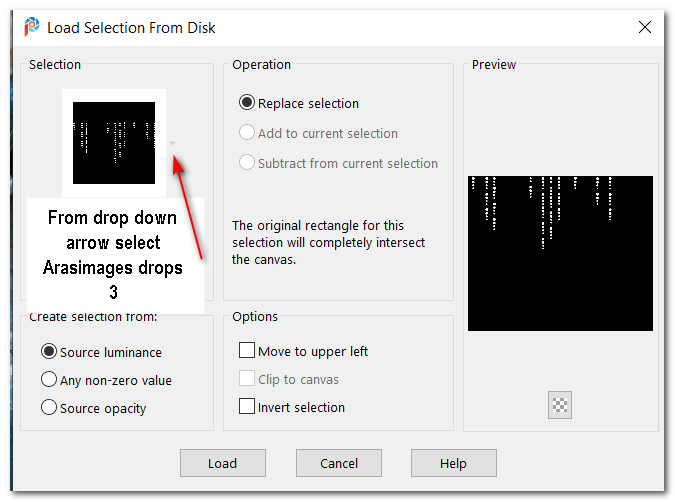
29. Selections/Load/Save Selection/Load Selection from Disk. From drop down arrow, choose Arasimages Drops 3. Load.
30. In Materials Palette, Change Foreground to Pattern/Diamonds/Angle:0, Scale: 120.
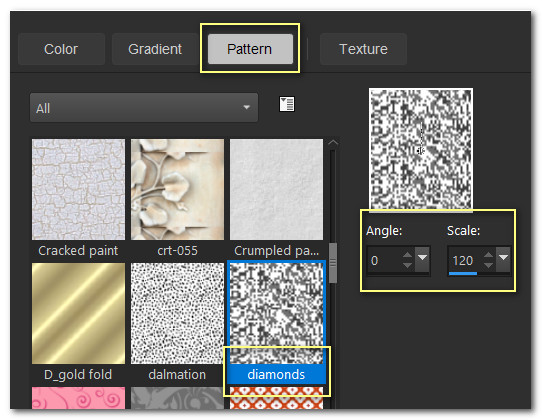
31. Set Flood fill tool to Match Mode:None. Flood fill all Diamonds pattern drops with one left click. (Reset Flood fill to Default RGB Value). Deselect.
32. Image/Mirror/Mirror Horizontal. Place diamonds so moon shows between diamonds on right side.
33. Effects/3D Effects/Drop Shadow. Vertical 0, Horizontal -10, Opacity 55, Blur 15, Color #000000.
34. Effects/Edge Effects/Enhance.
35. Open MR_Beyond Beauty.png lady. Erase Maryse watermark. Keep active on workspace.
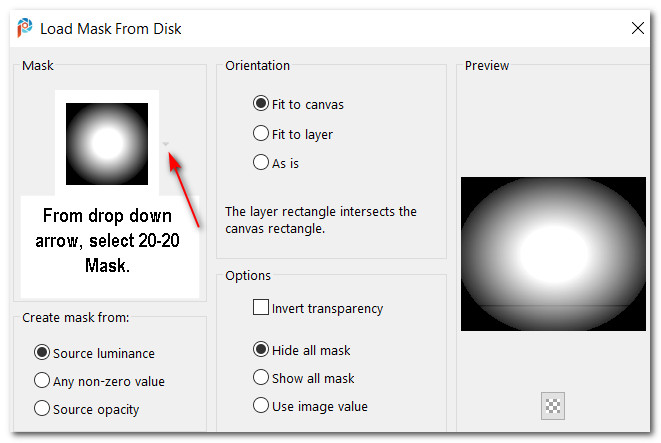
36. Layers/Load/Save Mask/Load Mask from Disk. From drop down arrow, select 20-20 Mask. Load. Merge/Merge Group.
37. Image/Resize/Resize by 66%/Resize all layers unchecked. Copy/Paste as New Layer.
38. Move small lady to right side of image above larger Dolphins.
39. Drop down to Diamonds layer in Layers Palette. With Eraser tool, erase the diamonds which are covering her face.
40. Drop down to SinedotsII layer in Layers Palette. With Eraser tool, erase the Sinedots off the lady. Go back to top layer to continue.
41. Go back to the MR_Beyond Beauty.png lady on workspace. Use Undo arrow to put her back to normal size and opacity - up to erasing Maryse watermark.
42. Image/Mirror. Mirror Horizontal.
43. Image/Resize/Resize by 120%/Resize all layers unchecked. Copy/Paste as New Layer.
44. Adjust/Sharpness/Sharpen. Place lady between Dolphins.
45. Effects/3D Effects/Drop Shadow. Vertical -20, Horizontal -20, Opacity 40, Blur 25, color #000000.
46. Image/Add Borders/Add 3px border, Symmetric checked, color #e6ebec.
47. Image/Add Borders/Add 5px border, Symmetric checked, color #205055.
48. Image/Add Borders/Add 3px border, Symmetric checked, color #e6ebec.
49. In Materials Palette, set Foreground to Silverpunk Pattern.
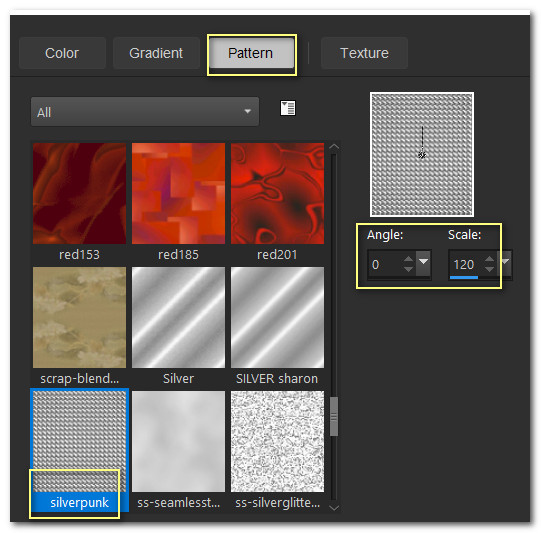
50. Using Magic Wand, activate the outer 3px border. Flood fill with Silverpunk Pattern.
51. Effects/Edge Effects/Enhance. Deselect.
52. Image/Add Borders/Add 3px border, Symmetric checked, color #205055.
53. Image/Add Borders/Add 3px border, Symmetric checked, color #e6ebec.
54. Leave a watermark or your name if you wish and save as .jpg or .png file.
OPTIONAL ANIMATION:55. Duplicate your saved image 5 times having 6 layers in all. Close off all layers except for the top layer. Highlight it.
56. From the tool bar, select the Picture Tube Tool, set to H Sparkle-White. Use settings below. Create on New Raster Layer not ticked.

57. Left click randomly several times on hanging diamonds and ladys' necklaces. Close off top layer (Copy (5) of Background.
58. Move down to Copy (4) of Background and highlight it. Change Scale to 24. Randomly click all diamonds again. Close off layer.
59. Move down to Copy (3) of Background and highlight it. Change Scale to 28. Randomly click all diamonds and larger lady's necklace again. Close off layer.
60. Move down to Copy (2) of Background and highlight it. Change Scale to 32. Randomly click hanging diamonds and larger lady's necklace again. Close off layer.
61. Move down to Copy of Background and highlight it. Change Scale to 36. Randomly click hanging diamonds and larger lady's necklace again. Close off layer.
62. Move down to Background layer and highlight it. Change Scale to 40. Randomly click hanging diamonds and larger lady's necklace again.
63. Open all of the other 5 layers. File/Save As/PSP Animation Shop (*psp) with file name of Playing with Dolphins in your working folder.
64. Open Animation Shop. File/Open. Open the file you just saved.
65. Edit/Select All. In the top tool bar click on View Animation. If your diamonds are sparkling too fast, click on Animation/Frame Properties. Set Display time at 15. OK. Click on View Animation again to see if the sparkles are more to your liking. The higher the number, the slower the animation.
66. If you are satisfied, we will now save our work. File/Save As. When the Save As box appears, give your work a name, name where you will save it and leave the Save as type set to (*.gif). Click on Save.
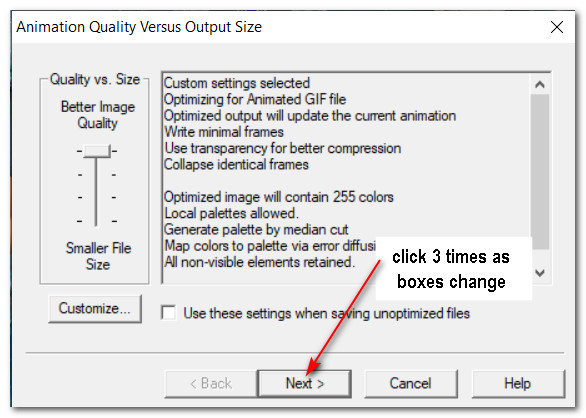
67. As the boxes change, click Next, Next, Next and Finish. Your animated work is now saved in your working folder.
Many thanks to PamelaD and Evatexas for their testing my tutorial. June 30, 2020.
If you are going to use this tutorial for stationery, cards or place the tutorial/tag on another site, I would appreciate you contacting me for permission, giving Arasimages credit for the original tutorial and if possible, a link back to my site. Thank you.
Copyright © Arasimages All Rights Reserved