
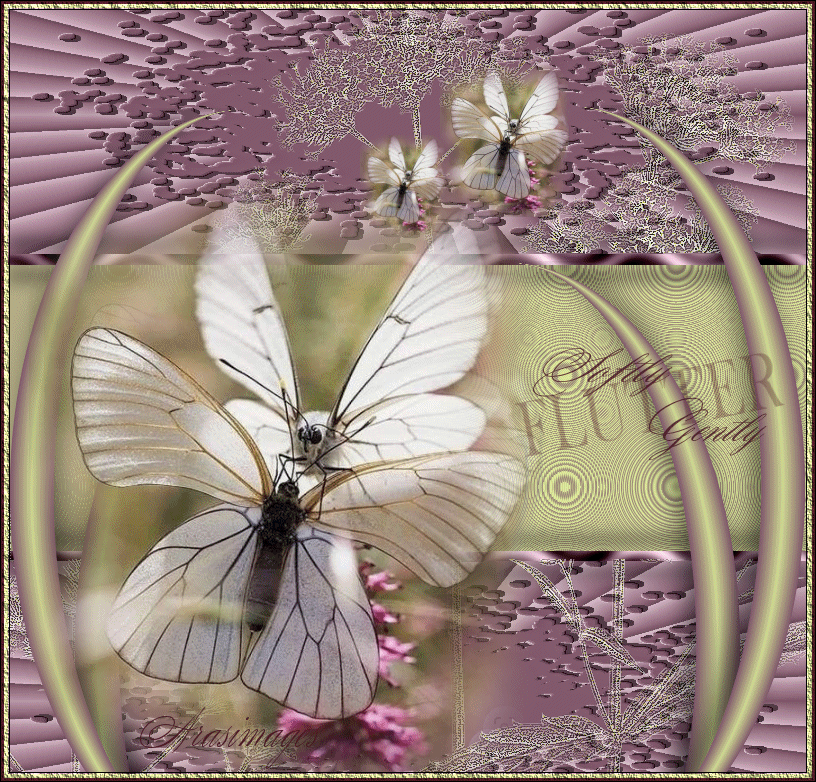
Flutter Softly
For this tutorial you will need the materials in the zip file below.

For an Italian, Danish, French, German, Dutch and Spanish translation click on the flag.


Create a folder on your desktop named Flutter Softly. Unzip the Materials in to the folder. Duplicate the original tubes and close out originals so you will not lose them, using duplicates in your work. I have used plugins Two Moons/Rotoblades, Filter Attacks/Filter Attacks and &Bkg Designer sf101/BB StringThing and Cirquelate, AAA Frames/Texture Frame and effects of PSP 2020. Export the brushes in to your PSP Files/Brushes folder. Place Selections into your PSP Files/Selections folder. I have also used Animation Shop to do the animation. To work this tutorial, it is assumed you have working knowledge of Paint Shop Pro.
Use the butterfly below to mark your place along the way.

1. In Materials Palette set Foreground to #cfd892, Background to #805a6c.
2. New/New Image 800px by 766px. Flood fill New Image with Background #805a6c.
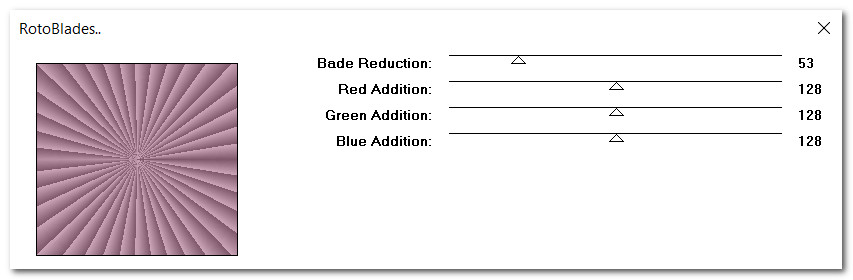
3. Effects/Two Moons/Rotoblades.
4. Layers/New Raster Layer. Flood fill with Background #805a6c.
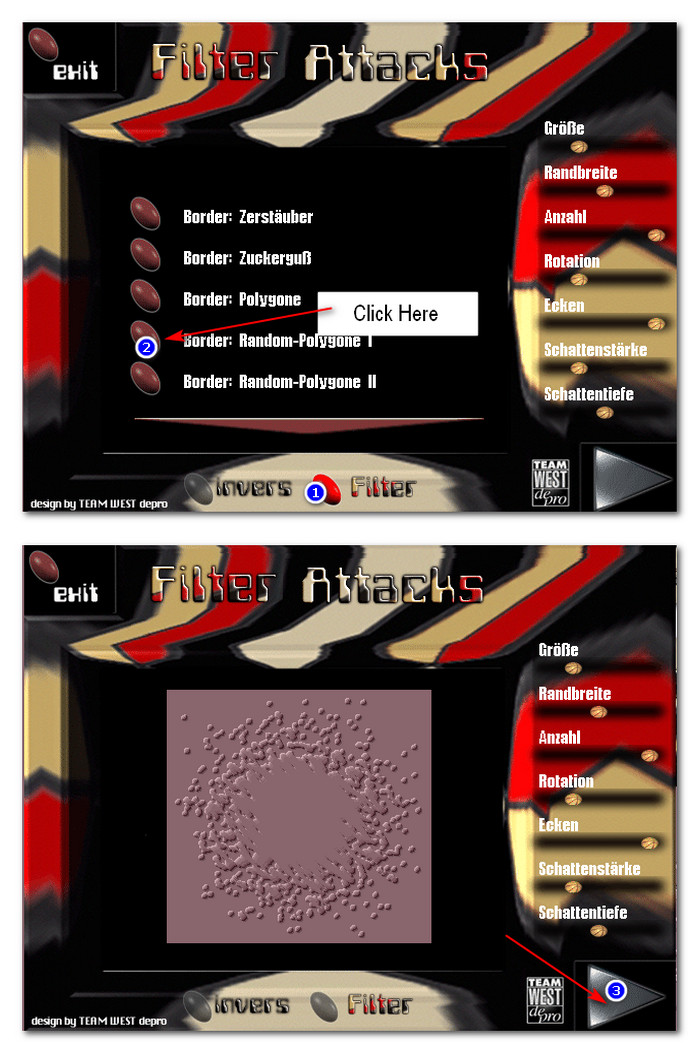
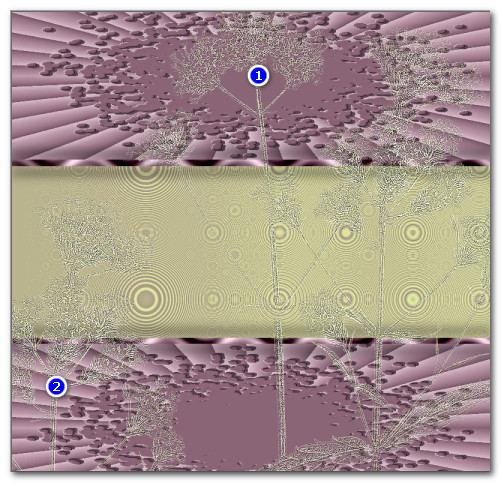
5. Effects/Filter Attacks/Filter Attacks. Click on Filter button/click on Border: Random-Polygone I. See top snapshot below. Use Default settings and click on gray arrow in bottom right corner when you see the pattern. See bottom snapshot below.
6. Merge/Merge Down.
7. Adjust/Sharpness/High Pass Sharpen.

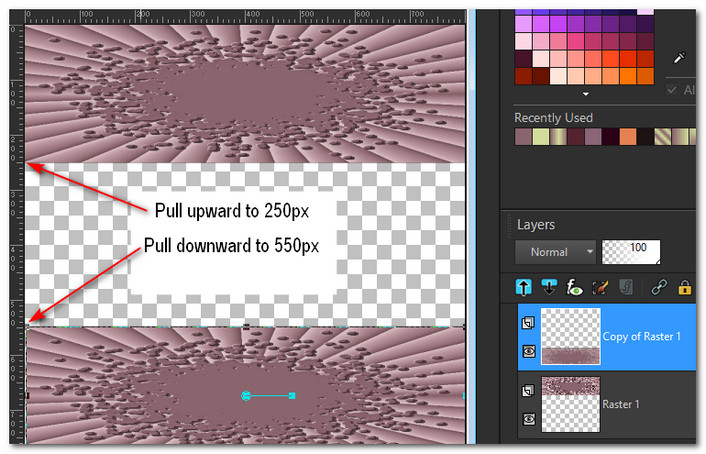
8. Using Pick tool set to Mode: Scale, move up to 250px. See snapshot below Step 9.
9. Duplicate. Objects/Align/bottom. Use Pick tool to move down to 550px.
10. Set Pick tool back to Move tool. Uncheck View/Ruler.
11. Layers/New Raster Layer. Flood fill with Foreground #cfd892. Pull to bottom of Layers Palette. Go back to top layer.
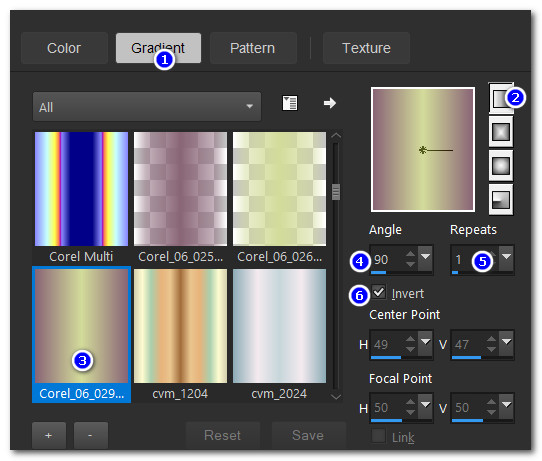
12. In Materials Palette, create a Gradient using the Foreground/Background colors. Use Corel_06_029 Gradient, Linear, Angle/90, Repeats/5, Invert checked, Center and Focal Points null.

13. Layers/New Raster Layer.
14. Selections/Load Save Selections/Load Selection from Disk. From drop down select ArasimagesFlutter Selection. Load.

15. Flood fill Selection with Gradient.
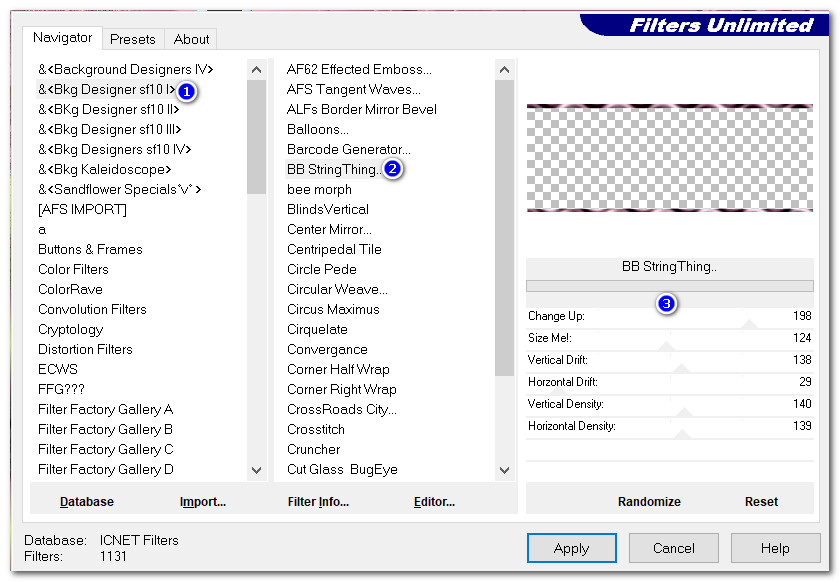
16. Effects/Filters Unlimited/&BKG Designer sf101/Cirquelate.

17. Drop Opacity down to 35. Selections/Select None.
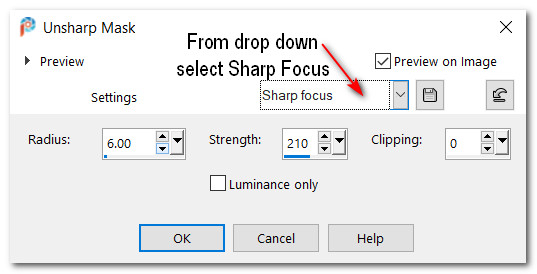
18. Adjust/Sharpness/Unsharp Mask.
19. Layers/New Raster Layer.
20. Selections/Load Save Selections/Load Selection from Disk. From drop down select ArasimagesRibbon Selection. Load.

21. Flood fill with Background #805a6c.
22. Effects/Filters Unlimited/&BKG Designer sf101/BB String Thing.
23. Selections/Select None.
24. Effects/3D Effects/Drop Shadow. Vertical 16, Horizontal 0, Opacity 50, Blur 24, color #000000.
25. Effects/3D Effects/Drop Shadow. Vertical -16, Horizontal 0, Opacity 50, Blur 24, color #000000.
26. Layers/New Raster Layer.
27. From Tool bar select Paint Brush. From the drop down select Colorel garden 14 brush. Use settings as seen below.

28. Change Gradient back to Color. Left click where indicated in snapshot below.
29. Effects/Edge Effects/Enhance. Effects/Edge Effects/Enhance More.
30. Use the Selection tool set to Rectangle, Mode: Add (Shift)/Feather 0, select the green center outside the ribbons. Delete flowers over the center. Selections/Select None.
31. In Materials Palette, set a new gradient using Linear, Invert checked, Corel_06_029, Angle 90/Repeats 1 using Foreground/Background colors.
32. Layers/New Raster Layer.
33. Using same settings as in Step #30, select a vertical rectangle 40px wide, length from top to bottom.

34. Flood fill with Gradient. Selections/Select None.
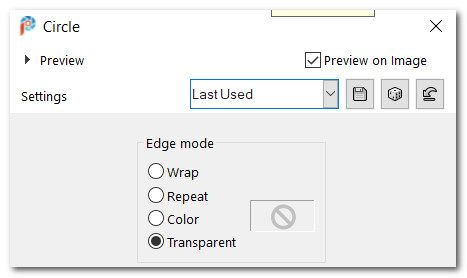
35. Effects/Geometric Effects/Circle.
36. Effects/3D Effects/Drop Shadow. Vertical -16, Horizontal -10, Opacity 50, Blur 36, color #000000.
37. Duplicate. In Layers Palette pull duplicate below original. Go back to top layer/highlight. Merge/Merge Down.
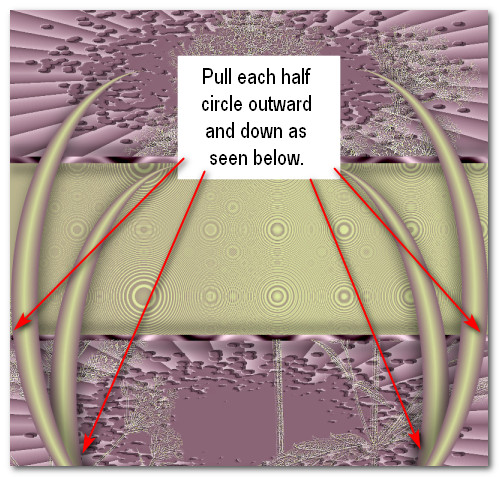
38. Duplicate. Image/Mirror. Mirror Horizontal.
39. Pull each layer of half circles out to edges and down. See placement below.
40. Open 2019-11-09-185252.jpg of butterflies. Copy/Paste as New Layer.
41. Using the Smudge Brush set to size 26, smudge the right side if it seems too straight. We want a nice soft border around butterflies.

42. Place to left side over inside half circle and drop Opacity down to 67. Duplicate. Place duplicate copy to left and down a little over first butterflies. Raise Opacity to 100.
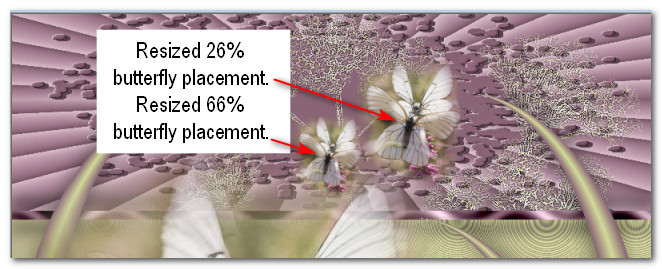
43. Duplicate Opacity 100 top layer butterflies. Image/Resize/Resize by 26%/Resize all layers unchecked.
44. Place 26%resized butterflies toward the top right. See snapshot below next step for placement.
45. Duplicate resized 26% butterflies. Image/Resize/Resize by 66%/Resize all layers unchecked. Place to left of other smaller butterfly.
46. Layers/New Raster Layer.
47. Change Background color to #491722. From Tool bar select Paint Brush. Choose FlutterSoftlyGently brush. Use settings below.

48. Right click to stamp brush on center right side of image.
49. Image/Add Borders/Add 4px border, Symmetric checked, color #cfd892.
50. Image/Add Borders/Add 4px border, Symmetric checked, color #491722.
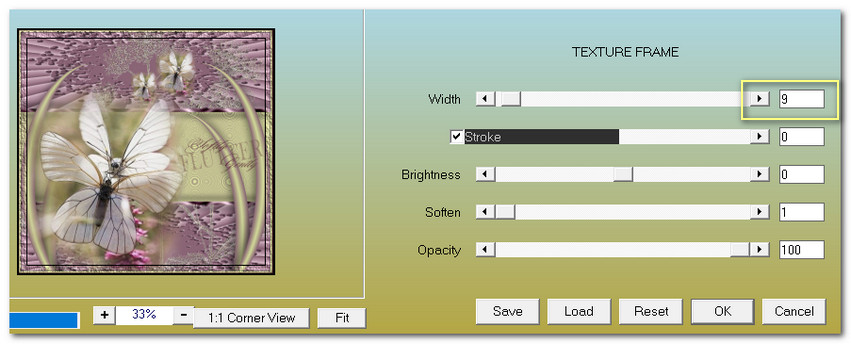
51. Effects/AAA Frames/Texture Frame. Repeat a second time.
52. Sign your name or leave your watermark if you wish. Save as .jpg or .png file.
53. Optional Animation: If you want your tag animated, open Animation Shop. File/Open animation.psp file. Highlight first frame, Edit/Select All. Copy.
54. Open your main image you created. Duplicate it 5 times having 6 frames in all. Highlight first frame, Edit/Select All.
55. Right click in first frame of main image, Paste into Selected Frame, place wings over main image wings and left click to set wings in place.
56. To save your work, File/Save As. When the Save As box appears, give your work a name (FlutterSoftly), name where to save it and leave it to save as a .gif file. Save.
57. As the boxes pop up, click on Next, Next, Next and Finish. Your animated tutorial is now finished and saved!
Thanks go to the unknown photographer of the butterflies. I am only the tuber and do not claim the photograph as my work. Thanks too, to PamelaD and EvaTexas for their faithful testing of my tutorials. July 19-2020.
If you are going to use this tutorial for stationery, cards or place the tutorial/tag on another site, I would appreciate you contacting me for permission, giving Arasimages credit for the original tutorial and if possible, a link back to my site. Thank you.
Copyright © Arasimages All Rights Reserved