
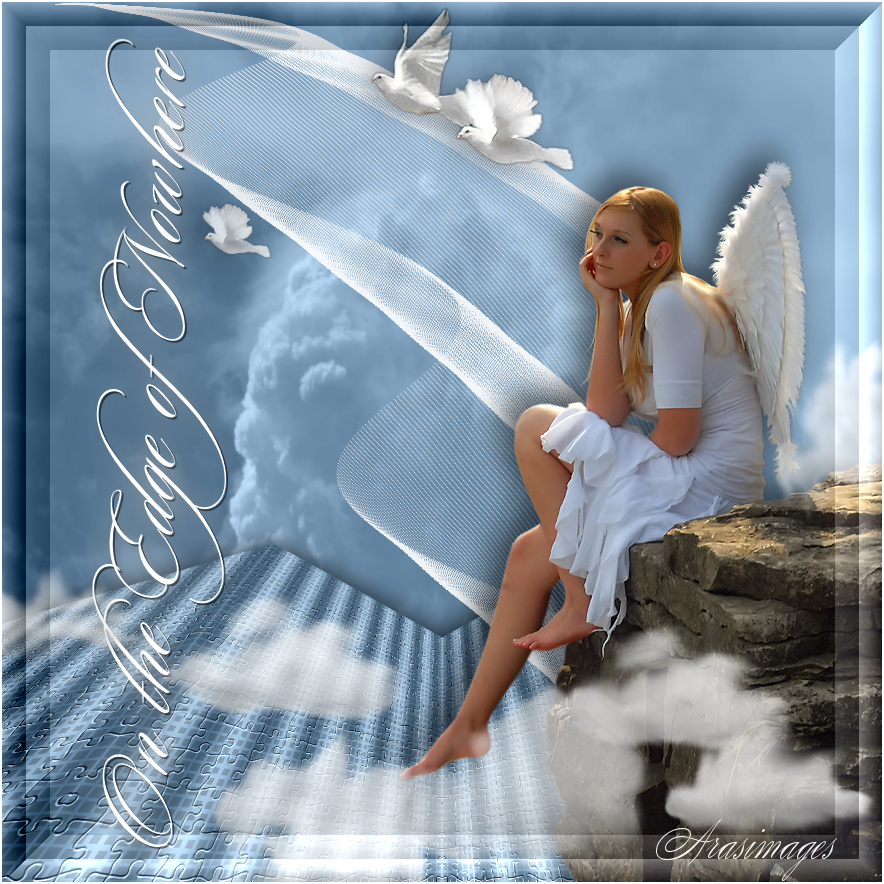
On the Edge of Nowhere
For this tutorial you will need the materials in the zip file below.

For an Italian, Danish, French, German, Dutch and Spanish translation, click on the flags.


Create a new folder on your desk top named On the Edge of Nowhere. Duplicate the tubes, place in folder and delete the originals. Place the Picture Tube in your PSP Files/Picture Tube folder. This tutorial was written using Plugins Mehdi/Wavy Lab, Dragonfly/SinedotsII/triple curl, Filters Unlimited/&Bkg Designer sf10ll/Puzzle, MuraMeister/Perspective and FiltersUnlimited/Button&Frames/3D Glass Frame. To work this tutorial, it is assumed you have some working knowledge of Paint Shop Pro. I have used PSP2020 to create this tutorial.
Thanks go to Nikita and to Maryse for their beautiful tubes. A special thanks for the photography of Linda Youngblood for her clouds over Wyoming USA.
Use the bookmark below to mark your place along the way.

1. New/New Image 880px by 880px. Flood fill with color #aacce9.
2. Layers/New Raster Layer. Selections/Select All.
3. Open Clouds.png file. Using Selections tool set to Rectangle, draw around inside of border. Copy.
4. Paste/Paste into Selection. Selections/Select None.
5. Set Blend Mode to Luminance (Legacy).
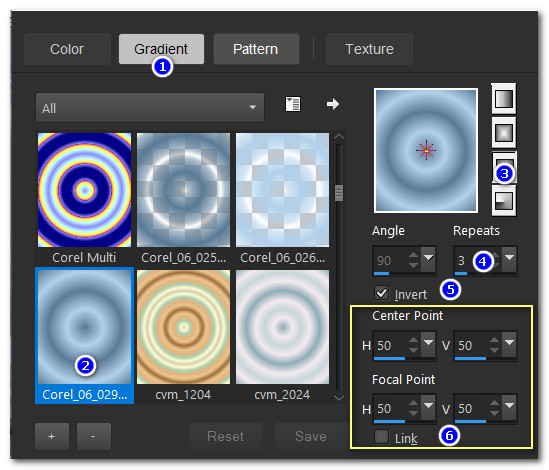
6. In Materials Palette, set Foreground to #aacce9, Background to #4e708d, Sunburst, Repeat 3, Angle Null, Invert checked, Focal and Center Points all set to 50.
7. Layers/New Raster Layer. Flood fill with Gradient.
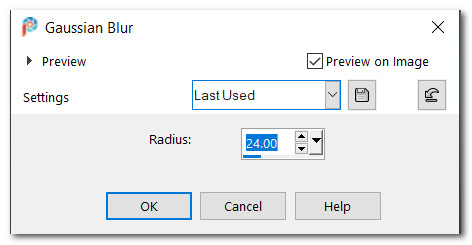
8. Adjust/Blur/Gaussian Blur/Radius 24.
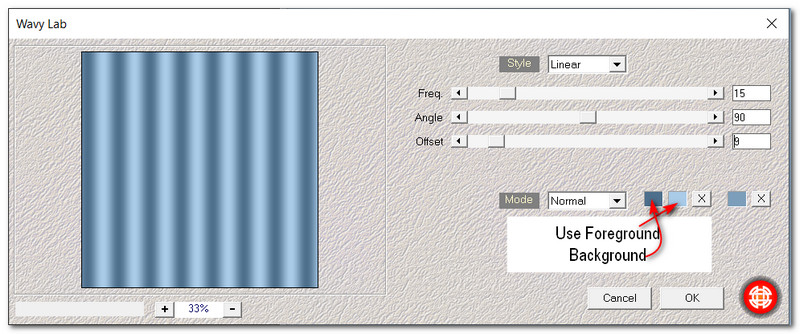
9. Effects/Mehdi/Wavy Lab.
10. Effects/Edge Effects/Enhance.
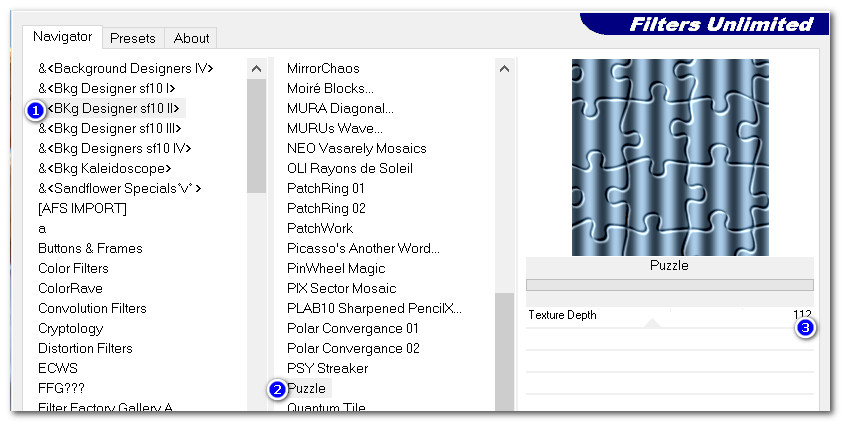
11. Effects/FiltersUnlimited/&Bkg Designer sf10II/Puzzle/Default setting: 112.
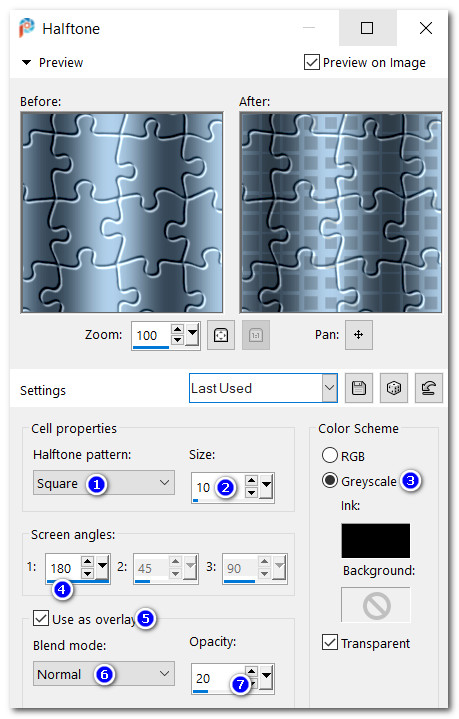
12. Effects/Artistic Effects/Halftone. Adjust/Sharpness/Sharpen.
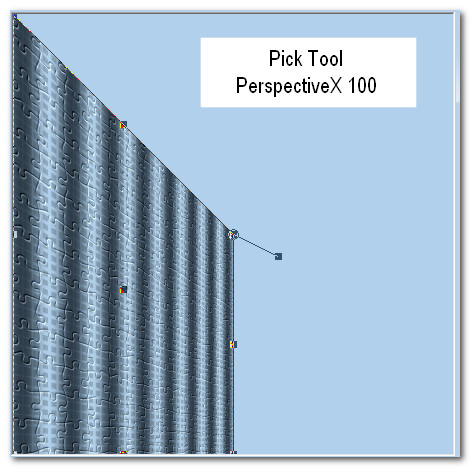
13. From tool bar choose the Pick tool. Set it to PerspectiveX/100.00. Leave all other settings the same. Press M key to deselect.
14. Duplicate. Image/Mirror. Mirror-Horizontal.
15. Merge/Merge Down.
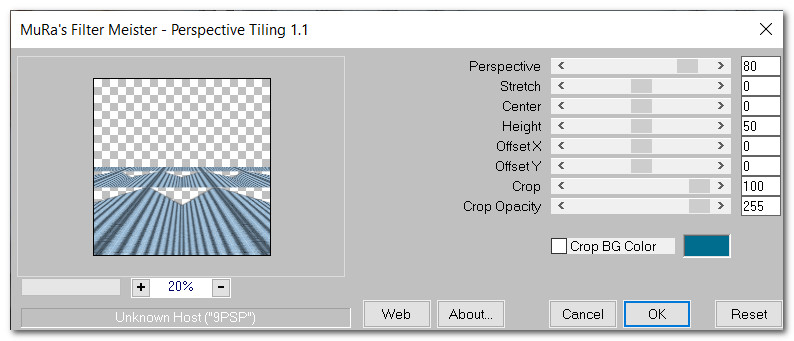
16. Effects/MuraMeister/Perspective.
17. Adjust/Sharpness/Sharpen.
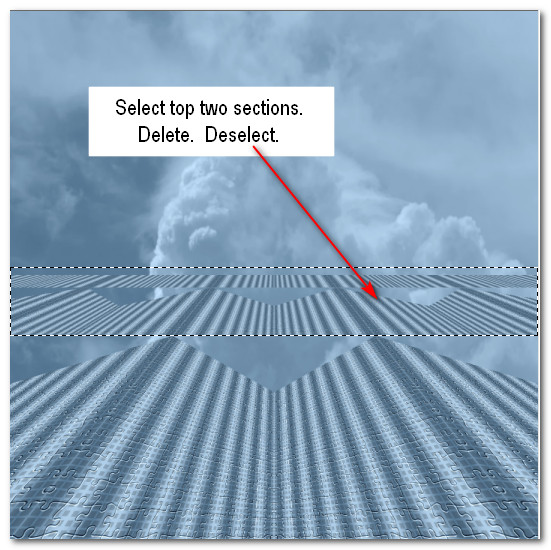
18. Using Selections tool, select around top two sections of Perspective. Delete. Deselect.
19. Effects/3D Effects/Drop Shadow. Vertical 0, Horizontal 0, Opacity 80, Blur 40, color #000000.
20. Layers/New Raster Layer.
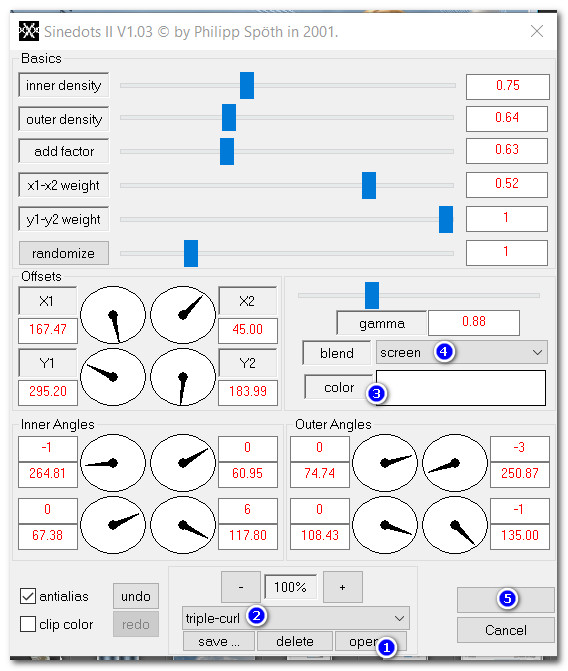
21. Effects/Dragonfly/Sinedots II. Click on Open and find q-to-t.cfg. Open. Click on drop down arrow and find triple curl in list, click on it. Set color to #ffffff, set blend at Screen. Click OK. Drop Opacity to 90.
22. Open MR_White angel.png. Copy/Paste as New Layer.
23. Use Selection tool to select around Maryse watermark and Delete. Deselect.
24. Effects/3D Effects/Drop Shadow. Vertical -12, Horizontal -12, Opacity 60, Blur 48, color #000000.
25. Adjust/Sharpness/Sharpen.
26. Place angel in bottom right corner to fit.
27. Open 1220639475_animaux.pspimage of birds. Copy/Paste as New Layer.
28. Image/Mirror. Mirror-Horizontal.
29. Image/Resize/Resize by 80%/Resize all layers unchecked.
30. Change Background of Materials Palette to #ffffff. Using Color Changer from tool bar right click once on birds to change to whiter color.
31. Effects/3D Effects/Drop Shadow. Vertical 0, Horizontal -12, Opacity 40, Blur 48, color #000000.
32. Place birds near upper center.

33. From Tool bar, select the Text tool. Choose Font Sloop Script Three, Size 100, Kerning:25, Font color #ffffff, write out the words "On the Edge of Nowhere". Using the outer Node, turn the text 90 degrees so it is vertical. Convert to Raster Layer.

34. Effects/3D Effects/Drop Shadow. Verical 0, Horizontal 0, Opacity 100, Blur 48, Color #ffffff.
35. Effects/3D Effects/Drop Shadow. Verical 2, Horizontal 2, Opacity 60, Blur 0, Color #000000.
36. Objects/Align/Vertical Center. Place to the left side of image.
37. Layers/New Raster Layer.
38. From tool bar, select the Picture Tube tool. Choose Picture tube Clouds.PspTube. Leave Scale set at Size 100 to start.

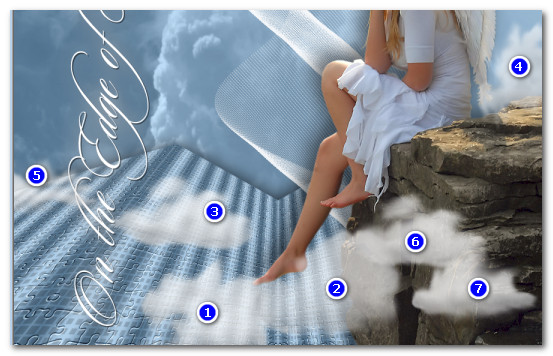
39. Background color of #ffffff in Materials Palette, right click three clouds (see example below) and change size to 77, stamp four more. You will have 7 clouds. Or you may choose which clouds you put where.
41. Effects/3D Effects/Drop Shadow. Vertical 0, Horizontal -12, Opacity 40, Blur 48, color #000000.
42. Drop the Opacity down to 79. Place the single bird in the upper left corner between text and clouds.
43. Image/Add Borders/Add 2px border, Symmetric checked, color #ffffff.
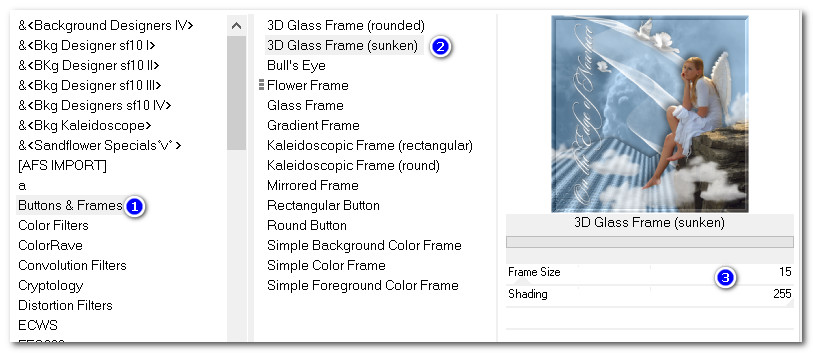
44. Effects/FiltersUnlimited/Button&Frames/3D Glass Frame (sunken) using snapshot below. Repeat frame changing Shading to 72/Frame Size 29.
Thank you PamelaD and Evatexas for checking my tutorials for me. 08-03-2020.
If you are going to use this tutorial for stationery, cards or place the tutorial/tag on another site, I would appreciate you contacting me for permission, giving Arasimages credit for the original tutorial and if possible, a link back to my site. Thank you.
Copyright © Arasimages All Rights Reserved