Wintergreen
For this tutorial you will need the materials in the zip file below.

For an Italian, German, French, Dutch and Spanish translation click on the flags.


This tutorial was written using PSP2019. Export the Snowflake medium Picture Tube into your PSP Files/Picture Tube folder and the Mask in your PSP Files/Mask folder. I have used Plugins Xero/Porcelain, FunHouse/Heizenberg's Mirror and effects of PSP. To work this tutorial, it is assumed you have working knowledge of Paint Shop Pro but many snapshots show you your way through.
Thanks go to Nikita and to Charlieonline for their beautiful tubes used.
Use the snowflake below to mark your place along the way.

1. New/New Image/850px by 900px. Flood fill with #dbdeca.
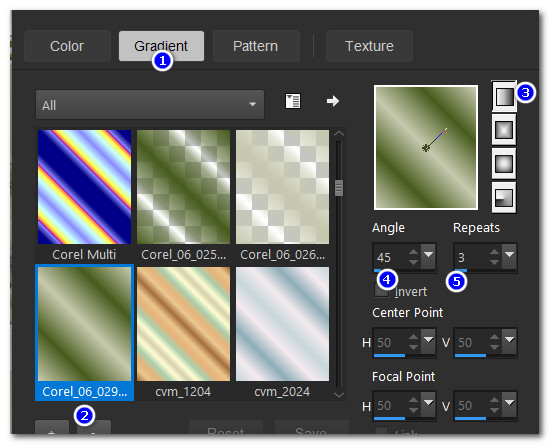
2. In Materials Palette to make a gradient set Foreground to #c1c4a7/Background to #3c5011. Set to Linear, Angle 45/Repeats 3. Invert checked, Center Point/Focal Point all set to Null. Corel_06_029 ForegroundBackground.
3. New layer. Flood fill with Gradient.
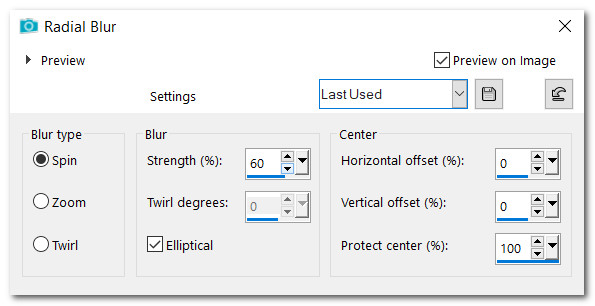
4. Adjust/Blur/Radial Blur.
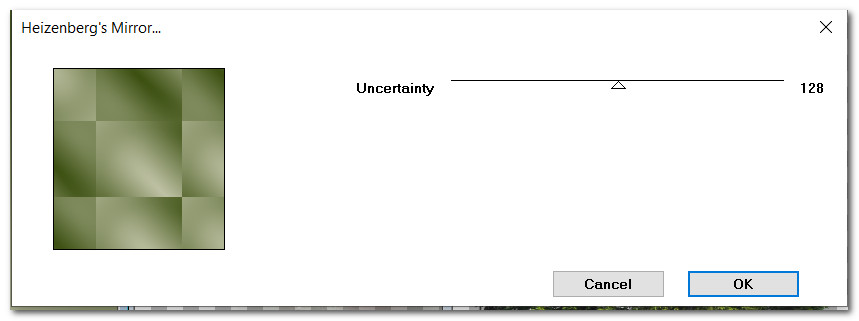
5. Effects/FunHouse/Heizenberg'sMirror.
6. Effects/Edge Effects/Enhance.
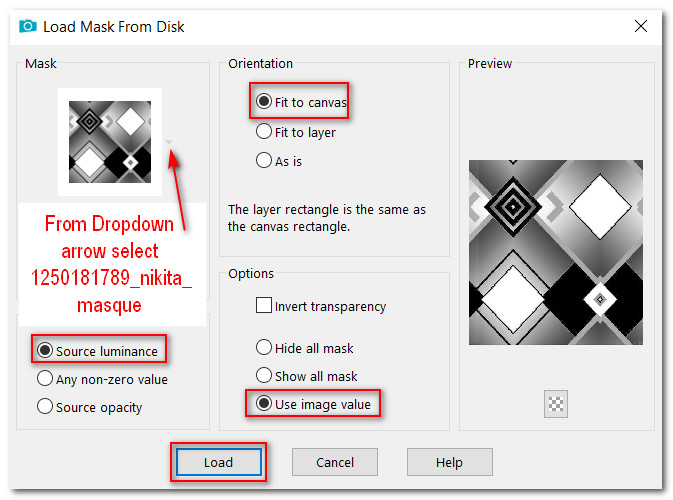
7. Layers/Load/Save Mask/Load Mask from Disk. From drop down arrow select 1250181784_nikita_masque. Load.
8. Merge/Merge Group.
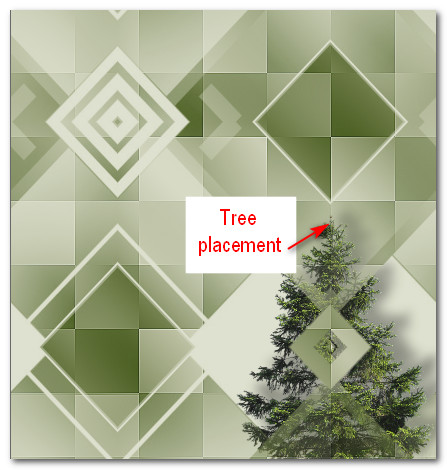
9. Open PineTree1.png. Copy/Paste as New Layer.
10. Image/Resize/Resize by 27%/Resize all layers unchecked.
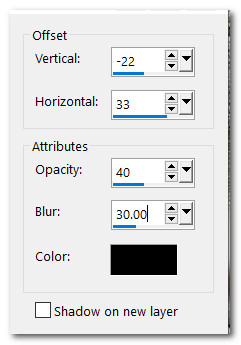
11. Effects/3D Effects/Drop Shadow. Vertical -22, Horizontal 33, Opacity 40, Blur 30, color #000000.
12. Move to bottom right corner and drag layer below Layer Group - Raster 2 so top of tree is under bottom of top diamond. Highlight Group - Raster 2 Layer.
13. Open 13458167161_femmes_nikita.png. Copy/Paste as New Layer.
14. Using Selection tool, select around Nikita's watermark and delete. Deselect.
15. Effects/3D Effects/Drop Shadow. Vertical -22, Horizontal 33, Opacity 40, Blur 30, color #000000.

16. Adjust/Sharpness/Sharpen. Move to left side of image.
17. From tool bar select Picture Tube tool/Snowflake medium.PspTube. Set Scale to 85.

18. Layers/New Raster Layer. Click on top of diamond to create a snowflake. If the snowflake is what you want, use it duplicating 3 times and place one on each corner of diamond. If the snowflake is not the one you want, delete and click again until you find the one you want to use. (There are different snowflakes to this Tube.)
19. Merge/Merge Down three times so snowflakes are all on one layer.
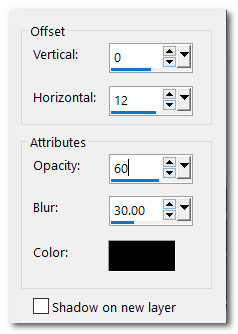
20. Effects/3D Effects/Drop Shadow. Vertical 0, Horizontal 12, Opacity 60, Blur 30, color #000000.
21. Activate Group - raster 2. Using Selections tool, select around the edges of small diamond. Copy. Deselect.
22. Select inside the border of the top larger diamond. Delete.
23. Go to the top layer. Layers/New Raster Layer. Paste/Paste into Selection. Image/Flip/Flip Horizontal. Deselect.
24. Merge/Merge Visible. Copy.
25. Select the inside of the larger diamond again. Paste/Paste into Selection.
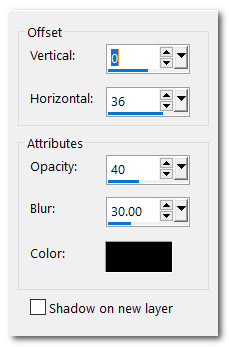
26. Effects/3D Effects/Drop Shadow. Vertical 0, Horizontal 36, Opacity 40, Blur 30, color #000000.
27. Selections/Select None.
28. Image/Add Border/Add 8px border on top and bottom, 20px border on sides, color #3c5011, Symmetric unchecked.
29. Select the outer border with Magic Wand. Layers/New Layer. Flood fill border with Gradient.
30. Effects/3D Effects/InnerBevel. Deselect.

31. Image/Add Borders/Add 8px border, Symmetric checked, color #3c5011.
32. Image/Add Border/Add 8px border on top and bottom, 80px border on sides, color #c3c6a9, Symmetric unchecked.
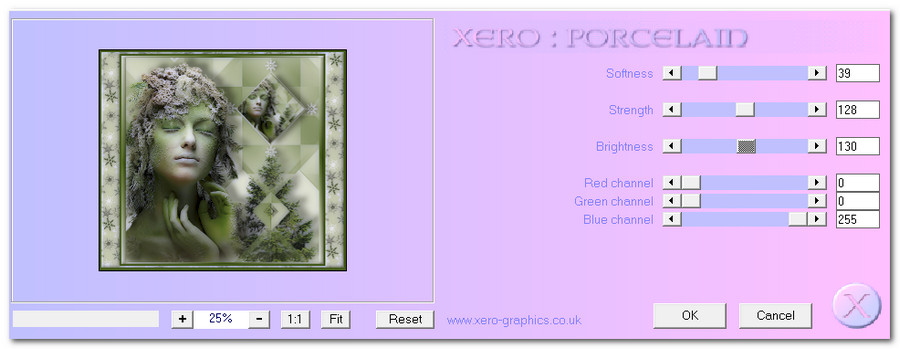
33. Using Magic Wand activate the wide border. Layers/New Raster Layer.
34. Open ch-SnowJew2.pspimageRECOLORED file. Close off charliegraph creation stamp.
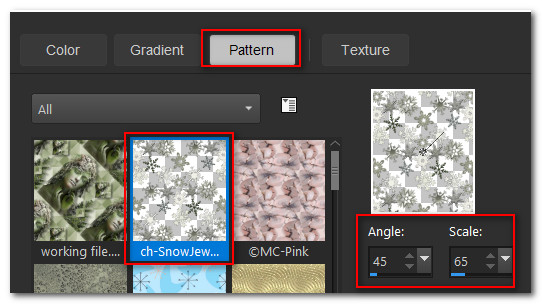
35. In Materials Palette, select Pattern. Set the Angle to 45, Scale to 65. Flood fill the large border.
36. Image/Add Borders/Add 8px border, Symmetric checked, color #3c5011.
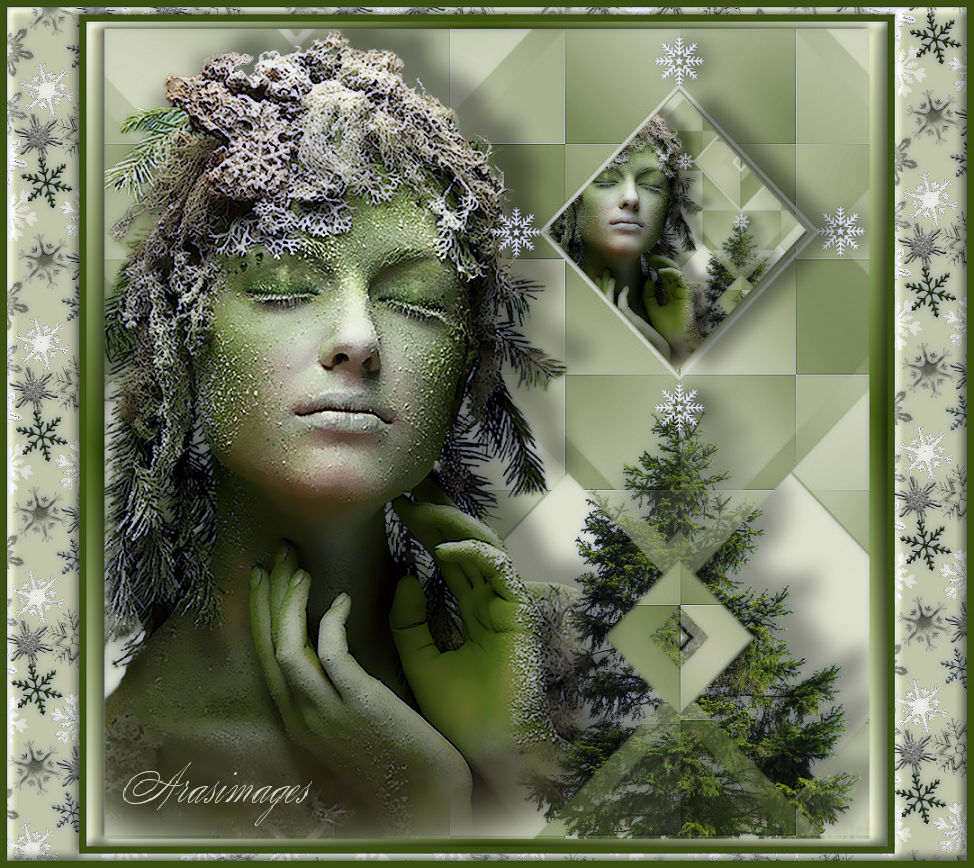
37. Effects/3D Effects/InnerBevel. Deselect.
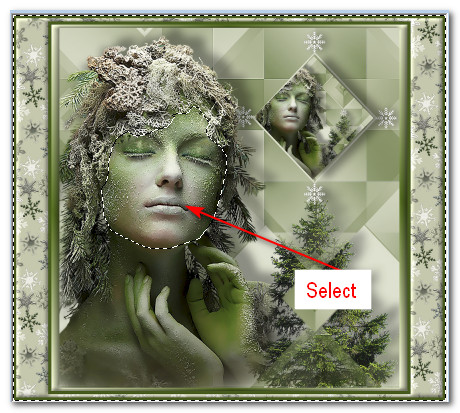
38. Using the Selection tool set to Point to Point, Feather 0, select around woman's face. Selections/Invert.
39. Effects/Xero/Porcelain. Deselect.
40. Image/Resize/Resize by 90%/Resize all Layers Selected.
41. Adjust/Sharpness/Sharpen.
42. Sign your name if you wish. Save as .jpg or .png file.
Thank you PamelaD and Evatexas for your faithful testing of my tutorials. November 2020.
If you are going to use this tutorial for stationery, cards or place the tutorial/tag on another site, I would appreciate you contacting me for permission, giving Arasimages credit for the original tutorial and if possible, a link back to my site. Thank you.
Copyright © Arasimages All Rights Reserved