Hooty Owl
For this tutorial you will need the materials in the zip file below.

For a French, Dutch, Spanish and German translation click on the flags.


Unzip the materials into a folder named Hooty Owl which you will make on your desktop. Please duplicate and close original tubes using the copies for your work so you will not lose the original. This tutorial was written using PSP2019. I have used Plugins Filters Unlimited 2/AFS IMPORT/MIRRBEVL, AP 13 [Distorts/Pattern]/Patterns-Fragments and Flaming Pear/Make Cube Tile and also used effects of PSP.
Thanks go to K@rine and to PamelaD of Arasimages Tubes for their lovely tubes used in this tutorial.
Use the FollowLeaf.png below to mark your place along the way.
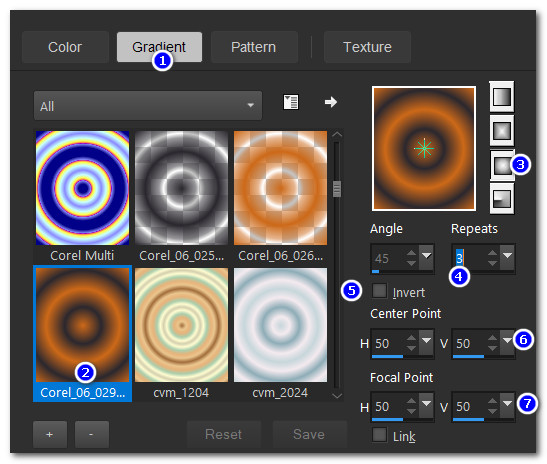
1. In Materials Palette, set color of Foreground to #c75e0c/Background to #000000. Select Gradient/Sunburst/Corel_06_029 Foreground/Background/Invert unchecked. Angle Null and Repeats set to 3. Center Point/Focal Point all set to 50.
2. File/New/New Image 700x900. Flood fill new image with Gradient.
3. Adjust/Blur/Gaussian Blur. Radius set to 65.
4. Duplicate. Effects/AP13 [Distorts Patterns]/Pattern-Fragments.
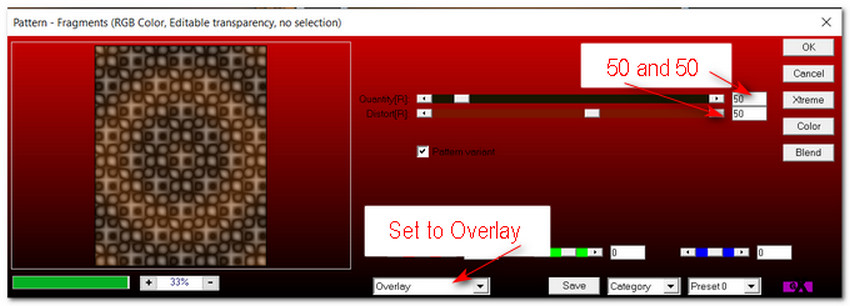
5. Set Blend Mode to Luminance (L).
6. Effects/Flaming Pear/Make Cube Tile. Apply this effect 3 times.
7. Drop Opacity to 61. Effects/Edge Enhance/Enhance.
8. Image/Add Borders/Add 1px border, color #000000.
9. Effects/3D Effects/Inner Bevel.

10. Image/Resize/Resize by 75%/Resize all layers unchecked.
11. Layers/New Raster Layer. Flood fill with gradient.
12. Adjust/Blur/Gaussian Blur. Radius 35.
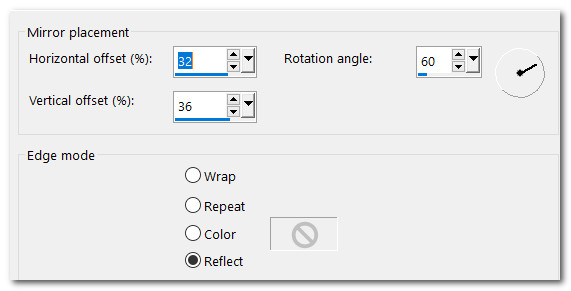
13. Effects/Reflection Effects/Rotating Mirror.
14. Pull Raster 2 to the bottom. Go back to top layer and highlight.
15. Effects/3D Effects/Drop Shadow. Vertical -15, Horizontal -15, Opacity 50, Blur 25, color #000000.
16. Effects/3D Effects/Drop Shadow. Vertical 15, Horizontal 15, Opacity 50, blur 25, color #000000.
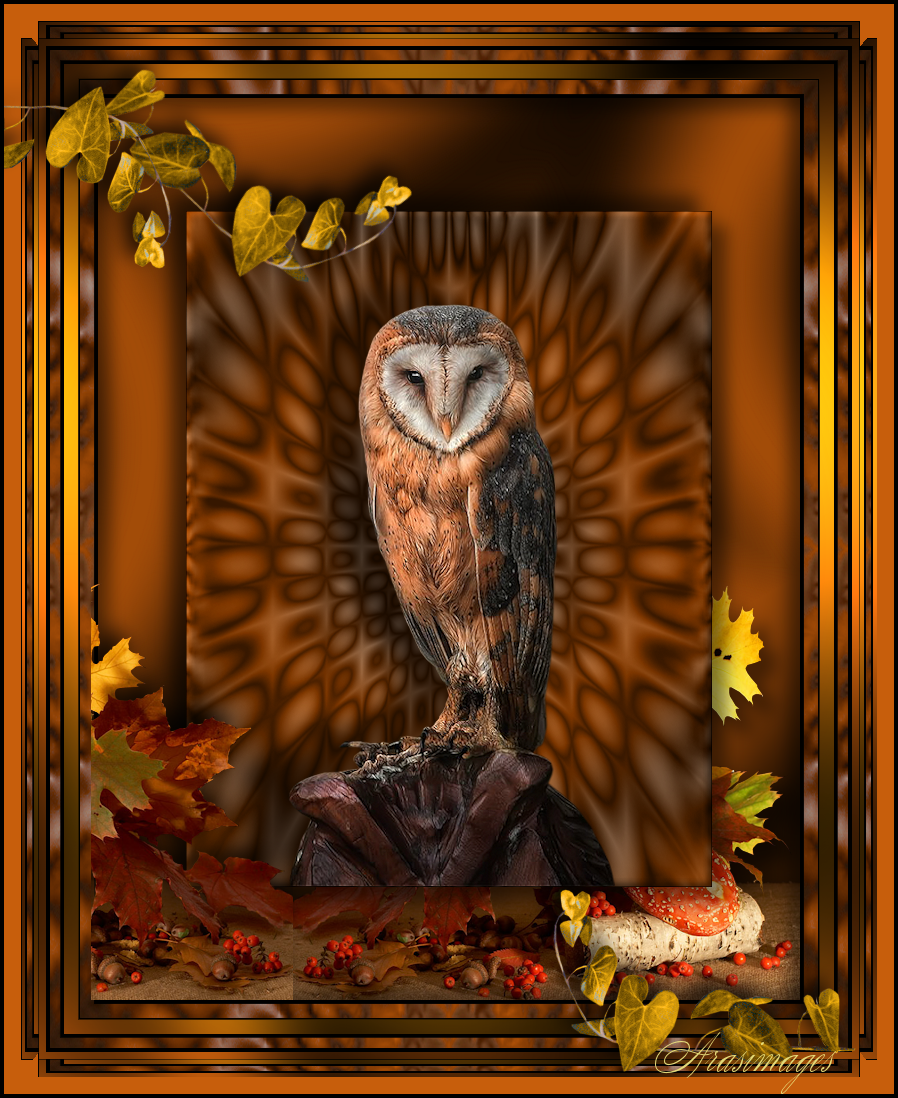
17. Open k@rine_Dreams_Barn_Owl2981.pspimage. Copy/Paste as New Layer.
18. Image/Resize/Resize by 75%/Resize all layers unchecked.
19. Effects/3D Effects/Drop Shadow. Vertical -20, Horizontal -45, Opacity 50, blur 30, color #000000.
20. Adjust/Sharpness/Sharpen. Move Owl to bottom of Raster 1 layer.
21. Open GoldOfFall.pspimage leaves. Copy HALF MIST layer. Paste as New Layer.
22. Effects/3D Effects/Drop Shadow. Vertical 15, Horizontal 15, Opacity 50, blur 25, color #000000.
23. Pull below Raster 1 layer. Move to right bottom corner.
24. Image/Add Borders/Add 4px border, color #000000, Symmetric checked.
25. Image/Add Borders/Add 14px border, color #c75e0c, Symmetric checked.
26. Activate 14px border using Magic Wand /default settings. Open ImageOne.pspimage/Copy.
27. Paste into Selection.
28. Effects/3D Effects/Drop Shadow. Vertical 11, Horizontal 11, Opacity 75, blur 30, color #000000.
29. Effects/3D Effects/Drop Shadow. Vertical -11, Horizontal -11, Opacity 75, blur 30, color #000000.
30. Effects/3D Effects/Inner Bevel. Deselect.
31. Image/Add Borders/Add 2px border, color #000000, Symmetric checked.
32. Image/Add Borders/Add 14px border, color #c75e0c, Symmetric checked.
33. Activate 14px border with Magic Wand. Add New Raster Layer.
34. In Materials Palette, change background color to #b57405 to change gradient. Flood fill 14px border with new gradient.
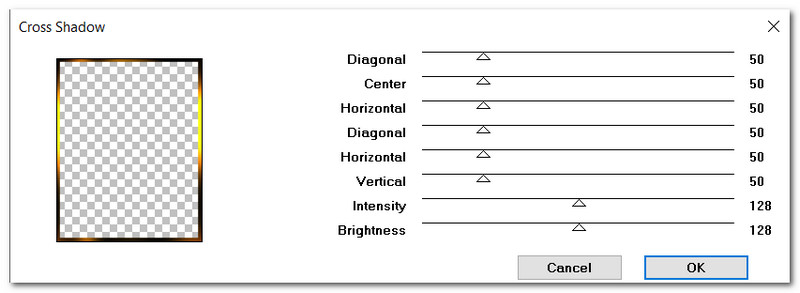
35. Effects/Graphics Plus/Cross Shadow.
36. Deselect. Image/Add Borders/Add 4px border, color #000000, Symmetric checked.
37. Image/Add Borders/Add 10px border, color #c75e0c, Symmetric checked.
38. Activate 10px border with Magic Wand by clicking on it.
39. Open ImageOne.pspimage and copy. Go back to main image and Paste into Selection. Deselect.
40. Image/Add Borders/Add 4px border, color #000000, Symmetric checked.
41. Image/Add Borders/Add 7px border, color #c75e0c, Symmetric checked.
42. Select 7px border with Magic Wand. Apply Cross Shadow as in Step. #35. Deselect.
43. Image/Add Borders/Add 1px border, color #000000, Symmetric checked.
44. Image/Add Borders/Add 34px border, color #c75e0c, Symmetric checked.
45. Activate 34px border with Magic Wand by clicking on it.
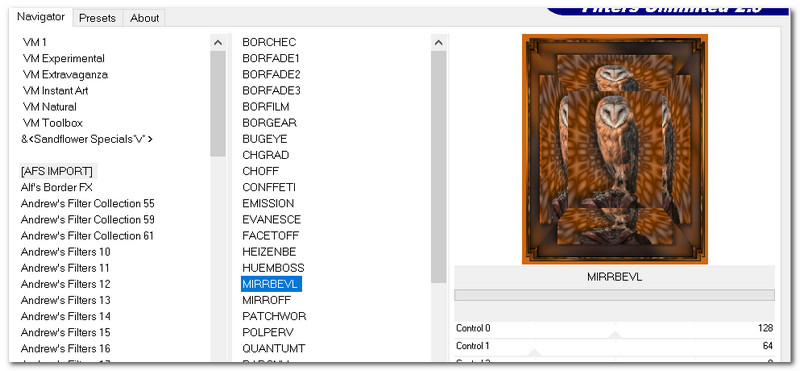
46. Effects/Filters Unlimited/AFS IMPORT/MIRRBEVL. Default settings. Deselect.
47. Open GoldOfFall.pspimage leaves. Copy/Paste as New Layer.
48. Image/Mirror. Mirror-Horizontal. Pull leaves down to bottom left corner meeting other leaves behind owl.
49. Effects/3D Effects/Drop Shadow. Vertical -11, Horizontal -11, Opacity 75, Blur 30, color #000000.
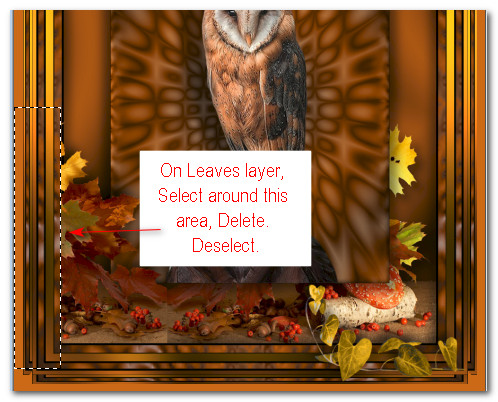
50. Select GoldOfFall leaves on bottom left corner where indicated. Delete. Deselect.
51. Image/Add Borders/Add 4px border, color #000000, Symmetric checked.
52. Open flower169.pspimage. Copy/Paste as New Layer.
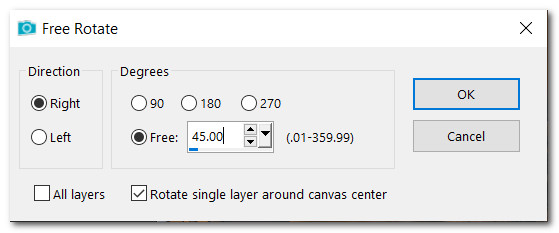
53. Place leaves in upper left corner. Paste leaves once more. Image/Flip. Flip-Vertical. Image/Rotate/Free Rotate Right by 45 Degrees. Place leaves over the first ones in top left corner.
54. (See snapshot for leaf placement).

55. Paste leaves once more. Image/Flip. Flip-Vertical. Image/Mirror. Mirror-Horizontal.
56. Place leaves in bottom right corner.
57. Merge/Merge Down all three layers of leaves.
58. Effects/3D Effects/Drop Shadow. Vertical -11, Horizontal -11, Opacity 75, Blur 30, color #000000.
59. Image/Add Borders/Add 4px border, color #000000, Symmetric checked.
60. Sign your name or leave your watermark if you wish.
Thank you PamelaD for checking my tutorials. August 2021.
If you are going to use this tutorial for stationery, cards or place the tutorial/tag on another site, I would appreciate you contacting me for permission, giving Arasimages credit for the original tutorial and if possible, a link back to my site. Thank you.
Copyright © Arasimages All Rights Reserved