First Snow of Winter
For an Italian, French, Dutch, Spanish and German translation click on the flags.


For this tutorial you will need the materials in the zip file below.

This tutorial was written using PSP2020. Others may be used. Create a folder on your desktop to unzip your materials in, this will be your work folder for this tutorial. Export the hbgbrush-old-192 002 in your PSP Files/Brushes folder. Export the GroundSnow.Psp tube into your PSP Files/Picture Tube folder. The Plugins Graphics Plus/Cross Shadow and those of the program were used. To work this tutorial, it is assumed you have some working knowledge of Paint Shop Pro.
Thanks go to Silvie to Suzi Sgai Tubes and to Luz Cristina for their lovely tubes used.
Use the bookmark below to mark your place along the way.
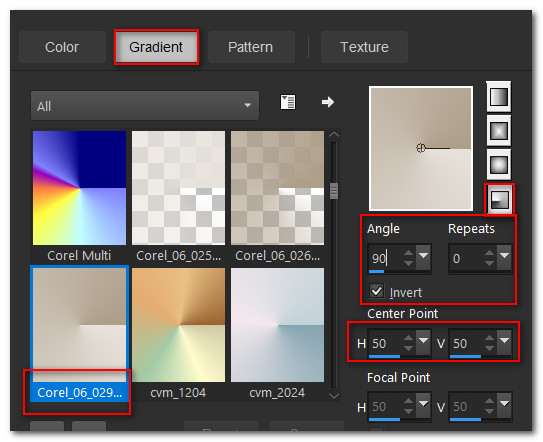
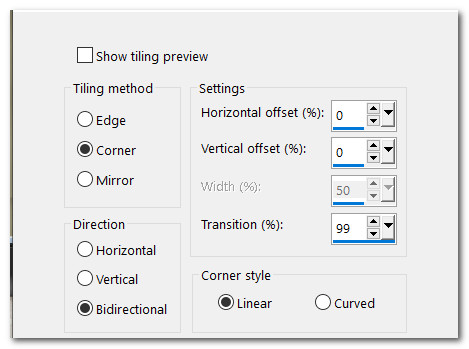
1. In Materials Palette set the Foreground color to #ad9e89/Background color #e7e2dc. Set to Gradient, Gradients/Corel_06_029, Radial/Angle 90/Repeats 0/Invert checked, Center Point H50/V50, Focal Points are null.
2. New/New Image 800px by 640px. Flood fill with Gradient.
3. Adjust/Blur/Gaussian Blur. Radius set to 35. Duplicate and Select All.
4. Open 1656-luzcristina.pspimage Raster 1. Copy.
5. Paste into Selection on main image. Deselect.
6. Effects/Image Effects/Seamless Tiling.
7. Effects/Edge Effects/Enhance.
8. Adjust/Sharpness/Sharpen.
9. Set Blend Mode to Luminance (Legacy).
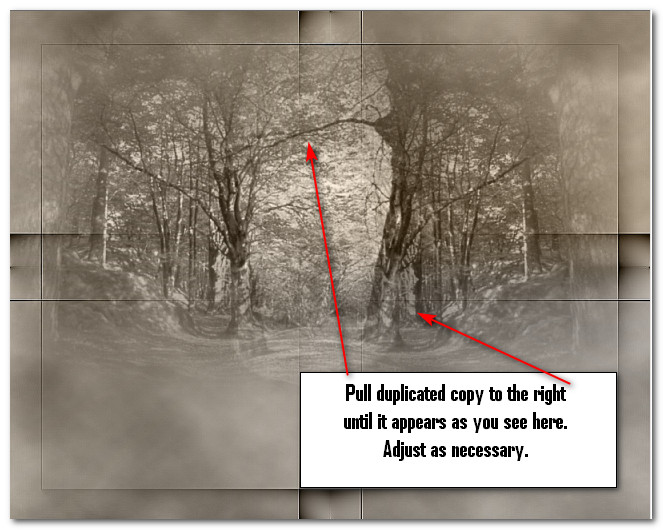
10. Open SS_57.pspimage. Copy/Paste as New Layer.
11. Pull upward and to the right a bit. Duplicate.
12. Image/Mirror. Mirror Horizontal. Pull to the left and adjust as seen below.
14. Set Blend Mode to Luminance (Legacy).
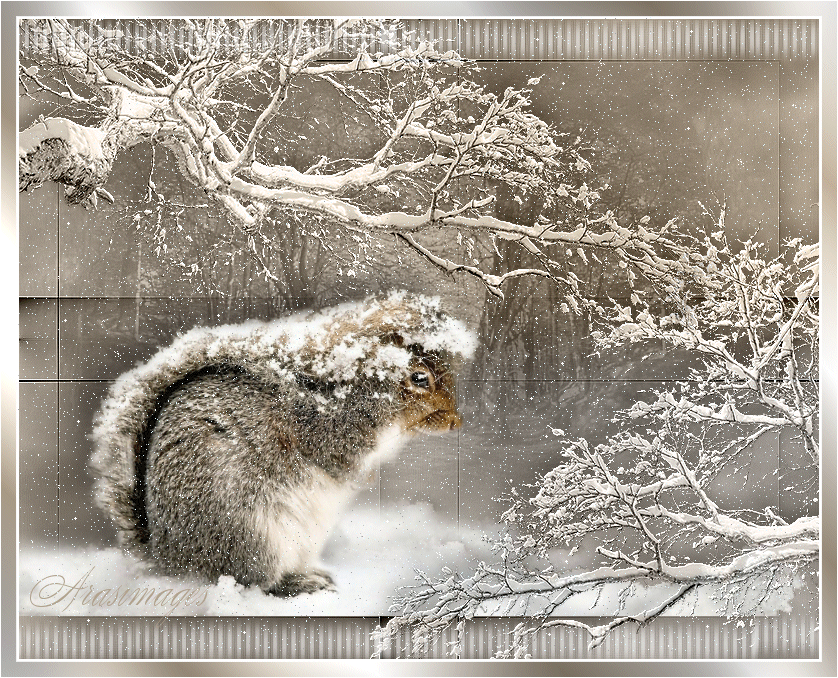
15. Open Squirrel_in_Snow_Silvie_05.10.2018.pspimage. Copy/Paste as New Layer.
16. Image/Resize/Resize by 55%/Resize all layers unchecked.
17. Place squirrel in bottom left corner inside lines.
18. Effects/3D Effects/Drop Shadow. Vertical -20, Horizontal -20, Blur 35, Opacity 35, color #000000.
19. From tool bar select Picture Tube GroundSnow.psp Tube.
20. Change Background color in Materials Palette to #ffffff.
21. Layers/New Raster Layer. Default settings/left stamp GroundSnow.psp toward bottom.
22. Image/Mirror. Mirror Horizontal. Pull into place as seen below.
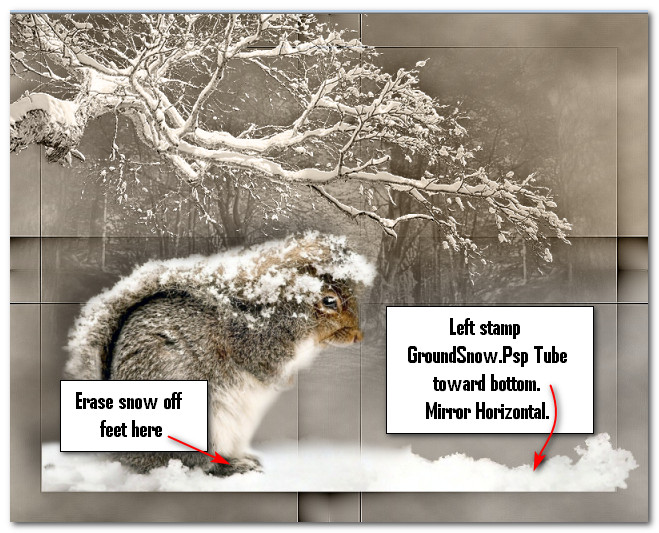
23. Using eraser tool set to 30, erase snow off Squirrel's feet.
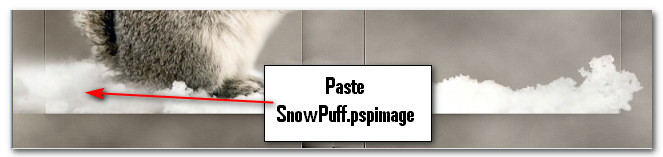
24. Open SnowPuff.pspimage. Copy/Paste as New Layer. Move to left side of Squirrel even with line. Duplicate.
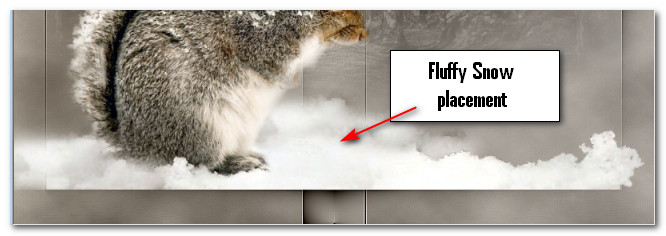
25. Open FluffySnow.pspimage. Copy/Paste as New Layer. Place to right of Squirrel over snow even with line. Pull layer beneath Squirrel layer. Return to top layer to continue.
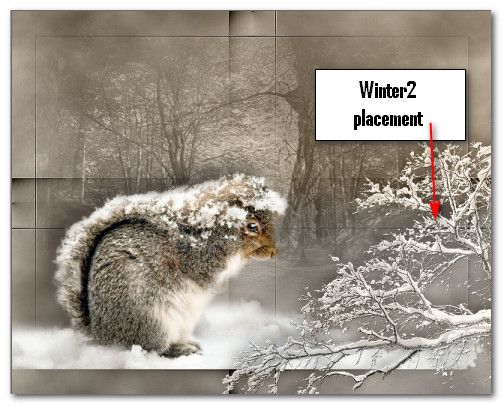
26. Open Winter2_21.01.2018.pspimage. Copy/Paste as New Layer.
27. Pull into bottom right corner. Blend Mode: Luminance (Legacy).
28. Effects/3D Effects/Drop Shadow. Vertical -10, Horizontal -4, Blur 35, Opacity 24, color #000000.
29. Adjust/Sharpness/Sharpen.
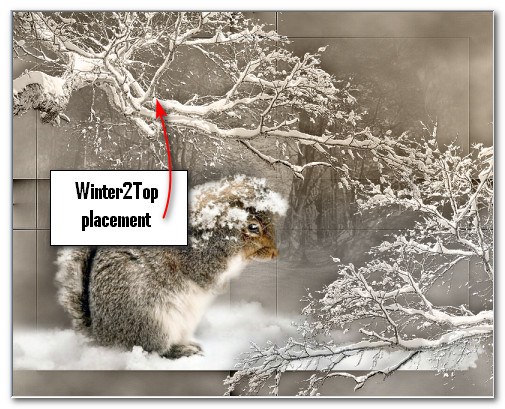
30. Paste again Winter2 image. Image/Mirror/Mirror Horizontal.
31. Effects/3D Effects/Drop Shadow. Vertical -10, Horizontal -4, Blur 35, Opacity 24, color #000000.
32. Adjust/Sharpness/Sharpen.
33. Pull into top left corner. Blend Mode: Luminance (Legacy).
34. Layers/New Raster Layer.
35. From tool bar select brush hbgbrushes-old-192 002. Set Size to 170 and leave all other settings at default.
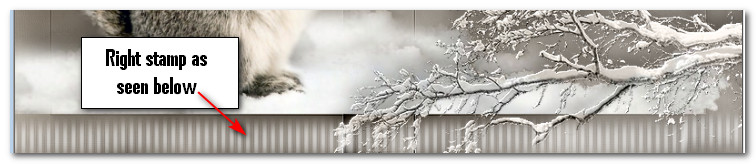
36. Right stamp along the bottom as seen below.
37. Duplicate. Image/Mirror. Mirror Vertical.
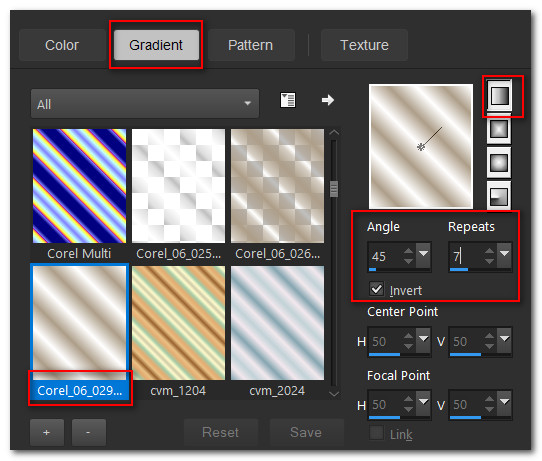
38. Merge/Merge Down. Adjust/Sharpness/Sharpen.
39. Image/Add Borders/Add 3px border, color #ffffff, Symmetric checked.
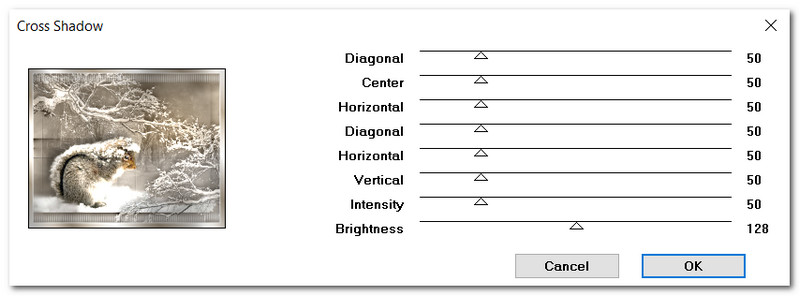
40. Image/Add Borders/Add 15px border, color #ad9e89, Symmetric checked.
41. Using Magic Wand Tolerance set to 0, activate the 15px border.
42. In Materials Palette, change the Gradient to Linear/Corel_06_029/Angle45/Repeats7/Invert checked/Center and Focal Points all set to null.
43. Flood fill the 15px border with new Gradient.
44. Effects/Graphics Plus/Cross Shadow. Deselect.
45. Image/Add Borders/Add 3px border, color #ffffff, Symmetric checked.
46. Sign your name or leave your watermark if you wish. Save finished file as a .jpg file. Copy.
ANIMATION OPTIONAL.
47. Open Animation Shop for animation. Paste your finished file as New Animation.48. Duplicate 19 times, having 20 frames in all. Highlight the first frame/Edit/Select All.
49. Open FirstSnowofWinterSnowfall.gif. Highlight first frame/Edit/Select All. Copy.
50. Go back to the main image. Right click in the first frame/the snow will fit inside the frame. Paste/Into Selected Frame and left click into place.
51. Use the tool bar at the top and click on the View Animation button to check how your snow looks. If it is fine then we will now save our work.
52. File/Save As. When the Save As box appears, give your work a name (First Snow of Winter), designate where it will be saved, leave it to save as a .gif file and click on Save. As the different boxes appear, simply click on Next, Next, Next and Finish.
53. You are now finished with your animated winter tutorial! Have fun and feel free to use a different background and main character like the squirrel! Happy PSPing!
Thank you Pamela for your testing this tutorial for me. November 7, 2021.
If you are going to use this tutorial for stationery, cards or place the tutorial/tag on another site, I would appreciate you contacting me for permission, giving Arasimages credit for the original tutorial and if possible, a link back to my site. Thank you.
Copyright © Arasimages All Rights Reserved