
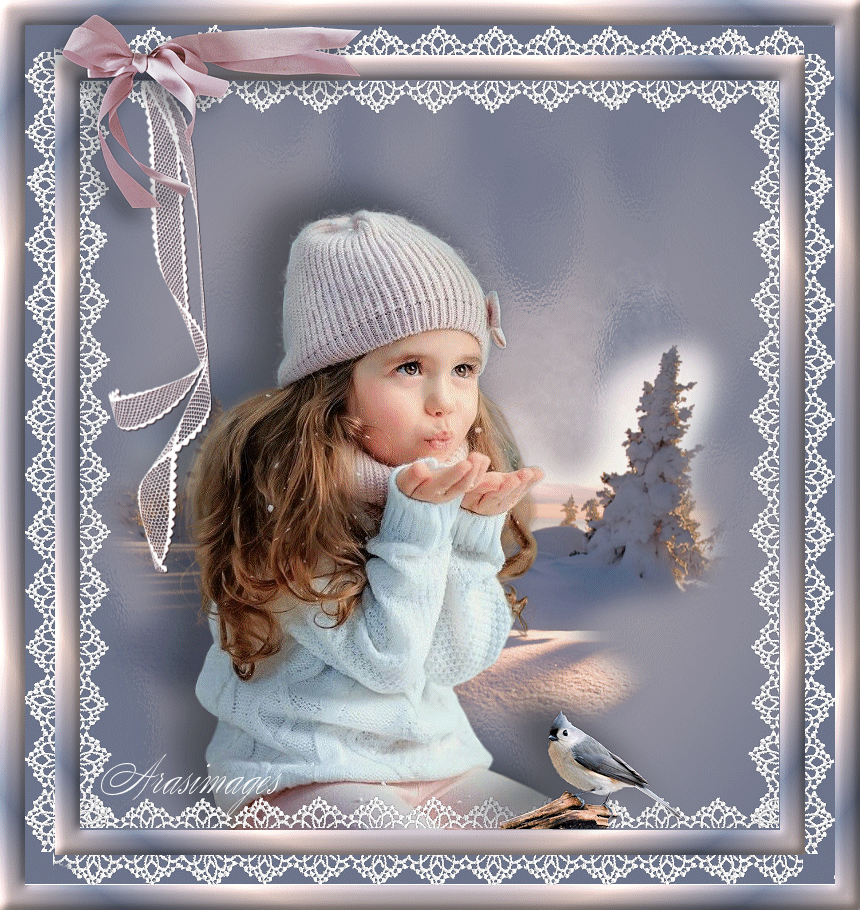
Playing in the Snow
For a Dutch, Italian, German and Spanish translation click on the flags.


For this tutorial you will need the materials in the zip file below.

Create a folder on your desktop named Playing in the Snow. Unzip the Materials included in this tutorial into the folder. Place the Narah_mask_0559.jpg in your PSP Files/Masks folder. No outside plugins have been used in this tutorial. This tutorial was written using PSP2021 Ultimate but others may be used. I have also used Animation Shop.
Thanks go to Kara, to Gerry to PamelaD from Arasimages and creators of various elements of unknown origins.
Use the ribbon below to mark your place along the way.

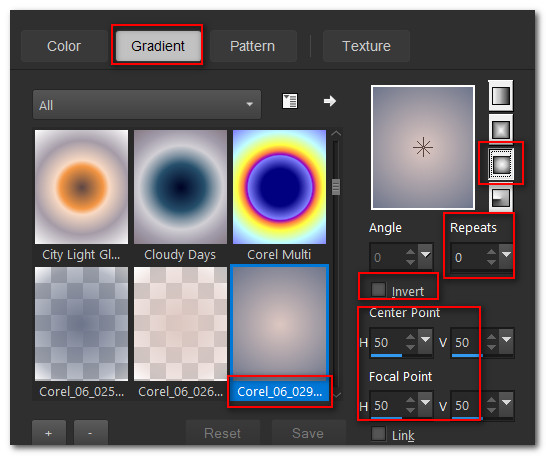
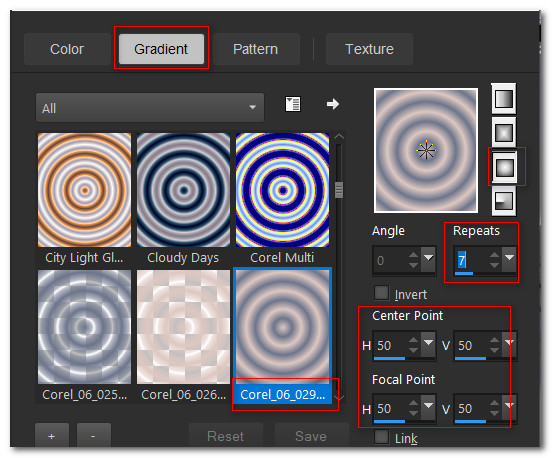
1. In Materials Palette, set color of Foreground to #ddc7c1 and Background to #6d758b. Set to Gradient/Angle null/Repeats at 0/Invert null/ Center and Focal Points all set to 50. Select Corel_06_029 and Gradient to Sunburst.
2. New/New Image 700pxW by 750pxH. Flood fill with gradient.
3. Layers/New Raster Layer. Flood fill with Background color.
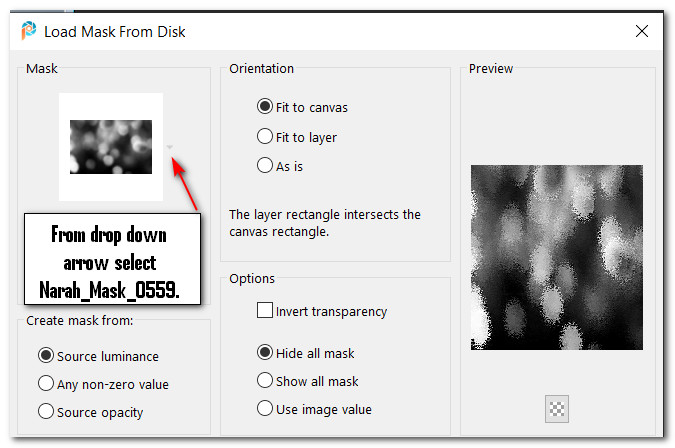
4. Layers/Load Save Mask/Load Mask From Disk. From dropdown arrow, select Narah_mask_0559. Load.
5. Merge/Merge Group.
6. Open KaraT712.psp. Copy/Paste as New Layer.
7. Image/Resize/Resize by 110%/Resize all layers unchecked.
8. Move tree image down a little below middle of main image and a few pixels to the left.
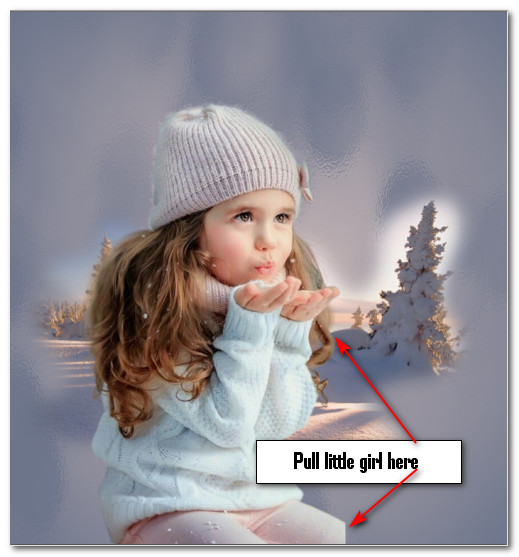
9. Open WinterGirl.pspimage. Copy tube layer/Paste as New Layer.
10. Pull little girl down to bottom of image.
11. Adjust/Sharpness/Sharpen.
12. Effects/3D Effects/Drop Shadow. Vertial -15, Horizontal -24, Opacity 50, Blur 45, color #252931. Repeat.
13. Open InnerLace.pspimage. Copy/Paste as New Layer.
14. Adjust/Sharpness/Sharpen.
15. In Materials Palette, set Gradient to Sunburst/Repeats7 (all other settings stay the same).
16. Image/Add Borders/Add 25px border, Symmetric checked, color #000000.
17. Activate the 25px border with Magic Wand. Flood fill with new Gradient.
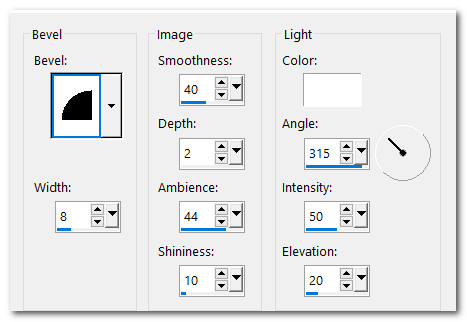
18. Effects/3D Effects/Inner Bevel.
19. Selections/Select None. COPY.
20. New/New Image/810px by 860px. Flood fill with Background color #6d758b.
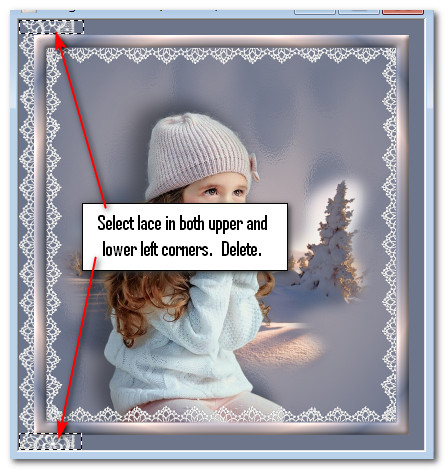
21. Paste as New Layer on to the new image the first image you made and copied.
22. Open the Lace.pspimage.
23. Adjust/Sharpness/Sharpen.
24. Copy/Paste as New Layer.
25. Pull lace layer beneath little girl layer.
26. Place lace on left side of image. Line up the points of outer lace with inner lace. Use the Selection tool (Select) on excess lace and delete lace on top and bottom corners. Deselect. See below.
27. Duplicate. Image/Mirror. Mirror Horizontal. Line up points of outer lace with inner lace.
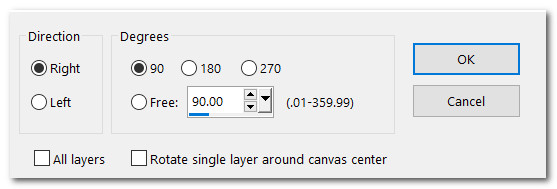
28. Paste Lace again. Image/Free Rotate/Rotate Right by 90 degrees.
29. Place lace across top. Line up the points of outer lace with inner lace. Vertically select corner lace and Delete. Deselect. Use Eraser tool to clean up corner pieces of lace that may look ragged.

30. Duplicate. Image/Mirror. Mirror Vertical.
31. Move to top layer to continue.
32. Open Gerry-Dieren 54-Bird-28 februari 2009.pspimage. Copy/Paste as New Layer.
33. Image/Resize/Resize by 30%/Resize all layers unchecked.
34. Place bird at bottom corner on inner border.
35. Effects/3D Effects/Drop Shadow. Vertial -15, Horizontal -24, Opacity 50, Blur 45, color #252931. Repeat.
36. Adjust/Sharpness/Sharpen.
37. Image/Add Borders/Add 25px border, Symmetric checked, color #000000.
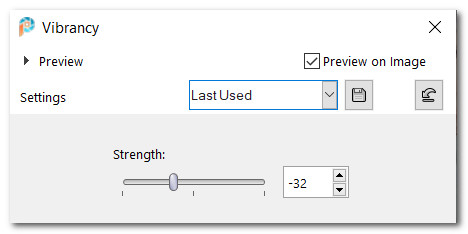
38. Activate the 25px border with Magic Wand. Flood fill with Gradient.
39. Effects/3D Effects/Inner Bevel. Selections/Select None.
40. Open lazo_baile_eterno_soleil_1705071.png. Copy/Paste as New Layer.
41. Move to upper left corner of image to hang from bottom of inner border.
42. Open 0-88e1c_f9fa6d62_M.png bow. Copy/Paste as New Layer.
43. Adjust/Hue and Saturation/Vibrancy.
44. Effects/3D Effects/Drop Shadow. Vertical 12, Horizontal -12, Opacity 50, Blur 26, color #252931.
45. Adjust/Sharpness/Sharpen. Place in upper left corner over hanging ribbon.
46. Place your watermark now if you wish and save as either a .jpg or .png file.
47. Merge/Merge Visible.
48. For Animation which is optional:
49. In Animation Shop/File/Open. Open Playing in the Snow.jpg. Duplicate it 18 times having 19 frames in all.
50. Edit/Select All.
51. File/Open/SimoneAni-277.mng file. Notice it has 19 frames. Place your curser in the first frame, Edit/Select All.
52. Animation/Rotate. Choose settings of Right and Free at 45 degrees. Selected Frames only. Click OK. Do this twice to tilt the "breath" toward the right.

53. Place curser on the top blue bar, right click and COPY.
54. Go to the little girl image and right click in FIRST frame. Paste/Into Selected Frame. Hover the breath near her mouth and in her hands, left click to set in place.
55. Repeat above step again only this time place the breath just a little bit upward to the right. You may have to do this a few times to get it to look just right but don't be afraid to use the back arrow to undo and try again.
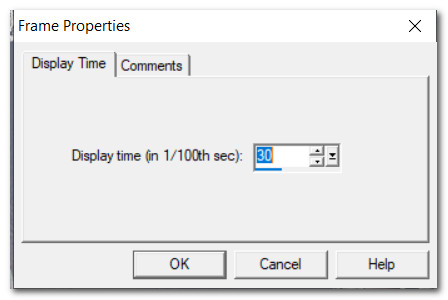
56. To get the speed of the breath slower, Animation/Frame Properties and set to 30.
57. Click on View Animation to make sure it looks as you want it to and now we will save our work.
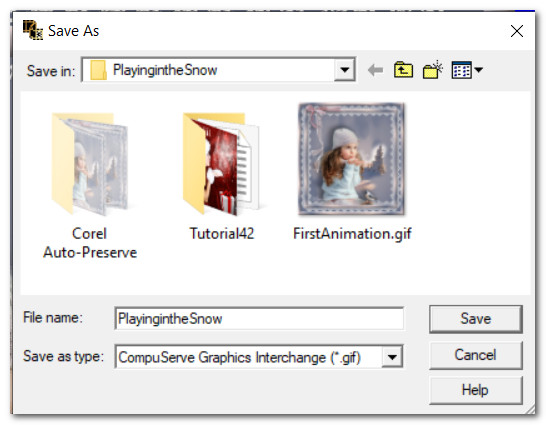
58. File/SaveAs. When this box appears, state where you are going to save your animated file, give it the name Playing in the Snow and leave the setting so it saves as a .gif file. Click on Save.
59. As the boxes appear, simply click on Next, Next, Next and then Finish. We are now done with our animation!
Thank you PamelaD for your testing my tutorial and for the beautiful tubing of our little girl in the snow! December 2021.
If you are going to use this tutorial for stationery, cards or place the tutorial/tag on another site, I would appreciate you contacting me for permission, giving Arasimages credit for the original tutorial and if possible, a link back to my site. Thank you.
Copyright © Arasimages All Rights Reserved