

Waiting for my Love
For this tutorial you will need the materials in the zip file below.

For a German, Spanish, Italian and French translation click on the flags.


Create a folder on your desktop named Waiting for my Love. Unzip the zipped Materials File into this folder. Import the font into your PSP Files/Fonts folder. Place the Selections in your PSP Files/Selections folder. Place the q-to-t.cfg file in your PSP Files/Plugins/Dragonfly/SinedotsII folder. This tutorial was written using AAA Frames/Texture, MuraMeister/Perspective, and several effects in PSP program. To work this tutorial, it is assumed you have some working knowledge of Paint Shop Pro. I used PSP Pro2019 Ultimate for this tutorial.
Thanks go to Nikita for the lady tube and piano tube. Also a thanks to Soleil for her lovely paper from which I revised the lace portion.
Use the generic bookmark below to mark your place along the way.

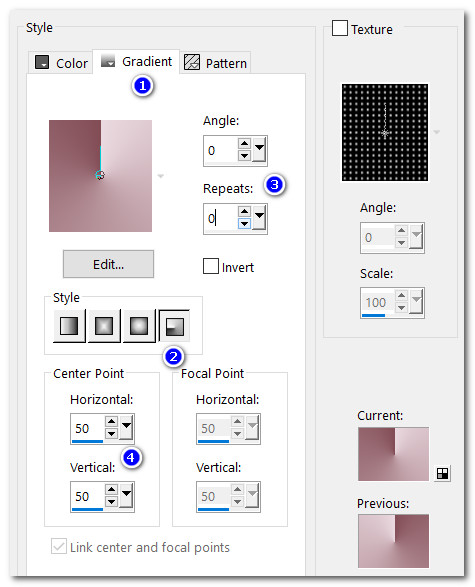
1. In Materials Palette set Foreground to #ebdae1, Background to #824c55. Set to Gradient, Style Radial, Angle/Repeats 0, Invert unchecked, Center Points 50, Focal points null, Link center and focal points checked.
2. New/New Image 850px by 900px. Flood fill with Gradient.
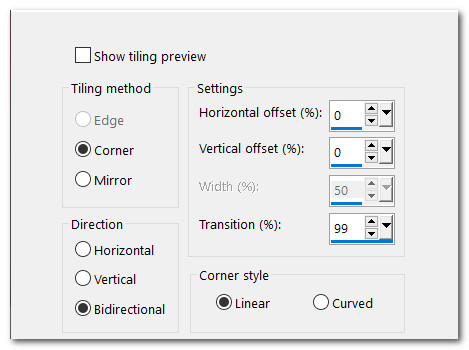
3. Effects/Image Effects/Seamless Tiling.
4. Adjust/Blur/Gaussian Blur. Radius 25.
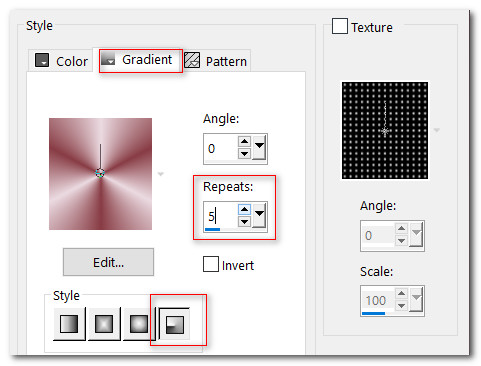
5. In Materials Palette change Repeats to 5.
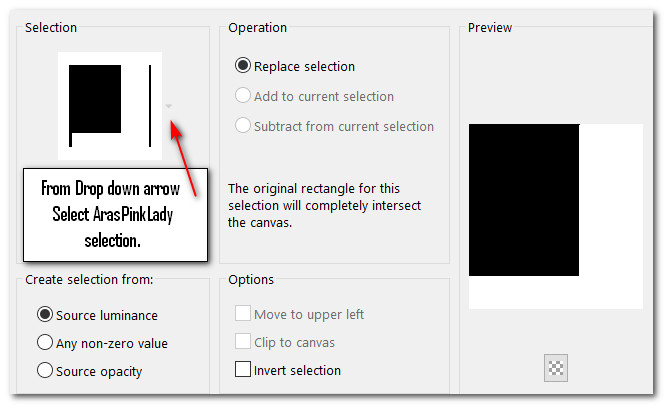
6. Selections/Load/Save Selections. Load Selection from Disk. Choose ArasPinkLady selection from drop down arrow. Load.
7. Layers/New Raster Layer. Flood fill Selection with Gradient.
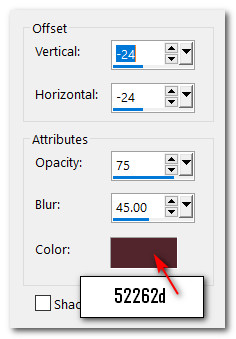
8. Effects/3D Effects/Drop Shadow. Vertical -24, Horizontal -24, Opacity 75, Blur 45, color #52262d.
9. Effects/Image Effects/Seamless Tiling.
10. Repeat Drop Shadow as in Step #8. Selections/Select None.
11. Layers/New Raster Layer.
12. Effects/Dragonfly/SinedotsII/q-to-t.cfg/Ribbon Twist. Click on Open and find q-to-t.cfg. Click on it and in the dropdown arrow space you will see a lot of filters including Ribbon-Twist. Click on ribbon twist. Change the color to #ebdae1, Set blend to Max Weight. Click OK. (I have included a pre-made layer of RibbonTwist in case you do not have it in your Dragonfly .cfg list).

13. Image/Flip. Flip-Vertical.
14. Effects/MuraMeister/Perspective Tiling.

15. Layers/New Raster Layer.
16. Effects/Dragonfly/SinedotsII/q-to-t.cfg/RibbonTwist. Same settings as Step 12.
17. Move to right a little so part of Sinedot is past right side. Lower Opacity to 43.
18. Open SOLEIL_19_12_06_papier_brisa03_(revised lace).pspimage. Copy/Paste as New Layer.
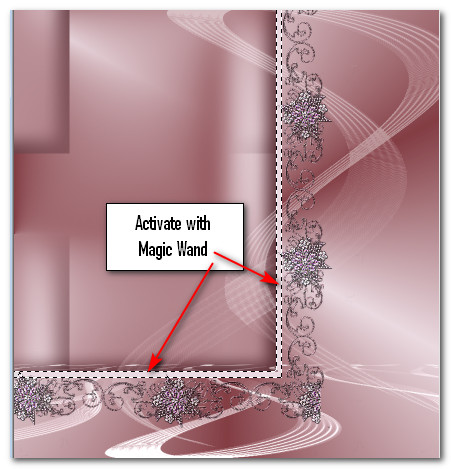
19. Move inside the rectangle on left side of image along edges.
20. Using Magic Wand, click to activate the small line.
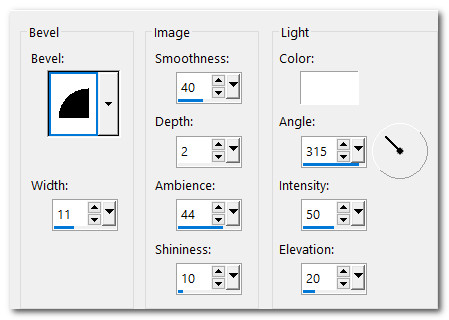
21. Effects/3D Effects/InnerBevel.
22. Effects/3D Effects/Drop Shadow. Vertical 0, Horizontal -24, Opacity 75, Blur 45, color #52262d.
23. Selections/Select None.
24. Layers/New Raster Layer.
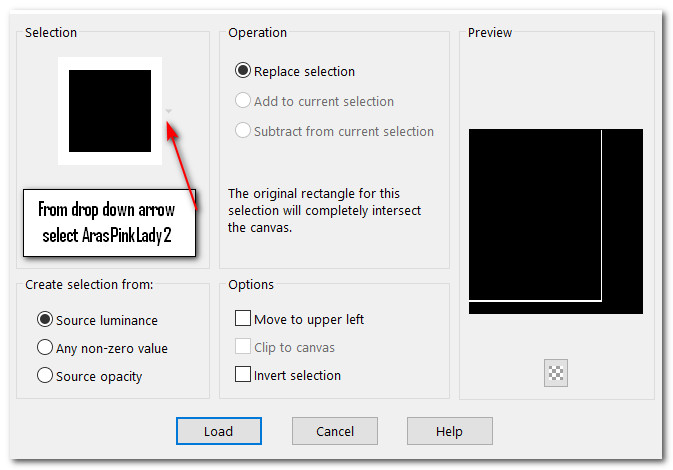
25. Selections/Load/Save Selections. Load Selection from Disk. Find ArasPinkLady2 selection from drop down arrow. Load.
26. Flood fill selection with Foreground color #ebdae1.
27. Effects/3D Effects/Drop Shadow. Vertical -15, Horizontal -15, Opacity 75, Blur 25, color #52262d.
28. Repeat Inner Bevel in Step #21. Selections/Selection None.
29. Layers/New Raster Layer.
30. From the Tool bar select the Paint Brush Tool/agi_heart1. Set it to Size 185, Rotation 0, using (dark color) color #833e44 and settings as seen below, stamp a heart at the top right. Change the Size to 137 and leave Rotation to 0, stamp again three times more as seen in example below, once with dark color and twice with (light color) #ebdae1. Change size to 93, Rotation left at 37, stamp a light color heart toward the top and two dark ones toward the bottom. Change Size to 128 and leave Rotation at 37, stamp light color next to top dark color. See example below for where to place them or use your own judgement for placement.

31. Open Nikita_reveries_d_19_03_08.pspimage. Copy/Paste as New Layer.
32. Image/Resize/Resize by 50%, Resize all layers unchecked.
33. Move piano keys to right side of image. Drop Opacity down to 50.
34. Drop down to outer beveled border (raster 6) and pull layer to top. Highlight and continue.
35. Open Beauty_pink_dream_CibiBijoux.pspimage. Copy/Paste as New Layer.
36. Place lady into the rectangle on the left of image. Pull her down past bottom edge.
37. Adjust/Sharpenss/Sharpen.
38. Effects/3D Effects/Drop Shadow. Vertical -24, Horizontal -24, Opacity 75, Blur 45, color #833e44.
39. Image/Add Borders/Add 1px border, Symmetric checked, color #622a30.
40. Image/Add Borders/Add 45px border, Symmetric checked, color #ebdae1.
41. Using Magic Wand click on 45px border to activate it.
42. Effects/3D Effects/Drop Shadow. Vertical -24, Horizontal -24, Opacity 75, Blur 45, color #622a30.
43. Effects/3D Effects/Drop Shadow. Vertical 24, Horizontal 24, Opacity 75, Blur 45, color #622a30.
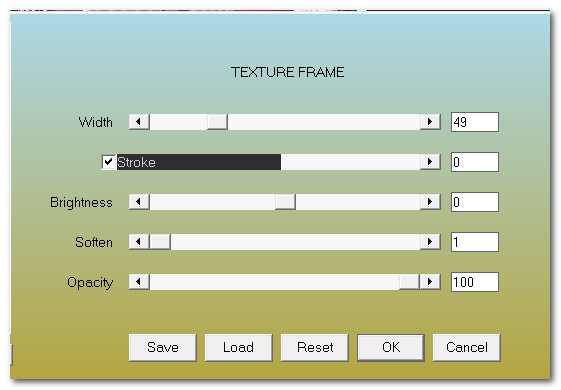
44. Effects/AAA Frame/Texture Frame.
45. Effects/3D Effects/Inner Bevel.
46. Selections/Select None.
47. Image/Add Borders/Add 2px border, Symmetric checked, color #622a30.
48. From Tool bar select the Text tool. Choose BickhamFancy.ttf font, Size 55, Background color #622a30, see settings below.

49. Type out the words "Waiting for my Love (space three times) Waiting for my Love". Convert to Raster Layer.
50. Duplicate. Merge/Merge Down.
51. Effects/3D Effects/Drop Shadow. Vertical 5, Horizontal 5, Opacity 75, Blur 25, color #ebdae1.
52. With the Pick Tool selected, use center turn node to turn text vertical. Place in right hand side over hearts and piano.
53. Sign your name or leave your watermark if you wish. Merge/Merge Visible.
54. If this image is too large for your use, please feel free to downsize it to whatever you wish.
Thank you PamelaD for your testing of my tutorial. January 14, 2022.
If you are going to use this tutorial for stationery, cards or place the tutorial/tag on another site, I would appreciate you contacting me for permission, giving Arasimages credit for the original tutorial and if possible, a link back to my site. Thank you.
Copyright © Arasimages All Rights Reserved