
Roses are Red
For this tutorial you will need the materials in the zip file below.

For an Italian, French, German, Spanish and Dutch translation click on the flags.


Create a folder on your desktop named Roses are Red. Unzip the zipped Materials File into this folder. Export the agi_texture_loveletters brush into your My PSP Files/Brushes Folder. This tutorial was written using MuraMeister/Perspective Tiling, AP 01 [Innovations]/Mirror-Both Sides and several effects in PSP program. To work this tutorial, it is assumed you have some working knowledge of Paint Shop Pro. I used PSP Pro2020 Ultimate for this tutorial.
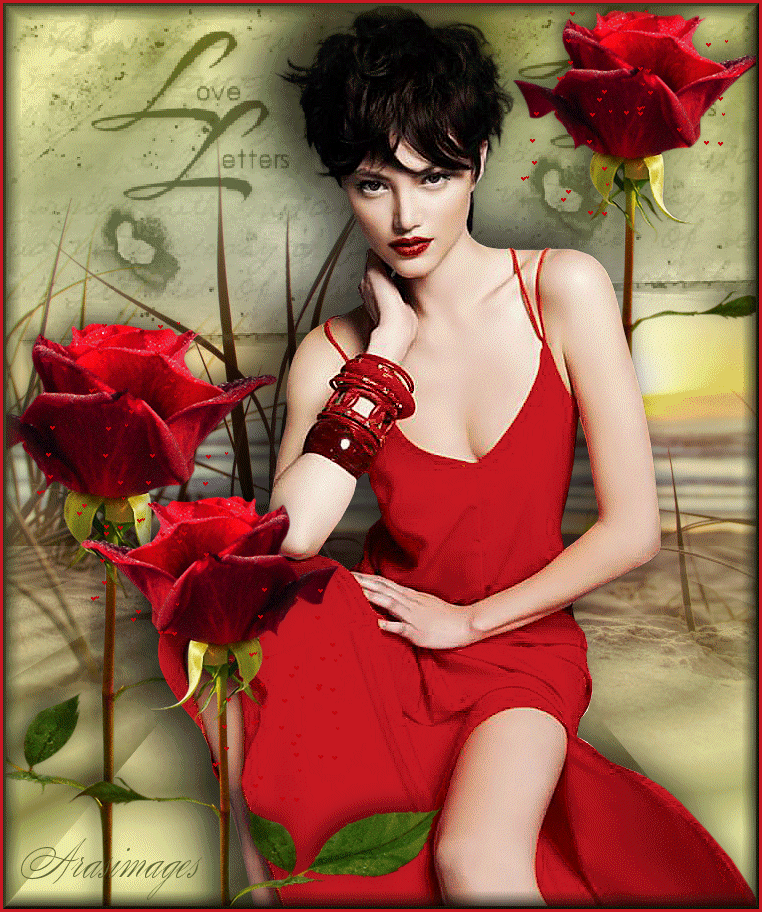
Thanks go to Maryse for the lady tube.
Use the generic bookmark below to mark your place along the way.

1. New/New Image 750px by 900px. Flood fill with color #494900.
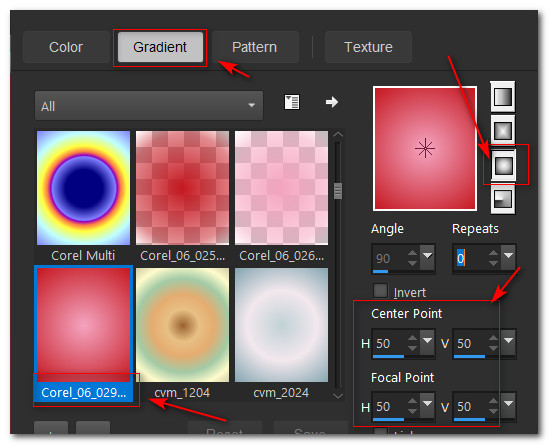
2. In Materials Palette set Foreground to #f36579, Background to #c51921. Set to Gradient, Corel_06_029(Foreground/Background), Style Sunburst, Angle/Repeats 0, Invert unchecked, Center Points 50, Focal points 50, Link center and focal points checked.
3. Layers/New Raster Layer. Flood fill with Gradient.
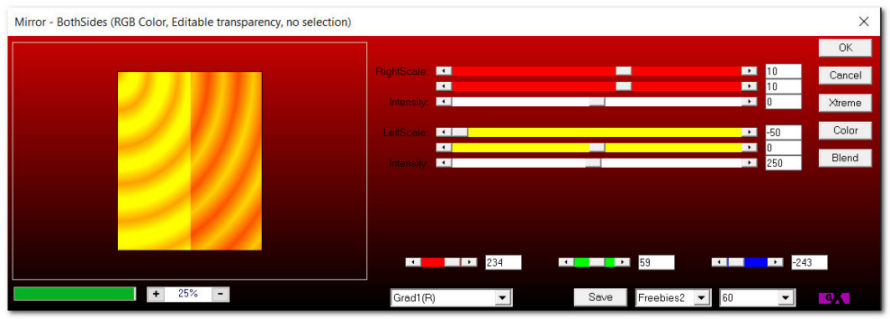
4. Effects/AP 01 [Innovations]/Mirror - Both Sides.
5. Set Blend Mode to Luminance (L).
6. Duplicate AP 01 layer.
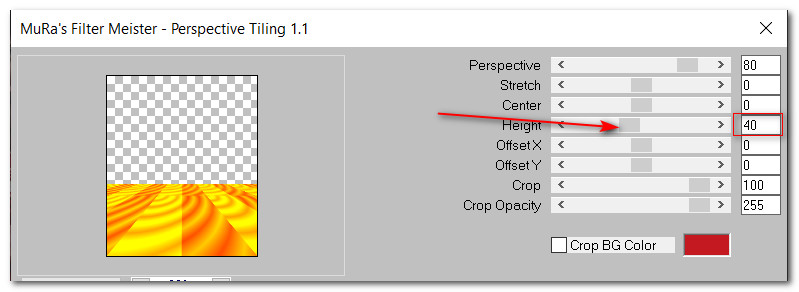
7. Effects/MuMeister/Perspective Tiling.
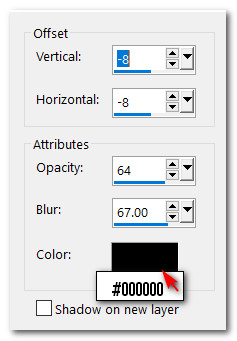
8. Effects/3DEffects/Drop Shadow. Vertical -8, Horizontal -8, Opacity 64, Blur 67, color #000000.
9. Open Weed plant closeup on the beach Stock Photo.jpg.
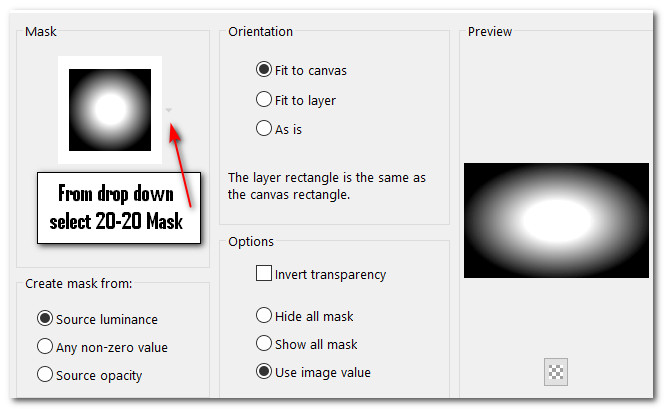
10. Layers/Load/Save Mask. Load Mask from Disk. From drop down arrow, select 20-20 Mask. Load. Merge/Merge Group.
11. Copy Mask Layer. Paste as New Layer on main image.
12. Layers/New Raster Layer.
13. From tool bar select Paint Brush tool. Find agi_texture_loveletters brush. Set size to 465, Step 32, all other settings leave at default.

14. Use Foreground color #494900. Stamp once in upper left corner and stamp again a little higher in top right corner.

15. Blend Mode set to Luminance (Legacy).
16. Open !cid_9ED30B23436B4AA68A90DAF3E795AA84@PCPHOTOS.png rose.
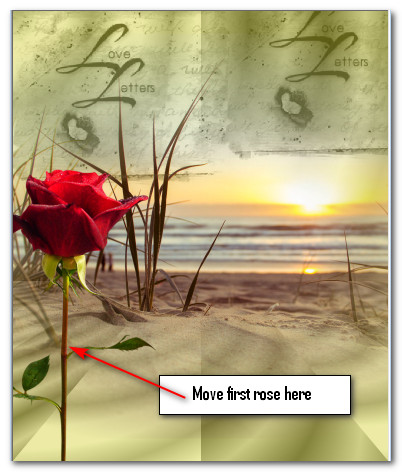
17. Copy/Paste as New Layer. Move to left bottom corner.
18. Duplicate rose.
19. Image/Resize/Resize by 85%/Resize all layers unchecked.
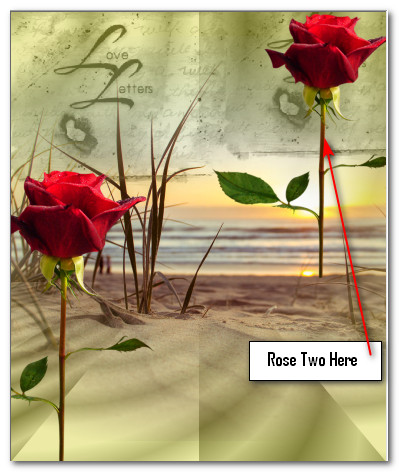
20. Place rose in upper right corner.
21. Duplicate. Image/Mirror. Mirror Horizontal.
22. Place rose in bottom left corner over first rose.
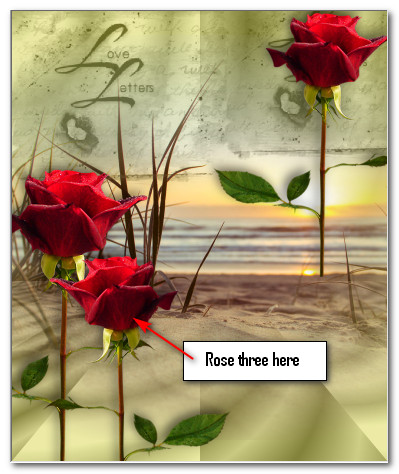
23. Apply to each rose the following drop shadow.
24. Effects/3D Effects/Drop Shadow. Vertical -8, Horizontal -8, Opacity 50, Blur 28, color #000000.
25. Adjust/Sharpness/Sharpen each rose.
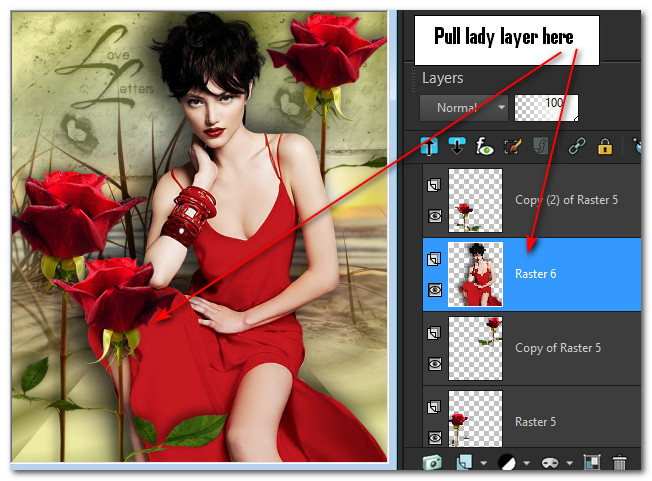
26. Open MR_Kailah.png. Select Maryse's watermark with Select tool/Delete. Selections/Select None.
27. Copy/Paste as New Layer on main image.
28. From tool bar select Color Changer. Recolor lady's dress with Background color #c51921.
29. Adjust/Sharpness/Sharpen.
30. Effects/3D Effects/Drop Shadow. Vertical -11, Horizontal -24, Opacity 64, Blur 67, color #000000.
31. Pull lady layer below rose three layer.
32. Image/Add Borders/Add 3px border, Symmetric checked, color #494900.
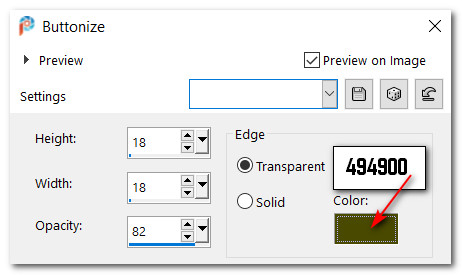
33. Effects/3D Effects/Buttonize.
34. Image/Add Borders/Add 3px border, Symmetric checked, color #c51921.
35. Sign your name or leave your watermark if you wish.
36. Save your image as Roses are Red.jpg or .png file. Copy.
37. Open Animation Shop. Paste as New Animation (the Roses are Red file).
38. Duplicate the Roses are Red file 7 times having 8 frames in all.
39. Click in first frame. Edit/Select All.
40. File/Open RedRoses.mng file. Click in first frame. Edit/Select All. On top frame Copy.
41. Go to the Roses are Red file. Right click inside the first frame, Paste/Into Selected Frame, choose one of the roses and hover the falling hearts over where you want them to be and left click in place.
42. Repeat Step 41 on the other two roses. You will do this about 12 times making them appear as if they were falling out of each rose. Click on the View Animation. If it doesn't look right, click the Undo arrow and try again to place until you are satisfied.
43. To save your animation go to File/Save As. When the Save As box appears, give your work the name Roses are Red, designate where to save your work and leave it to save as a .gif file. Save.
44. When the next boxes appear, click on Next, Next, Next and Finish. Your work is now saved.
45. If this image is too large for your use, please feel free to downsize it to whatever you wish.
Thank you PamelaD for your testing of my tutorial. February 5, 2022.
If you are going to use this tutorial for stationery, cards or place the tutorial/tag on another site, I would appreciate you contacting me for permission, giving Arasimages credit for the original tutorial and if possible, a link back to my site. Thank you.
Copyright © Arasimages All Rights Reserved