
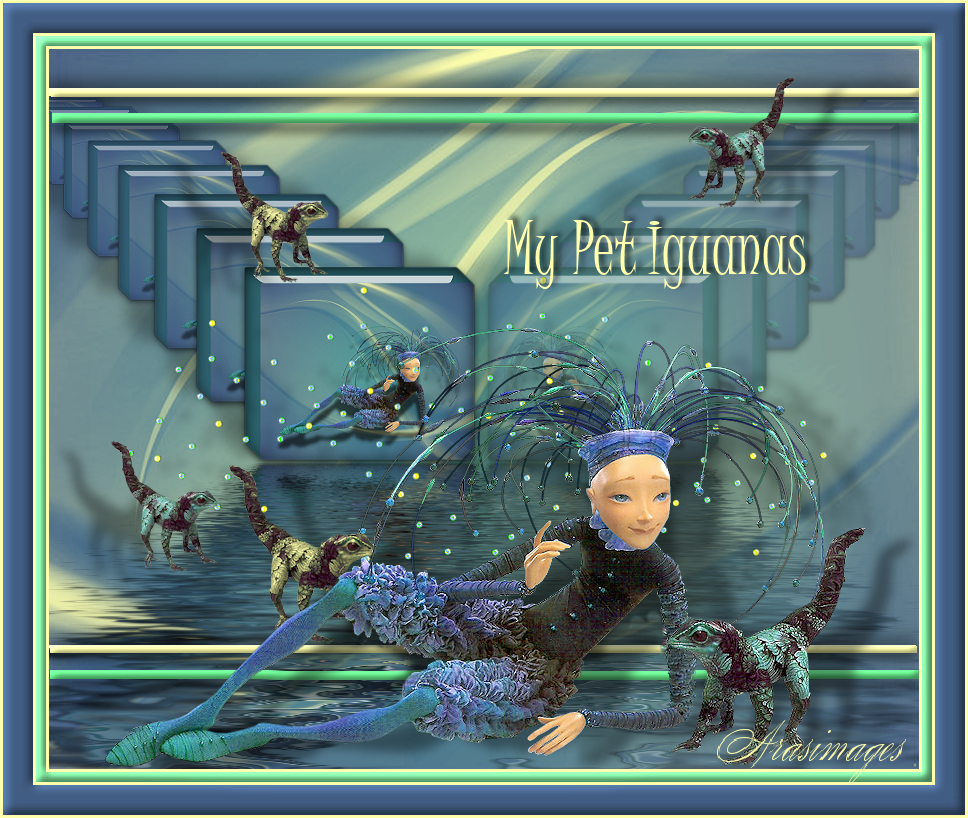
My Pet Iguanas
For this tutorial you will need the materials in the zip file below.

For an Italian, French, Spanish, German and Dutch translation click on the flags.


This tutorial was written using tubes by PamelaD from Arasimages and effects in PSP. Create a new folder on your desktop named MyPetIguanas and unzip the materials in it. Plugins used Mura's Meister/Copies and Flaming Pear/Flood. Click on each of the Alien Skin Eye Candy 5: Impact .fls files and they will automatically go into the Impact folder. Place the two Selections in your PSP Files/Selections folder. Place the Mask in your PSP Files/Masks folder. Install the Font Juice ITC in your PSP Font folder. I have used PSP2019 and PSP2020. To work this tutorial, it is assumed you have some working knowledge of Paint Shop Pro.
Thanks go to PamelaD of Arasimages for the fun tube of the Doll and Iguana.
Use the bookmark below to mark your place along the way.

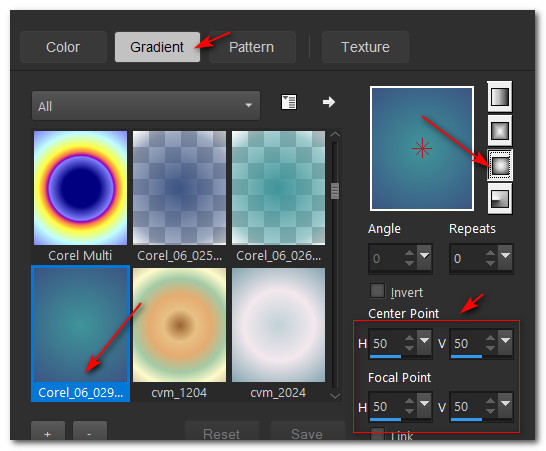
1. In materials Palette, set Angle/Repeats to 0, set the Foreground color to #3f959a, Background color to #3c5482, Style Sunburst, Invert unchecked, Center and Focal Points all set to 50. Use Corel_06_029_Foreground/Background Gradient.
2. New/New Image 870px by 720px. Flood fill with Gradient.
3. In Materials Palette, change Background color to #ffffad.
4. Layers/New Raster Layer. Flood fill new layer with #ffffad.
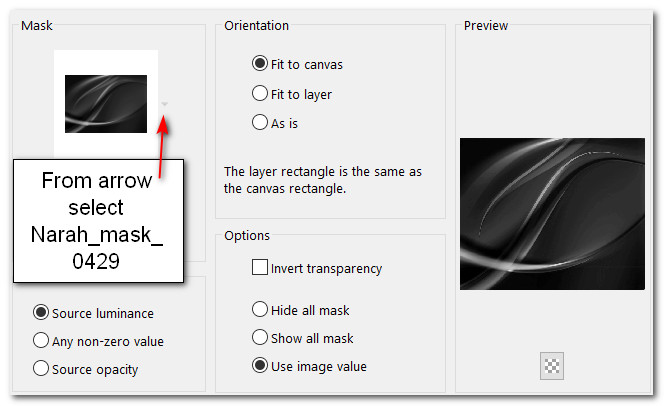
5. Layers/Load/Save Mask/Load Mask from Disk. From drop down arrow select Narah_mask_0429. Load.
6. Merge/Merge Group.
7. Open BlueDoll.png. Copy/Paste as New Layer.
8. Effects/3D Effects/Drop Shadow. Vertical 46, Horizontal 6, Opacity 61, Blur 17, color #000000.
9. Image/Mirror. Mirror-Horizontal.
10. Merge/Merge Visible.
11. Image/Resize/Resize by 50%/Resize all layers unchecked.
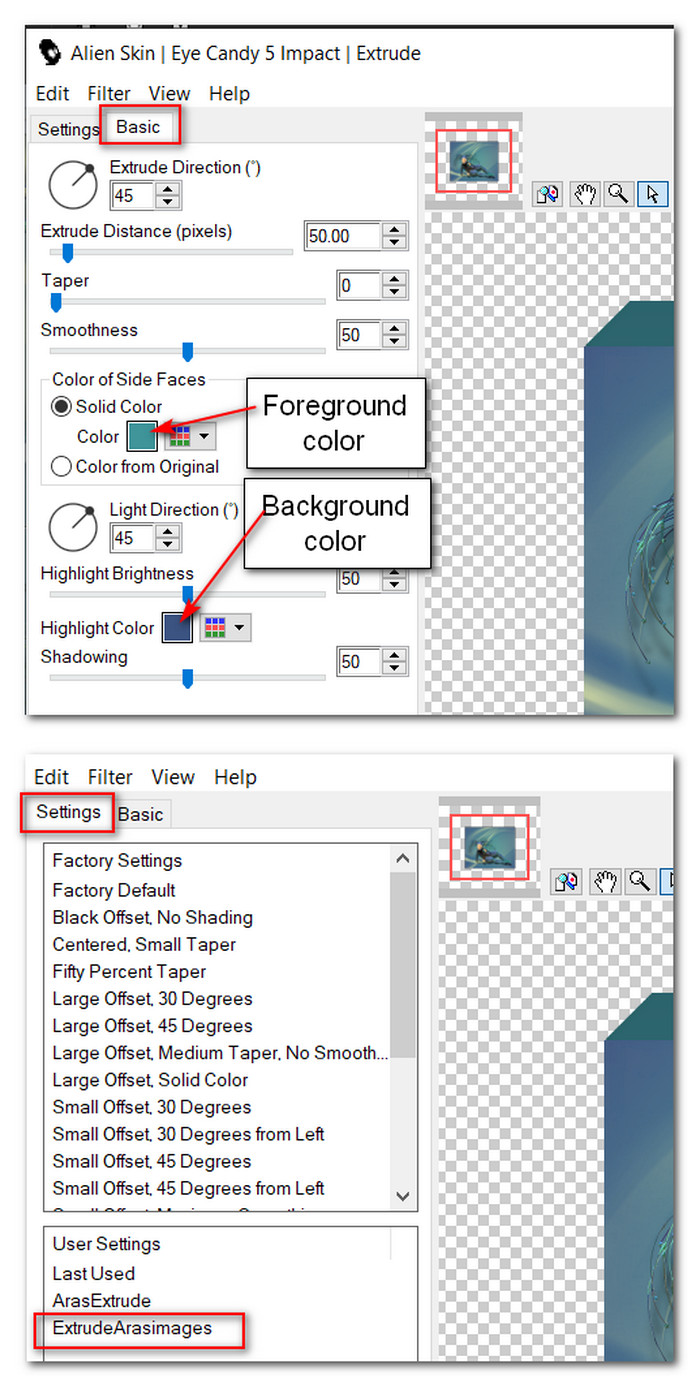
12. Effects/Alien Skin Eye Candy 5: Impact/Extrude/ExtrudeArasimages.
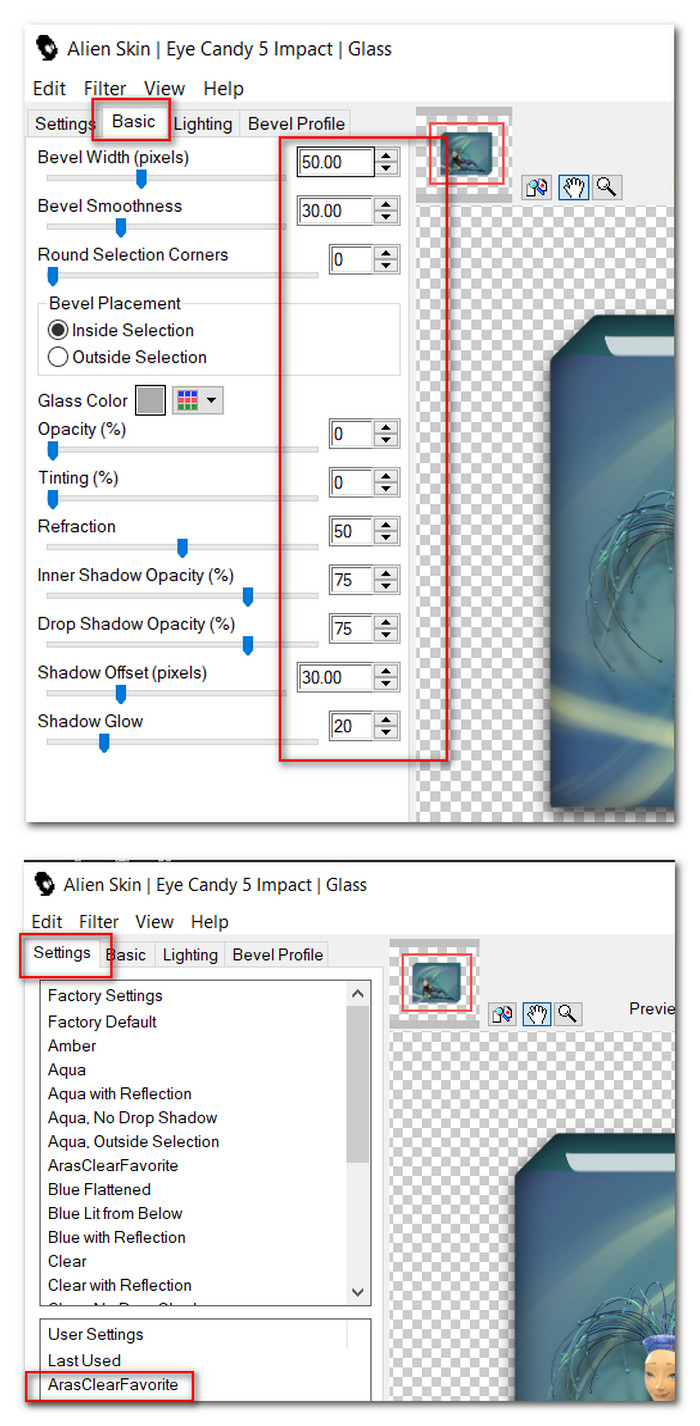
13. Effects/Alien Skin Eye Candy 5: Impact/Glass/ArasClearFavorite.
14. Image/Resize/Resize by 50%/Resize all layers unchecked.
15. In Materials Palette, change Background color to #3c5482.
16. Effects/MuRa's Meister/Copies. Save and minimize MuraMeister Copies as we will soon be using it again.

17. In Material Palette, change gradient to original as in Step 1. New/New Image/870px by 720px. Flood fill with original gradient.
18. In Materials Palette, change Background color to #ffffad.
19. Layers/New Raster Layer. Flood fill new layer with #ffffad.
20. Layers/Load/Save Mask/Load Mask from Disk. From drop down arrow select Narah_mask_0429. Load.
21. Merge/Merge Group. Duplicate mask layer.
22. Maximize saved MuraMeister Copies. Copy/Paste as New Layer on new working image.
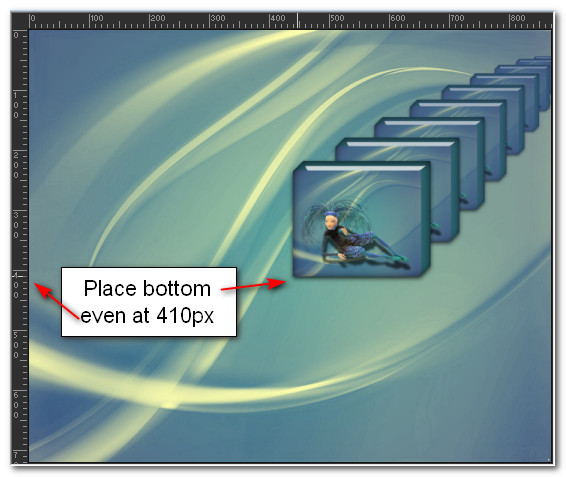
23. Place copies on right side of image with bottom at 410px. See below.
24. Duplicate. Image/Mirror. Mirror-Horizontal.
25. On both Copies apply the following drop shadow. Vertical -10, Horizontal -26, Opacity 30, Blur 22, color #000000.
26. Lower the Opacity of the right Copies to 56. Move to top layer and Merge/Merge Down.
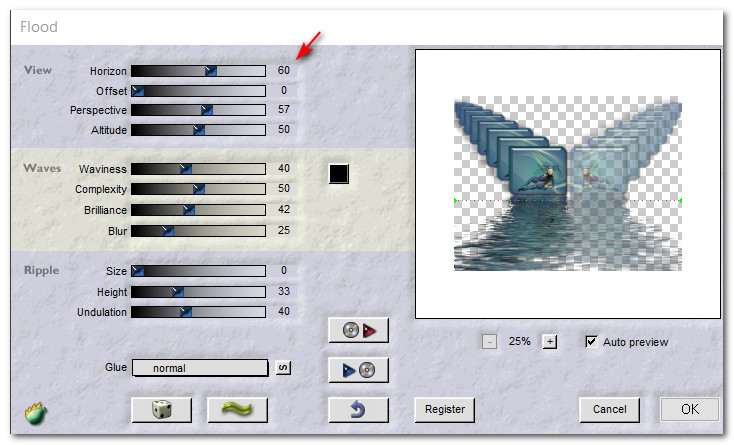
27. Effects/Flaming Pear/Flood using settings below.
28. Layers/New Raster Layer.
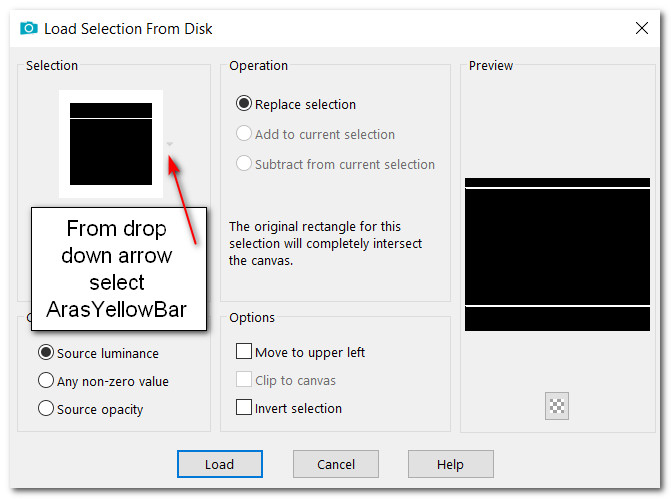
29. Selections/Load/Save Selection. Load Selection from Disk. Choose ArasYellowBarSelection from drop down arrow. Load.
30. Flood fill bars with #ffffad. Deselect.
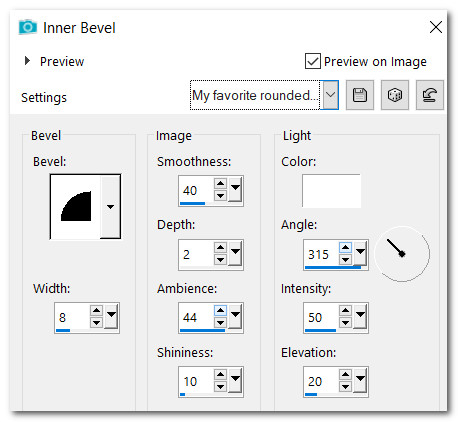
31. Effects/3D Effects/InnerBevel.
32. Effects/3D Effects/Drop Shadow. Vertical 6, Horizontal 0, Opacity 30, Blur 55, color #000000.
33. Effects/3D Effects/Drop Shadow. Vertical -6, Horizontal 0, Opacity 55, Blur 24, color #000000.
34. Layers/New Raster Layer.
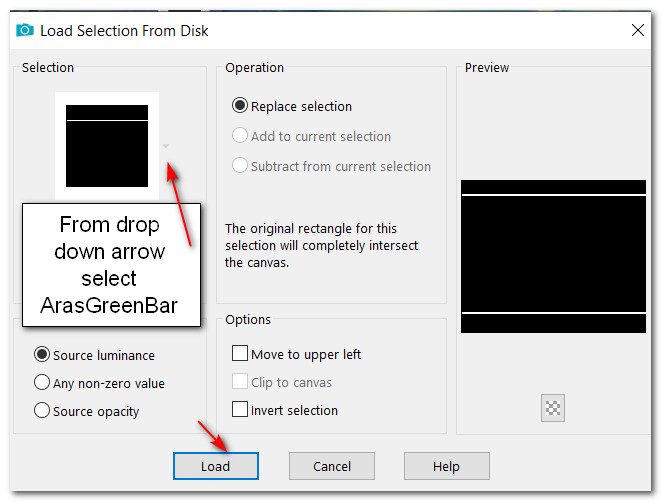
35. Selections/Load/Save Selection. Load Selection From Disk. Choose ArasGreenBar selection from drop down arrow. Load.
36. Flood fill bars with #65e288. Deselect.
37. Effects/3D Effects/InnerBevel.
38. Effects/3D Effects/Drop Shadow. Vertical 10, Horizontal 0, Opacity 50, Blur 15, color #000000.
39. Open BlueDoll-withDots.pspimage. Copy/Paste as New Layer. Move to bottom and left a little.
40. Effects/3D Effects/Drop Shadow. Vertical 10, Horizontal 50, Opacity 38, Blur 15, color #000000.
41. Adjust/Sharpness/Sharpen.
42. Open Iguana.png. Copy/Paste as New Layer. Move to right of Doll.
43. Repeat drop shadow as in Step 40.
44. Copy Iguana/Paste as New Layer.
45. Image/Mirror. Mirror-Horizontal. Place above Doll's right leg.
46. Using Color Changer Tool, left click #ffffad Foreground color on Iguana.
47. Image/Resize/Resize by 75%/Resize all layers unchecked.
48. Pull this layer below the Doll layer.
49. Repeat drop shadow as in Step 40. Go back to top layer to continue.
50. Paste Iguana as New Layer again. Image/Resize/Resize by 55%/Resize all layers unchecked.
51. Repeat drop shadow as in Step 40. Move Iguana to top right corner.
52. Duplicate Iguana. Image/Mirror. Mirror-Horizontal.
53. Place on first doll block in left corner area.
54. Using Color Changer Tool, left click #ffffad Foreground color on Iguana.
55. Duplicate Iguana in upper right corner. Image/Mirror. Mirror-Horizontal.
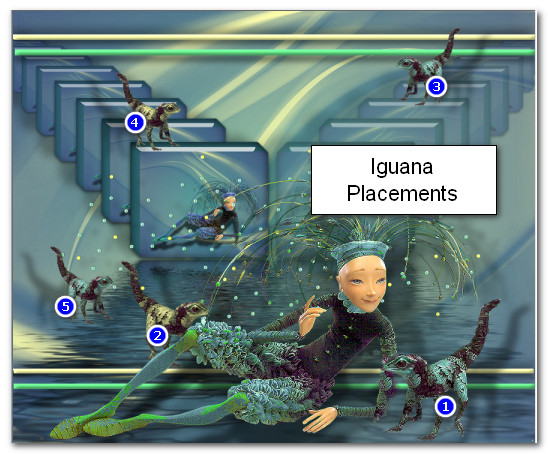
56. Place Iguana in bottom left corner. See below for Iguanas placements.
57. Click on double arrow in Materials Palette by Foreground/Background to swap colors so yellow is on the bottom.
58. From Tool Bar select the Text tool. Choose Font Juice ITC, Size 72, Font color #ffffad, Stroke 0.0. Type out "My Pet Iguanas". Convert to Raster Layer.

59. Effects/3D Effects/Drop Shadow. Vertical -3, Horizontal 5, Opacity 72, Blur 8, color #000000.
60. Image/Add Borders/Add 3px Border, Symmetric checked, color #ffffad.
61. Image/Add Borders/Add 10px Border, Symmetric checked, color #7ee49c.
62. Use Magic Wand on 10px border to activate it. Apply Inner Bevel. Deselect.
63. Image/Add Borders/Add 3px Border, Symmetric checked, color #ffffad.
64. Image/Add Borders/Add 30px Border, Symmetric checked, color #435f85.
65. Use Magic Wand on 30px border to activate it. Apply Inner Bevel as in Step 62. Deselect.
66. Image/Add Borders/Add 3px Border, Symmetric checked, color #ffffad.
67. Thank you for completing My Pet Iguanas tutorial.
Thank you PamelaD for testing each of my tutorials. I appreciate you! March 21, 2022.
If you are going to use this tutorial for stationery, cards or place the tutorial/tag on another site, I would appreciate you contacting me for permission, giving Arasimages credit for the original tutorial and if possible, a link back to my site. Thank you.
Copyright © Arasimages All Rights Reserved