
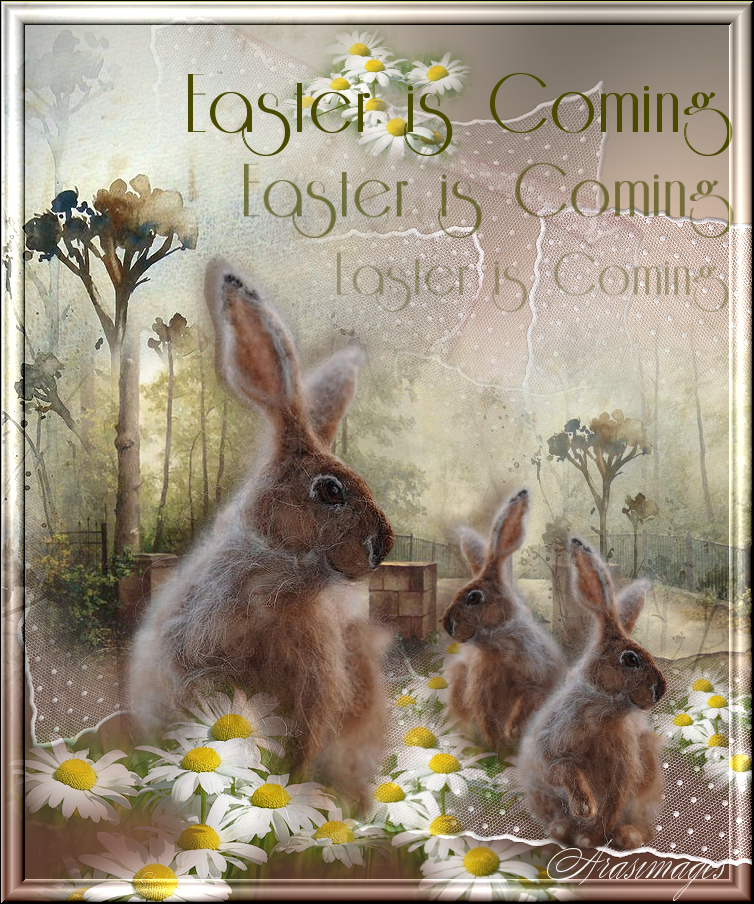
Easter is Coming
For this tutorial you will need the materials in the zip file below.

For a German, Italian, Dutch, Spanish and French translation click on the flags.


Create a new folder on your desktop named Easter is Coming and unzip the materials in it. Duplicate the tubes and close originals using the duplications saving the originals. Plugins used are Graphics Plus/Cross Shadow and FiltersUnlimited2/Buttons&Frames/3DGlassFrame1. Install the Font Riesling in your PSP Font folder. This tutorial was written using PSP2020. To work this tutorial, it is assumed you have working knowledge of Paint Shop Pro.
Thanks go to PamelaD of Arasimages, Luz Cristina and Soleil for the beautiful tubes.
Use the generic bookmark below to mark your place along the way.

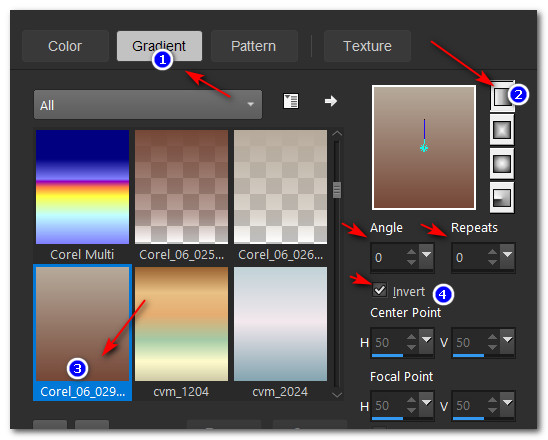
1. In materials Palette, set the Foreground color to #b6aa9b, Background color to #754737, set Angle/Repeats to 0, Style Linear, Invert checked, Center and Focal Points all null. Use Corel_06_029_Foreground/Background Gradient.
2. New/New Image 750px by 900px. Flood fill with Gradient.
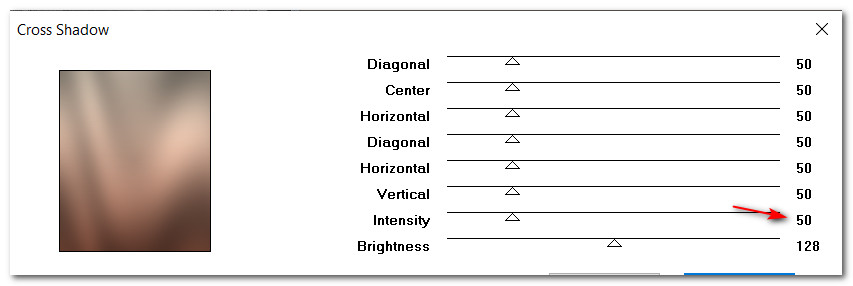
3. Effects/Graphics Plus/Cross Shadow.
4. Open tul_topitos2_nelia_baile_eterno_soleil_1705071.pspimage of lace. Copy/Paste as New Layer.
5. Place in left center border.
6. Adjust/Sharpness/Sharpen.
7. Duplicate. Image/Free Rotate/Rotate Left by 90%. Image/Flip. Flip Vertical. Pull to right side.
8. Copy lace again. Paste as New Layer.
9. Free Rotate/Rotate Left by 90%. Adjust/Sharpness/Sharpen. Place in top center of main image. Drop Opacity to 58.
10. Duplicate. Set Opacity to 100. Rotate/Free Rotate Left by 90%.
11. Image/Mirror. Mirror Horizontal. Place in bottom right corner.
12. Open d738e14284dc70fa3decaf5f2332138c.pspimage of weeds.
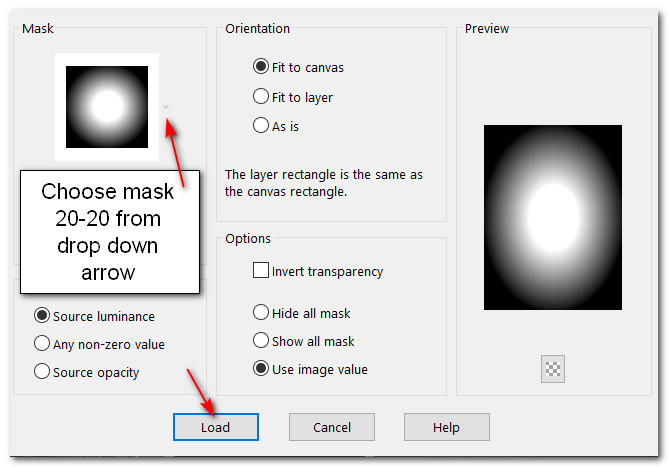
13. Layers/Load/Save Mask/Load Mask from Disk. From drop down arrow select mask 20-20. Load.
14. Merge/Merge Group.
15. Copy weeds/Paste as New Layer on working image. Move to left border.
16. Open 1656-luzcristina.pspimage bridge. Copy/Paste as New Layer.
17. Move to left side over weeds/lace.
18. Duplicate. Image/Mirror. Mirror Horizontal.
19. Drop Opacity to 90. Move bridge to right side matching center posts.
20. Copy misted weeds/Paste as New Layer.
21. Image/Resize/Resize by 60%/Resize all layers unchecked.
22. Lower Opacity to 54. Move to right side over bridge. (See image below for placement of weeds).

23. Open Cherokee~Daiseys1.psp. Copy/Paste as New Layer.
24. Image/Resize/Resize by 50%/Resize all layers unchecked.
25. Image/Mirror. Mirror Horizontal.
26. Place daisies toward the top in the middle.
27. Duplicate. Place toward bottom below the gate.
28. Duplicate. Place above bottom right corner. (See image below for daisy placements).
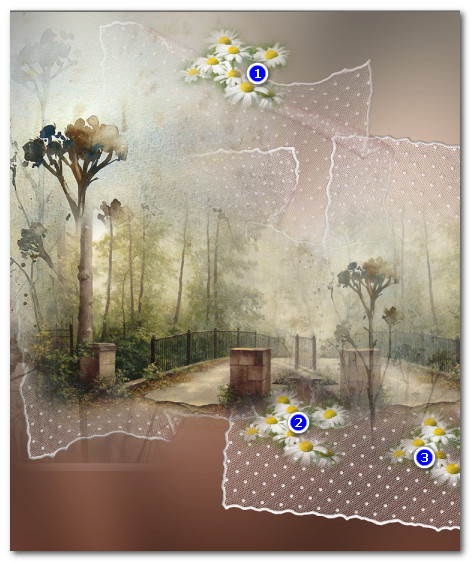
29. Copy/Paste Daiseys again. Image/Mirror. Mirror Horizontal.
30. Image/Resize/Resize by 80%/Resize all layers unchecked. Place toward middle bottom of main image.
31. Open Doll_215.pspimage of Rabbit. Copy/Paste as New Layer.
32. Image/Resize/Resize by 50%/Resize all layers unchecked.
33. Image/Mirror. Mirror Horizontal.
34. Place resized Rabbit to right of second daisy cluster.
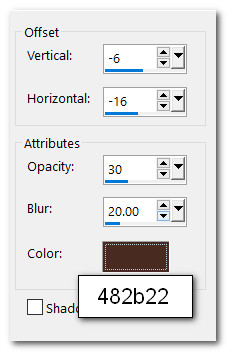
35. Effects/3D Effects/Drop Shadow. Vertical -6, Horizontal -16, Opacity 30, Blur 20, color #482b22.
36. Copy/Paste rabbit as New Layer. Resize by 56%. Place slightly over the right of first rabbit.
37. Effects/3D Effects/Drop Shadow. Vertical -6, Horizontal -16, Opacity 30, Blur 20, color #482b22.
38. Adjust/Sharpness/Sharpen.
39. Copy/Paste rabbit as New Layer.
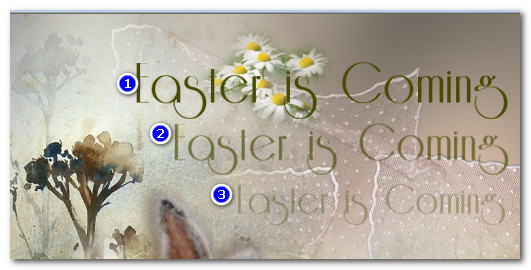
40. Effects/3D Effects/Drop Shadow. Vertical -6, Horizontal -16, Opacity 46, Blur 22, color #482b22.
41. Adjust/Sharpness/Sharpen. Place rabbit near bottom left corner.
42. Copy/Paste Daiseys again. Place daiseys at bottom of large rabbit.
43. Adjust/Sharpness/Sharpen.
44. In Materials Palette change Background color to #494900.
45. From Tool bar select Text tool. Choose Font Riesling. Set to Size 96, Font style: Bold, Stroke width: 0.0, color #494900. Kerning: 25.

46. Type out the words "Easter is Coming". Conver to Raster Layer.
47. Place over small flowers at top. (See image in Step 49 for all text).
48. Duplicate. Resize to 90. Lower Opacity to 67. Place under first text.
49. Duplicate. Resize to 80. Lower Opacity to 38. Place under second text.
50. Image/Add Borders/Add 2px border, Symmetric checked, Color #494900.
51. Effects/Filters Unlimited 2/Buttons & Frames/3D Glass Frame 1.

52. Sign your name and save as .png or .jpg file.
Thank you PamelaD for testing each of my tutorials. I appreciate you! April 2022.
If you are going to use this tutorial for stationery, cards or place the tutorial/tag on another site, I would appreciate you contacting me for permission, giving Arasimages credit for the original tutorial and if possible, a link back to my site. Thank you.
Copyright © Arasimages All Rights Reserved