
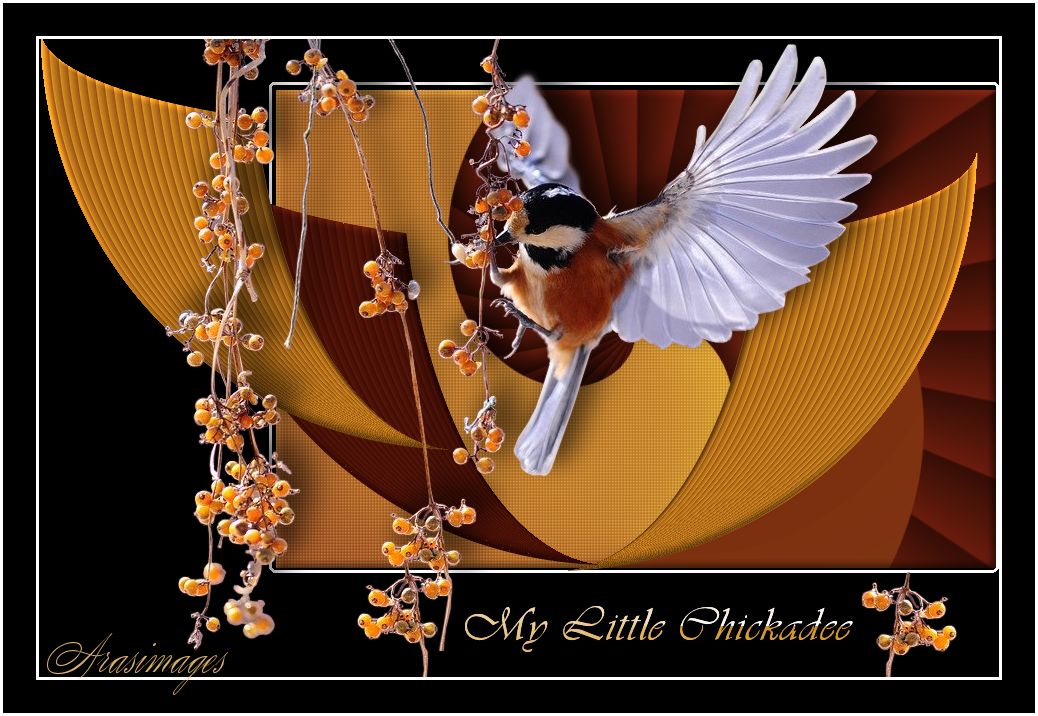
My Little Chickadee
For this tutorial you will need the materials in the zip file below.
For an Italian, German, French and Spanish translation click on the flags.


Create a folder on your desktop and unzip the materials in to it. This tutorial was written using PSP2020 Ultimate. On this tutorial I have used Plugins MuraMeister/Pole Transform, Penta/Color Dot and effects of PSP. To work this tutorial, it is assumed you have working knowledge of Paint Shop Pro.
Thanks go to PamelaD of Arasimages for the lovely bird and berries tube used in this tutorial.
Use the bookmark below to mark your place along the way.

1. In Materials Palette, set Background color to #000000.
2. New/New Image. Width at 960px/Height 638px. Flood fill with background color.
3. In Materials Palette, change the background color to #6c1d0e.
4. Layers/New Raster Layer. Flood fill with new background color.
5. Effects/Texture Effects/Blinds.

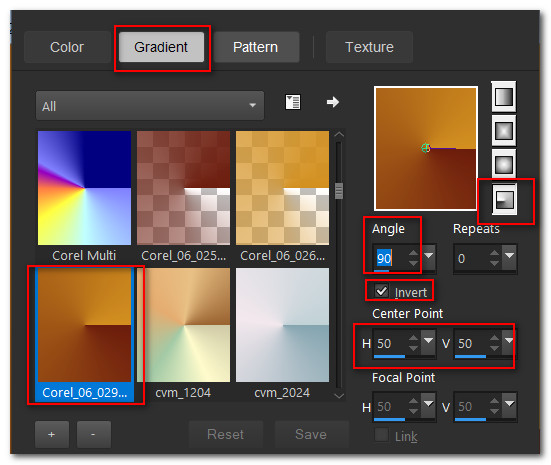
6. In Materials Palette, set the Foreground color to #d39020, leave Background color to #6c1d0e. Set to Gradient tab, Style Radial, Angle to 90/Repeats 0. Invert checked, gradient Corel_06_029_foreground-background.
7. Layers/New Raster Layer. Flood fill with gradient.
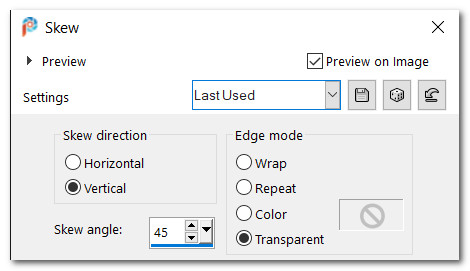
8. Effects/Geometrics Effects/Skew. Merge/Merge Down.
9. Effects/MuraMeister/Pole Transform.
![]()
10. Using Magic Wand set to Add(Shift), RGB Value, Tolerance 10, select the gold part of the image, click on the gold to activate it.

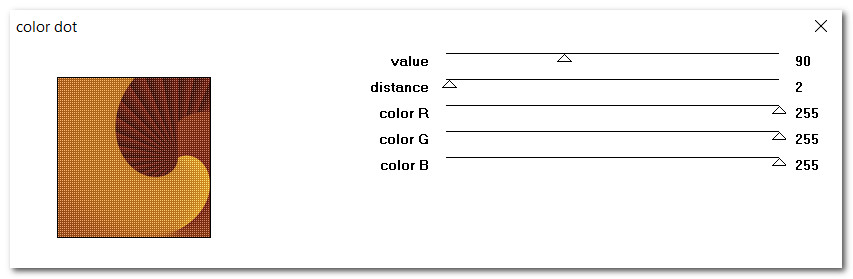
11. Effects/Penta/Color Dot.
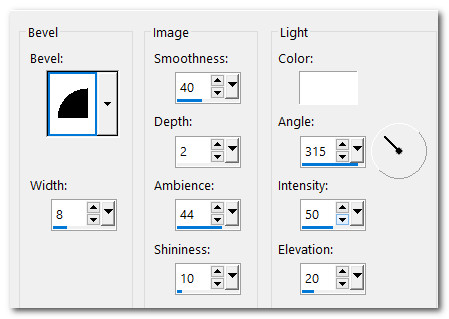
12. Effects/3D Effects/Inner Bevel.
13. Effects/3D Effects/Drop Shadow. Vertical -15, Horizontal 15, Opacity 46, Blur 35, color #000000.
14. Selections/Select None.
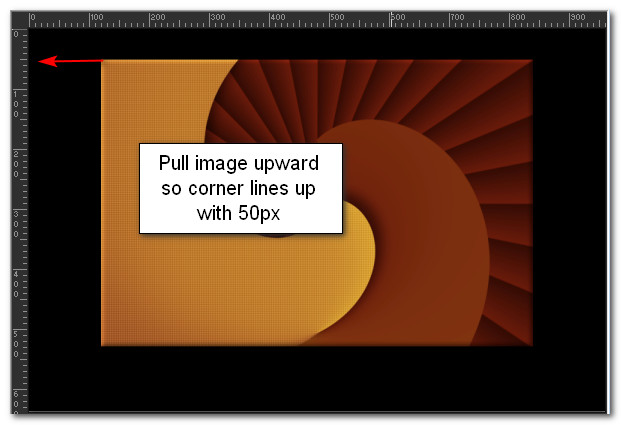
15. Image/Resize/Resize by 75%/Resize all layers unchecked.
16. Move resized image upward to 50px on left.
17. Layers/New Raster Layer.
18. Using Selections tool, select around the resized image.
19. Selections/Modify/Expand by 6px. Flood fill selection with color #ffffff.
20. Selections/Modify/Contract by 3px. Delete. Deselect.
21. Merge/Merge Down. Objects/Align/Right.
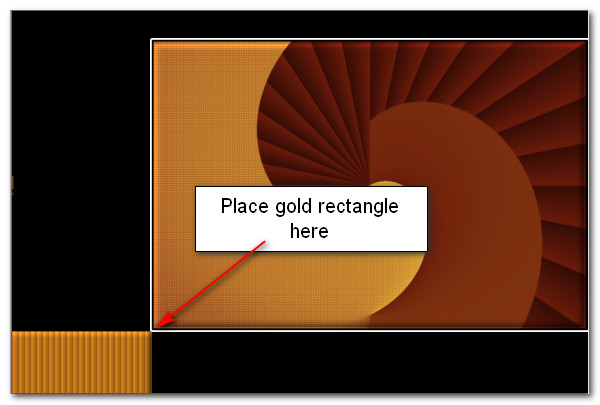
22. Open Small Rectangle.pspimage. Copy/Paste as New Layer.
23. Move rectangle to bottom left corner so corners meet as seen below.
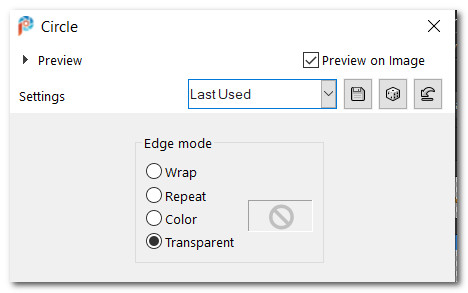
24. Effects/Geometric Effects/Circle.
25. Duplicate twice. On one duplicate, Image/Mirror. Mirror Horizontal.
26. Place mirrored gold wing on right side. Place one duplicated gold wing opposite on left side. Place last duplicate in upper left corner over left side wing.
27. Using background color #6c1d0e and Color Changer, click on second duplicated wing to recolor it. See below for recoloring and placement of all wings.
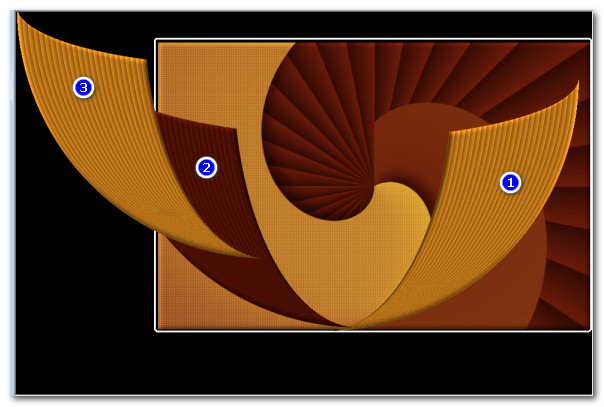
28. Open BIRD.pspimage. Copy/Paste as New Layer. Image/Mirror. Mirror Horizontal.
29. Place Chickadee in center of image having berries along side of center image.
30. Effects/3D Effects/Drop Shadow. Vertical -15, Horizontal 15, Opacity 46, Blur 35, color #000000.
31. Repeat drop shadow.
32. Change Background color in Materials Palette to #ffffff. Click on small double arrows so gradient is on background (bottom).
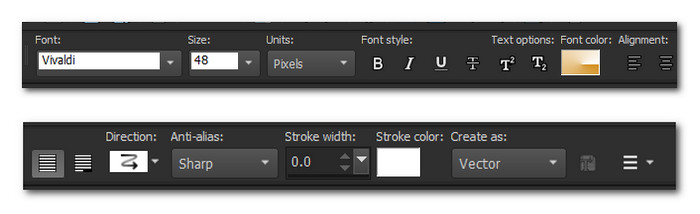
33. From Tool bar select Text tool. Select Font Vivaldi, set Size to 48, all other settings at default.
34. Type out the words "My Little Chickadee". Convert to Raster Layer. Duplicate to brighten.
35. Merge/Merge Down. Adjust text to be centered to right of berries.
36. Open the BIRD.pspimage. Selections/Freehand selection, go around the bottom center cluster of berries. Copy.
37. Go back to working image. Activate Raster 1. Paste as New Layer.
38. Place berries to right of text. Duplicate. Image/Mirror. Mirror Horizontal. Place duplicated berries to left of center branch at bottom.
39. Image/Add Borders/Add 3px border, Symmetric checked, color #ffffff.
40. Image/Add Borders/Add 33px border, Symmetric checked, color #000000.
41. Image/Add Borders/Add 3px border, Symmetric checked, color #ffffff.
42. Add your watermark if you wish and save as a .png or .jpg file.
If this image is too large for your use, please feel free to reduce in size.
I would like to give thanks to my wonderful tester, PamelaD who so faithfully tests these tutorials for me. (June 15, 2022)
If you are going to use this tutorial for stationery, cards or place the tutorial/tag on another site, I would appreciate you contacting me for permission, giving Arasimages credit for the original tutorial and if possible, a link back to my site. Thank you.
Copyright © Arasimages All Rights Reserved