
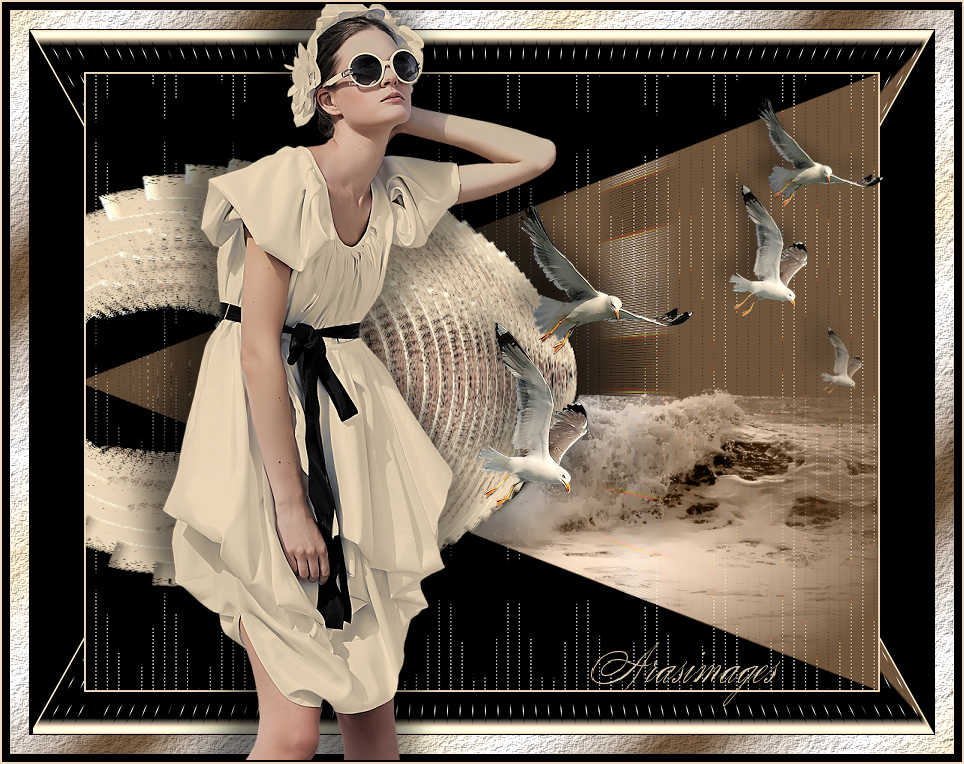
A Day at the Ocean
For this tutorial you will need the materials in the zip file below.
For an Italian, German, French, Dutch and Spanish translation click on the flags.


Create a folder called A Day at the Ocean on your desktop and unzip the materials in to it. Copy originals using these for the tutorial and close out the originals. This tutorial was written using PSP2020 Ultimate. On this tutorial I have used Plugins L en K landksiteofwonders/L enK Zitah, AAA Frames/Texture Frames and effects of PSP. Place Gradient vyp_gradient_03 in your PSP Files/Gradients folder. Place the Selection in your PSP Files/Selections folder. To work this tutorial, it is assumed you have working knowledge of Paint Shop Pro.
Thanks go to Maryse for the lovely lady tube and Seagulls used in this tutorial.
Use the generic bookmark below to mark your place along the way.

1. In Materials Palette, set Foreground color to #efdbbc/Background color to #6f553c.
2. New/New Image. Width at 700px/Height 900px. Flood fill with background color.
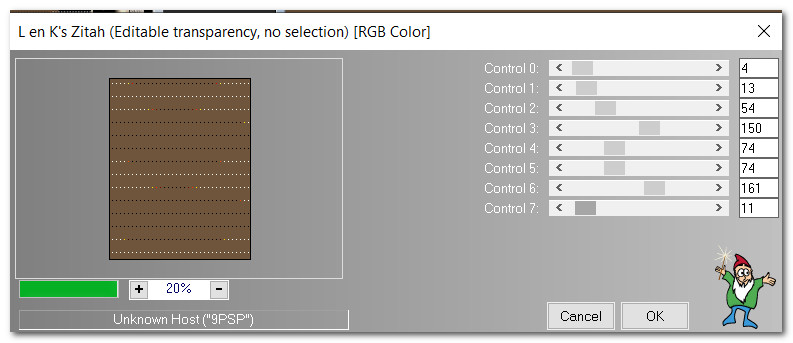
3. Effects/L en K landksiteofwonders/L en K Zitah.
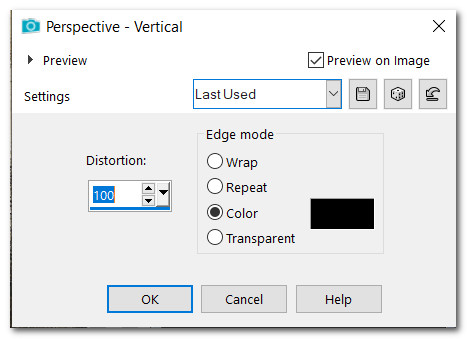
4. Effects/Geometric Effects/Perspective-Vertical.
5. Effects/L en K landksiteofwonders/L en K Zitah. Use same settings as Step #3.
6. Selections/Load Save Selection/Load Selection from Disk. Load.

7. Layers/New Raster Layer. Flood fill with foreground color #efdbbc.
8. Open MR_Oksana.png of woman. Select Maryse watermark, delete, deselect.
9. Image/Mirror. Mirror-Horizontal.
10. Using Color Changer tool Tolerance and Edge Softness both set to 15, left click on lady's dress to change color. Copy. Paste/Paste into Selection. (Minimize/Save changed image of lady on desktop as we will use this later). Continue with main image.
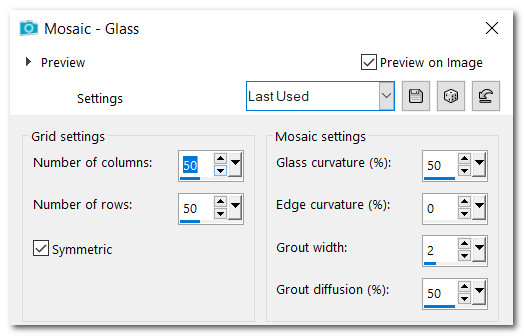
11. Effects/Texture/Mosaic-Glass.
12. Effects/3D Effects/InnerBevel. Deselect.

13. Effects/Reflection Effects/Feedback.
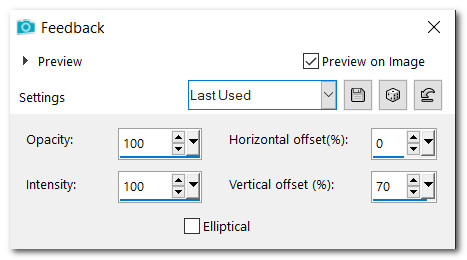
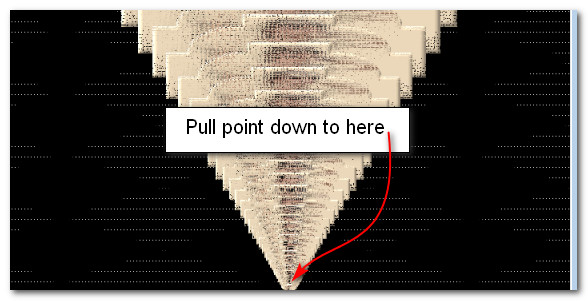
14. Pull Feedback down so point at bottom matches brown bottom point.
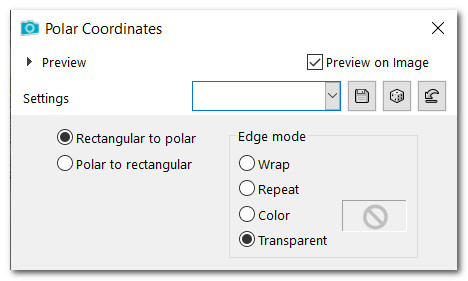
15. Effects/Distortion Effects/Polar Effects.
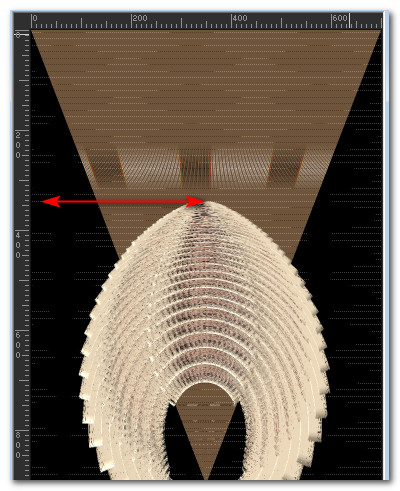
16. Image/Flip. Flip Vertical. Pull downward to 340px.
17. Effects/3D Effects/Drop Shadow. Vertical -21, Horizontal -21, Opacity 40, Blur 35, color #000000.
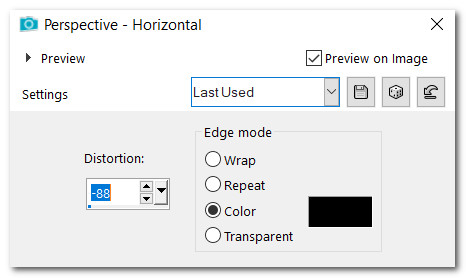
18. Effects/3D Effects/Drop Shadow. Vertical -21, Horizontal 21, Opacity 40, Blur 35, color #000000.
19. Effects/3D Effects/Drop Shadow. Vertical -35, Horizontal 0, Opacity 40, Blur 35, color #000000.
20. Image/Add Borders/Add 2px border, Symmetric checked, color #efdbbc.
21. Duplicate image. Image/Resize/Resize by 88%. Resize all layers unchecked.
22. Drop down to Background (first layer). Duplicate.
23. Effects/Geometric Effects/Perspective Horizontal.
24. Duplicate Copy of Background. Image/Mirror. Mirror Horizontal.
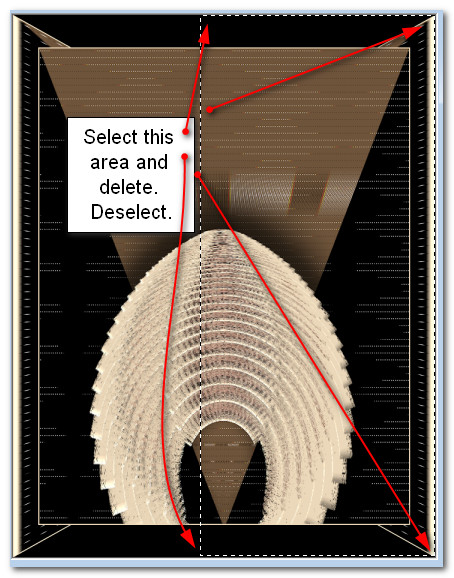
25. Using Selections tool set to Rectangle, Add (Shift)/Feather 0, draw out a rectangle from middle of image to top/bottom of right side. Delete. Deselect.
26. Go to top layer to continue.
27. Image/Add Borders/Add 1px border, Symmetric checked, color #000000.
28. Image/Add Borders/Add 20px border, Symmetric checked, color #efdbbc.
29. Using Magic Wand, click on 20px border to activate it.
30. Set Materials Palette to Gradient, vyp_Gradient_03, Style Linear, Angle:45/Repeats:5, Invert unchecked.
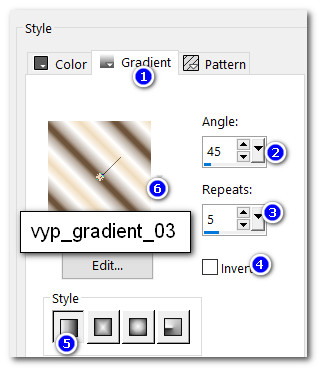
31. Flood fill 20px border with Gradient.
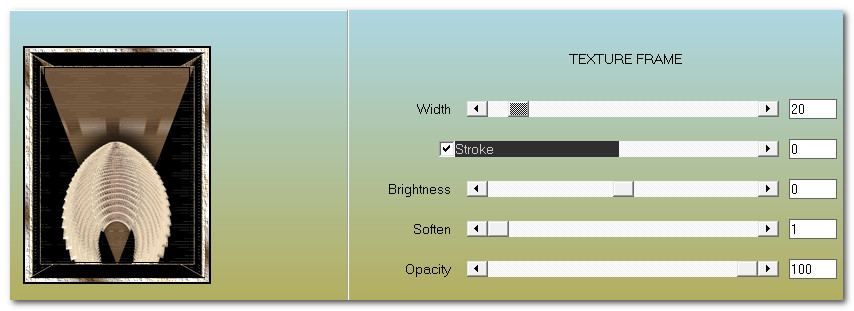
32. Effects/AAA Frames/Texture Frame. Deselect.
33. Image/Add Borders/Add 5px border, Symmetric checked, color #000000.
34. Image/Rotate Right. (Whole image rotates so it is horizontal).
35. Open caro3003.pspimage of ocean. Copy/Paste as New Layer.
36. Move to right side of image having horizon at center. Blend Mode set to Luminance Legacy.
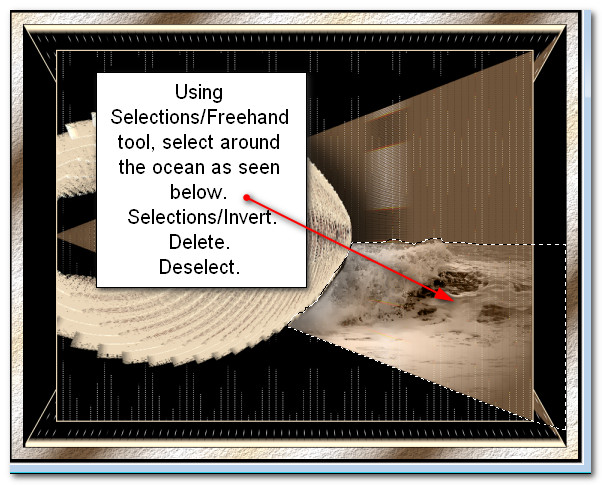
37. Using Selections/Freehand tool set to Point to Point/Add (Shift)/Feather 0, surround the ocean as seen below. Selections/Invert. Delete. Deselect.

38. Open MR_Shorebirds.png. Using Selections tool, Rectangle, surround Maryse's watermark. Delete. Deselect.
39. Image/Resize/Resize by 37%/Resize all layers checked.
40. Copy/Paste as New Layer. Place over Feedback image and over water in right center of image.
41. Adjust/Sharpness/Sharpen.
42. Effects/3D Effects/Drop Shadow. Vertical -21, Horizontal -21, Opacity 40, Blur 35, color #000000.
43. Duplicate. Resize/Resize by 72%/Resize all layers unchecked.
44. Place in upper right corner.
45. On MR_Shorebirds.pspimage, using Selections/Freehand tool (settings as in Step 37), surround bottom Seagull. Copy. Go back to working main image and Paste as New Layer.
46. Image/Resize/Resize by 72%/Resize all layers unchecked. Repeat twice. Place Seagull hovering just over the water on the right horizon.
47. Lower Opacity to 72.
48. Maximize MR_Oksana.png of lady on desktop. Copy/Paste as New Layer.
49. Place lady in center left side of image.
50. Adjust/Sharpness/Sharpen.
51. Effects/3D Effects/Drop Shadow. Vertical -21, Horizontal -21, Opacity 40, Blur 35, color #000000. Repeat.
52. Image/Add Borders/Add 2px border, Symmetric checked, color #000000.
53. Image/Add Borders/Add 2px border, Symmetric checked, color #efdbbc.
54. Add your name if you wish. Save as .jpg or .png image.
I would like to give thanks to my wonderful tester, PamelaD who so faithfully tests these tutorials for me. (June 30, 2022)
If you are going to use this tutorial for stationery, cards or place the tutorial/tag on another site, I would appreciate you contacting me for permission, giving Arasimages credit for the original tutorial and if possible, a link back to my site. Thank you.
Copyright © Arasimages All Rights Reserved