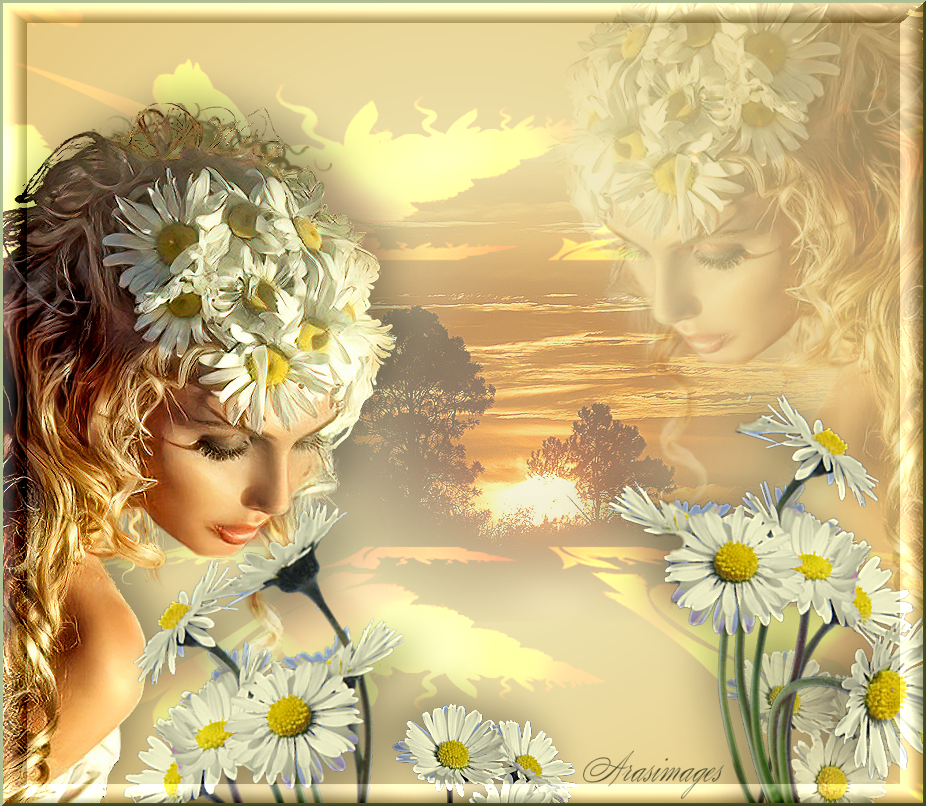
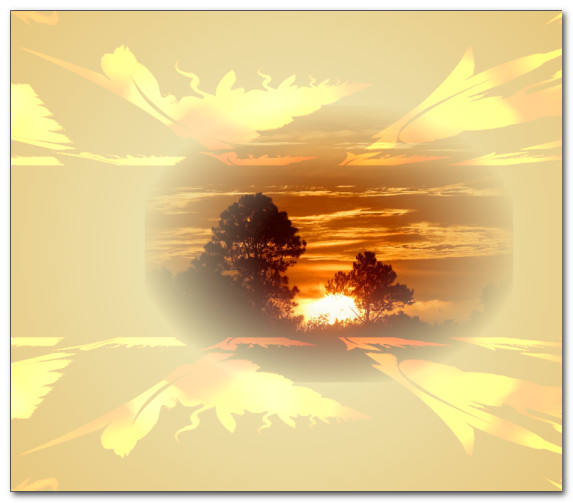
Summer Sunset
For this tutorial you will need the materials in the zip file below.

For an Italian, Dutch, French, Spanish and German translation click on the flags.


Create a folder on your desktop naming it Summer Sunset. Unzip materials into this folder, duplicating the tubes and use the duplicates for your tutorial work. I have used the plugins MuRa'sMeister/Perspective, AP 01 [Innovations]/Mirror-Both Sides, Filters Unlimited/Buttons & Frames/3D Glass Frame (rounded) and several effects of PSP itself. This tutorial was written using PSP2020. To work this tutorial, it is assumed you have some working knowledge of Paint Shop Pro.
It is important to note that some foreign PSP programs are giving different results with their Plugins effects. In this tutorial, Step #5 gives a different result than my English program and therefore the following steps are not correct either. To solve this problem, you may copy/paste as new layer the Layer 2 I have included in the Materials. Another way to solve this issue, thanks to my tester Pamela and my French translator Lili, they say to place the lady 5 or 6 pixels away from the bottom left edges of the image so when Step #5 Feedback is applied, the end result is correct.
Thanks go to Nikita and to PamelaD and Evatexas (now deceased) for their work tubing the daisies and sunset used in this tutorial.
Use the bookmark below to mark your place along the way.

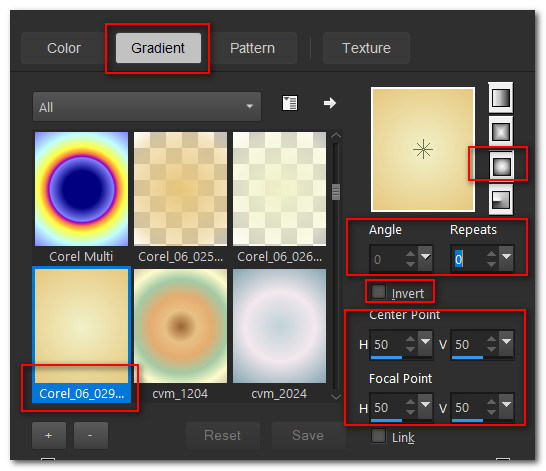
1. In Materials Palette, set Foreground to #f0f1c9, Background to #e7c77d. Set Style to Sunburst, Invert unchecked, Gradient to Corel_06_029 foreground-background, Angle/Repeats at 0, Center and Focal Points all at 50.
2. New/New Image 920px by 800px. Flood fill with Gradient.
3. Open 156914730937_femmes_nikita.png of woman. Copy/Paste as New Layer.
4. Using Selection tool/Selection set to Rectangle/Add (Shift)/Feather 0, select Nikita's watermark and press Delete. CTRL+D. Place woman in bottom left corner to fit.

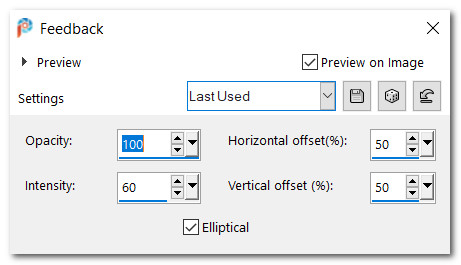
5. Effects/Reflection Effects/Feedback.
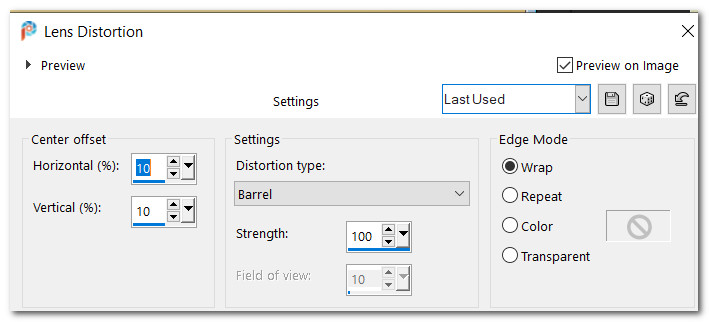
6. Effects/Distortion Effects/Lens/Distortion.
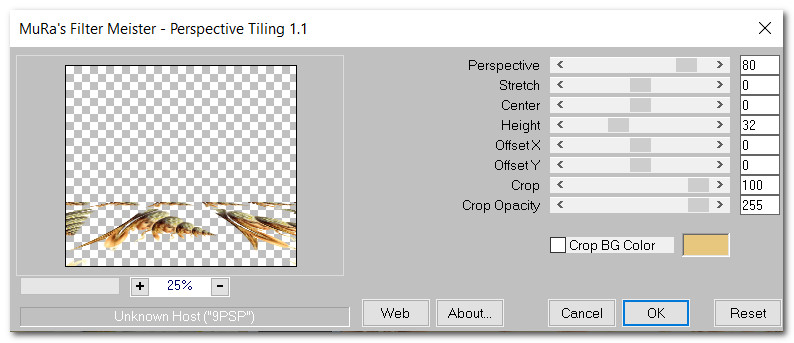
7. Effects/Mura'sMeister/Perspective Tiling.
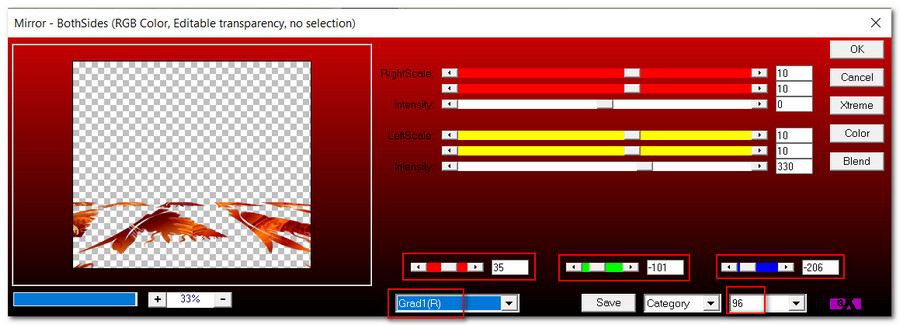
8. Effects/AP 01 [Innovations]/Mirror-Both Sides. (Note: When finding 96 in bottom right dropdown of this plugin, you must click on a lower number several times in the dropdown and the numbers continue to change. Eventually after a few clicks, 96 shows and you now can apply it).
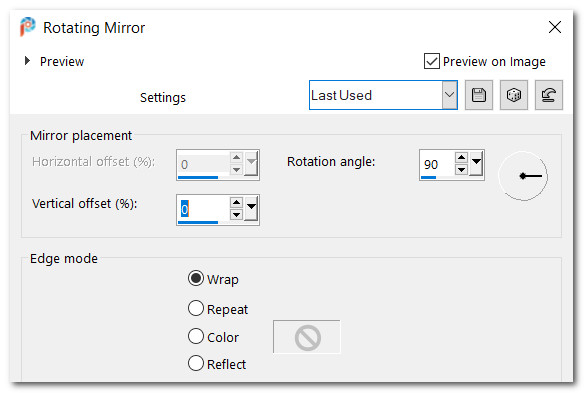
9. Effects/Reflection Effects/Rotating Mirror.
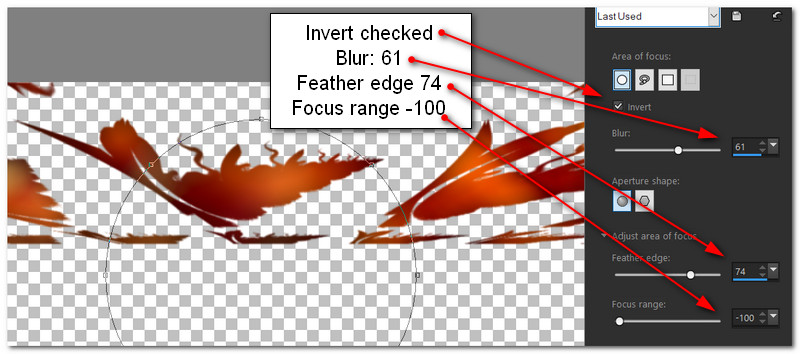
10. Adjust/Depth of Field.
11. Blend Mode: Dodge. Effects/Edge Effects/Enhance.
12. Open Sunrise5E.pspimage. Copy misted layer/Paste as New Layer.
13. Pull sunrise to the right so large tree lines up with top 420px.
14. Pull sunrise layer below Raster 2. Lower Opacity to 50.
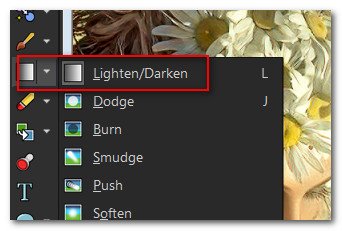
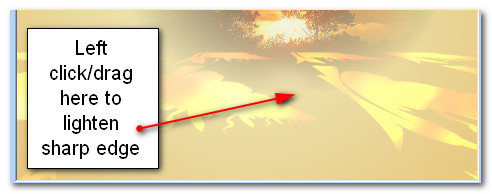
15. Effects/Edge Effects/Enhance.
16. Go back to top layer to continue.
17. Open 156914730937_femmes_nikita.png. Remove Nikita's watermark.
18. Image/Mirror. Mirror-Horizontal. Copy/Paste as New Layer.
19. Place in upper right corner, deeper into corner than edges of tube. Drop Opacity down to 33.
20. Drop down to Raster 3 (sunset scene). Use the Eraser tool to erase the scene off the lady's face.

21. From Tool bar select the Lighten/Darken tool. Left click and drag to erase the center sharp line of the sunset scene as seen below.
22. Go up to Raster 2 and erase the background off the lady's hair. Use same Eraser settings as step #20 above. Go up to top layer Raster 4 to continue.
23. Copy lady/Paste as New Layer. Remove Nikita's watermark. Pull lady into bottom left corner to fit.
24. Adjust/Sharpness/Sharpen.
25. Effects/3D Effects/Drop Shadow. Vertical -15, Horizontal 15, Opacity 35, Blur 55, color #000000.
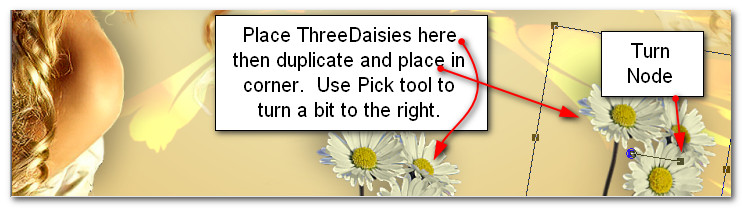
26. Open ThreeDaisies.psp. Copy/Paste as New Layer.
27. Image/Resize/Resize by 50%/Resize all layers unchecked.
28. Left click on daisies with Foreground color using Color Changer tool to make daisies not so bright white.
29. Effects/3D Effects/Drop Shadow. Vertical -15, Horizontal -15, Opacity 35, Blur 55, color #000000.
30. Place in center bottom of image, having only part of them showing.
31. Adjust/Sharpness/Sharpen More.
32. Duplicate. Place in right bottom corner. Use the Pick tool to turn them a bit toward the left. Lower Opacity to 78.
33. Open Daisies2.psp. Copy Tubed layer/Paste as New Layer.
34. Image/Resize/Resize by 75%. Resize all layers unchecked.
35. Using Color Changer tool, left click foreground color to change daisy color to a more yellow shade.
36. Adjust/Sharpness/Sharpen More.
37. Image/Mirror. Mirror-Horizontal. Place in bottom left corner.
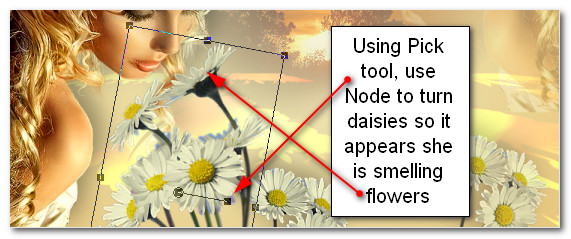
38. Use Pick Tool to turn daisies so it appears she is smelling the flowers. Adjust flowers as needed.
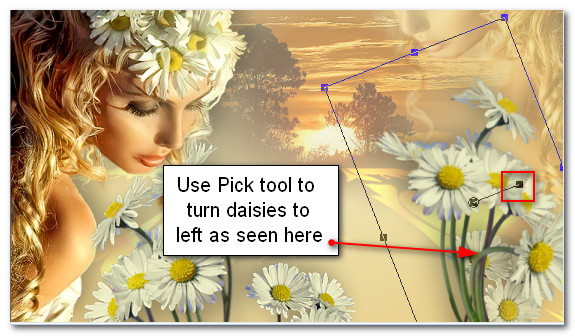
39. Effects/3D Effects/Drop Shadow. Vertical 15, Horizontal 15, Opacity 35, Blur 55, color #000000.
40. Open Daisies2.psp. Working on TUBED layer, use Eraser tool set to Size 20 or higher, erase the two green outer left two stems and the top left flower.
41. Using Color Changer tool, left click foreground color on daisies to change daisies color to a more yellow shade.
42. Image/Resize/Resize by 77%. Resize all layers unchecked.
43. Copy/Paste as New Layer.
44. Effects/3D Effects/Drop Shadow. Vertical 15, Horizontal 15, Opacity 35, Blur 55, color #000000.
45. Use Pick Tool to turn daisies so they lean toward the left. Have top daisy on her shoulder.
46. Adjust/Sharpness/Sharpen More.
47. Image/Add Borders/Add 3px border, Symmetric checked, Color #748155.
48. Effects/Filters Unlimited/Buttons & Frames/3D Glass Frame (rounded).

49. Sign your name and save as a .jpg or .png file.
Thank you PamelaD for testing this tutorial for me. These tutorials would not be the same without you. July 20, 2022
If you are going to use this tutorial for stationery, cards or place the tutorial/tag on another site, I would appreciate you contacting me for permission, giving Arasimages credit for the original tutorial and if possible, a link back to my site. Thank you.
Copyright © Arasimages All Rights Reserved