

For this tutorial you will need the materials in the zip file below.

For an Italian, Spanish, French, German and Dutch translation click on the flags.


Create a folder on your desktop named Merry Christmas. Unzip the materials zip file into this folder. Place the snowflake brush in your PSP Files/Brushes folder. Place the Selection in your PSP Files/Selections folder. If you don't have the Font Toots Extended in your PSP then install it. Check to see if you have Styled Line Dotted_4 in your PSP Styled lines folder. If not, please copy and paste it in your PSP Files/Styled Lines folder. I have used the plugins AAA Frames/Frame Works and FU/AFS Import in this tutorial as well as effects of PSP. Animation Shop is also used. I used PSP 2020 for creating. To work this tutorial, it is assumed you have some working knowledge of Paint Shop Pro and Animation Shop.
Thanks go to FranieMargo for her Mask, CibiBijoux for her gifts tube and Maryse for her lady tube.
Use the FollowMe snowflake below to mark your place along the way.

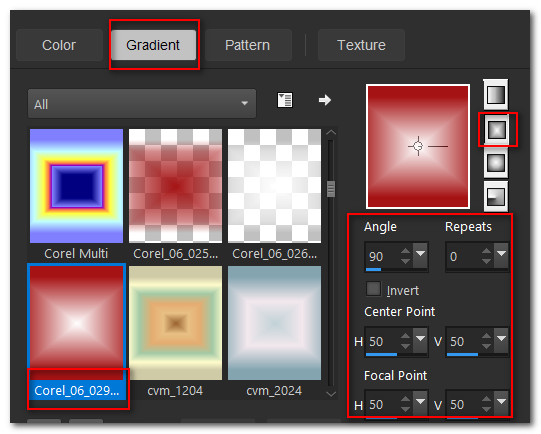
1. In Materials Palette, set the Foreground to color #ffffff, Background color to #a61516. Create a Gradient using Corel_06_29 foreground/background, Rectangular, Angle 90/Repeats 0, Invert unchecked, Center and Focal Points all set to 50.
2. File/New/New Image 800px X 950px. Flood fill with Gradient.
3. Effects/Filters Unlimited 2.0/[AFS IMPORT]. Default settings as seen in image below.

4. Effects/Edge Effects/Enhance.
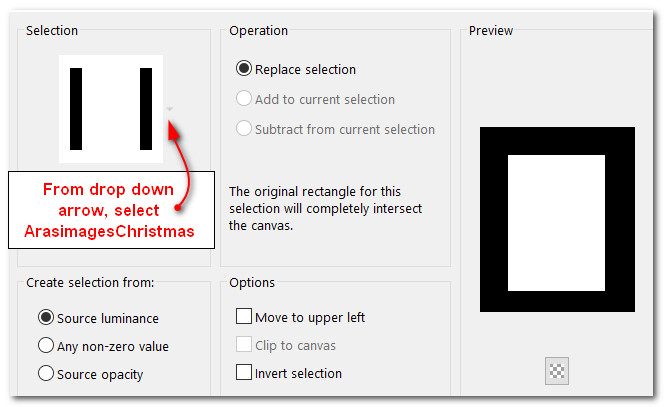
5. Selections/Load/Save Selections/Save Selections from Disk. From dropdown select ArasimagesChristmas. Load.
6. Layers/New Raster Layer. Flood fill Selection with Background color #a61516.
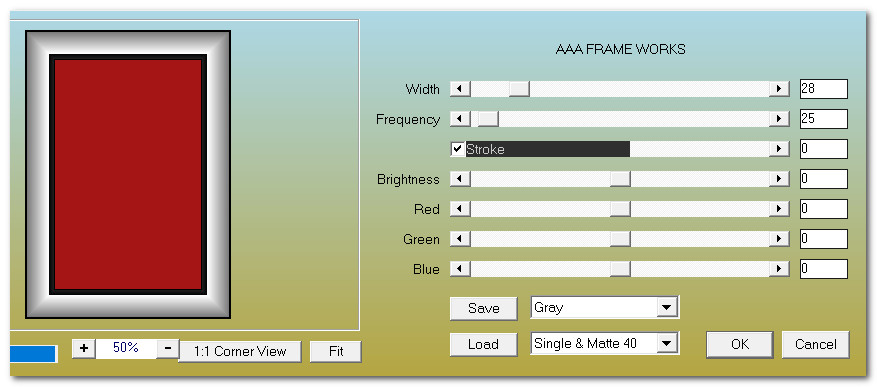
7. Effects/AAA Frames/AAA Frame Works. Deselect.
8. Effects/3D Effects/Drop Shadow. Vertical 10, Horizontal 10, Opacity 50, Blur 25, color #000000.
9. Effects/3D Effects/Drop Shadow. Vertical -10, Horizontal -10, Opacity 50, Blur 25, color #000000.
10. Using Move tool, move rectangle into upper right corner leaving a space at the top and right side.
11. Layers/New Raster Layer. Flood fill with Foreground color #ffffff.
12. Open the masques-495-franiemargot.jpg on your workspace. Go to working image. Layers/New Mask Layer/From Image. From drop down choose the masques-495-franiemargot. Click OK.

13. Right click in Layers Palette/Merge/Merge Group.
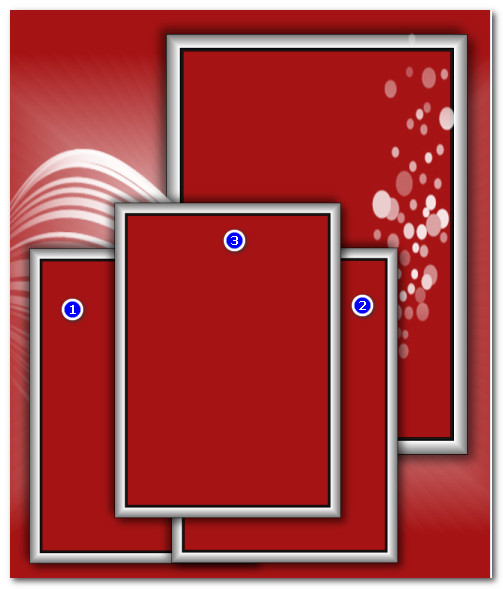
14. Duplicate/Merge/Merge Down.
15. Drop down to Raster 2 and duplicate. Resize/Resize by 75%/Resize all layers unchecked.
16. Place in bottom left corner leaving a space on left side and bottom. Layers/Arrange/Bring to Top.
17. Duplicate and place over the right side of first duplication.
18. Duplicate again and place over the first two duplications. See below for placements of rectangles.
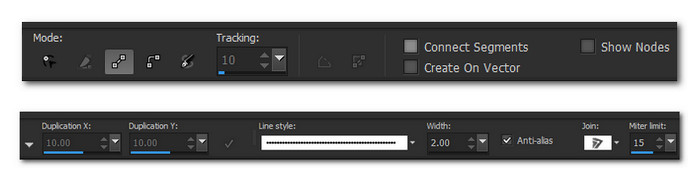
19. Using the Selections tool set to Type: Rectangle/Mode: Add(Shift)/Feather 0, draw a narrow selection for the sign at the top inside the first rectangle. See example below.
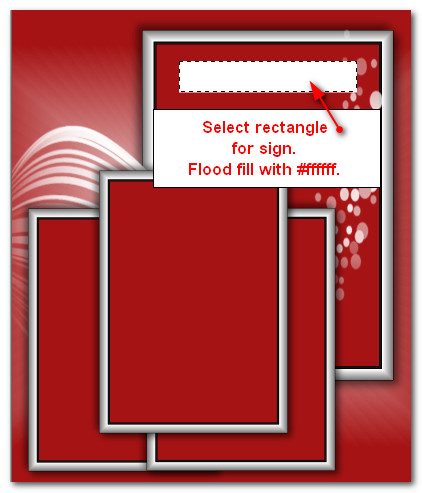
20. Layers/New Raster Layer. Flood fill with Foreground color #ffffff.
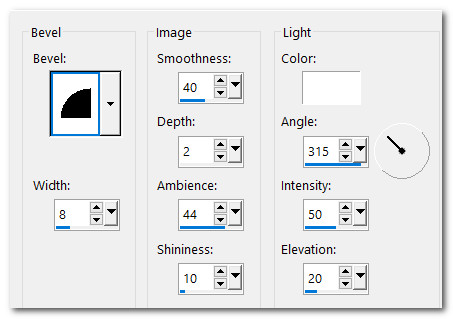
21. Effects/3D Effects/Inner Bevel. Deselect.
22. Effects/3D Effects/Drop Shadow. Vertical -10, Horizontal -10, Opacity 50, Blur 25, color #000000.
23. Using Pen Tool from Tool bar, select Line Style Dotted_4/Width: 2.00 Foreground color set to #fffff. See settings and example below. Click first node below black inner frame, then a second click on the white sign. Repeat on other side so sign is hanging from "ropes". Convert to Raster Layer.
24. Effects/3D Effects/Drop Shadow. Vertical -10, Horizontal -10, Opacity 50, Blur 25, color #000000.
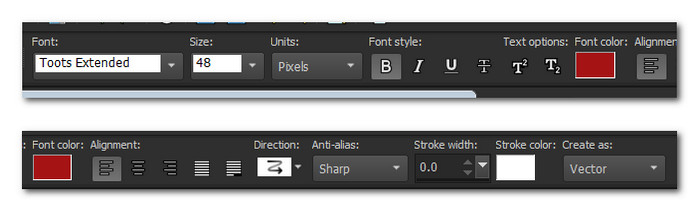
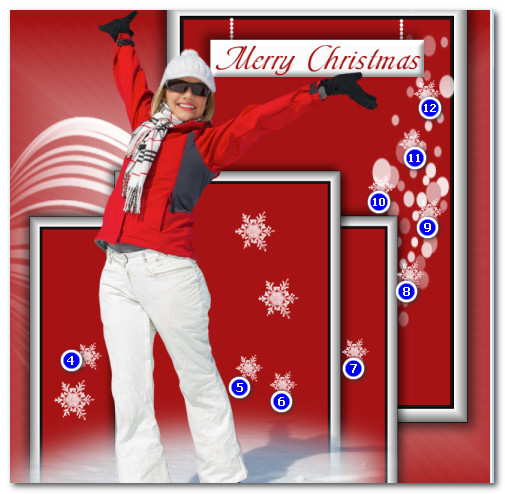
25. From tool bar select the Text tool set to these settings. Using Font Toots Extended/Size 48 Bold, Stroke width: 0.0, Kerning 25, color #a61516, Type out the words "Merry Christmas". Convert to Raster Layer.
26. Place and center the text on the white sign.
27. Open MR_Joie de l'Hiver.png. Using the Selections tool set to Type:Rectangle/Mode Add (Shift)/Feather 0 and surround Maryse's watermark, delete. Deselect.
28. Effects/3D Effects/Drop Shadow. Vertical 10, Horizontal 15, Opacity 50, Blur 30, color #000000.
29. Copy/Paste on working image as New Layer. Move lady to left side of image. Adjust/Sharpness/Sharpen.
30. Layers/New Raster Layer.
31. From Tool bar select the Paint Brush tool/Snowflake31 set to Size 75. Using Foreground color #ffffff, stamp as shown below.

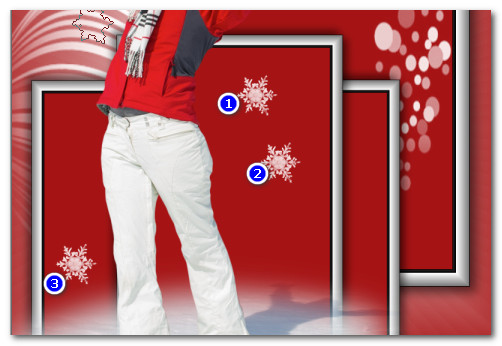
32. Change size of Snowflake31 to 50 and stamp 4-12 times using above settings.
33. Adjust/Sharpness/Sharpen.
34. Effects/3D Effects/Drop Shadow. Vertical 2, Horizontal 8, Opacity 50, Blur 6, color #000000.
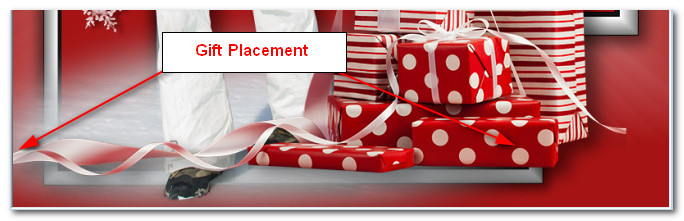
35. Open Deco_noel_rouge_by_CibiBijoux.pspimage. Copy/Paste as New Layer.
36. Place gifts in bottom right corner having ribbon so it is touching the left side of image. Leave space at the bottom.
37. Adjust/Sharpness/Sharpen.
38. Effects/3D Effects/Drop Shadow. Vertical 10, Horizontal 15, Opacity 50, Blur 30, color #000000.
39. Image/Add Border/Add 10px border, Symmetric checked, color #ffffff.
40. Effects/AAA Frames/Frame Works.
41. Place your watermark and save as .jpg file called Merry Christmas image. COPY.
42. Open Animation Shop. Paste as New Animation in its workspace.
43. Duplicate image until you have 36 frames. (You might find the duplication icon in the tool bar at the top helpful in duplicating.)

44. Highlight the first frame. Edit/Select All.
45. File/Open Arassnowimage.gif. Highlight the first frame. Edit/Select All.
46. Left click on the top blue section/Copy.
47. Go back to the Animation image. Right click/Paste/Paste/Into Selected Frame. Hover the snowflakes inside the upper left frame of image. Left click to set into place. Repeat for the upper right side and then bottom left and bottom right side.
48. Click on the View Animation and check if your snow is falling correctly and inside the frame. If so then we will now save our work.
49. File/Save As. The SaveAs box will appear. Save in: (Your Merry Christmas folder). File name: Name it Merry Christmas. Save as type: Leave it set to save as a .gif file. Click Save.
50. As the boxes appear and change, click Next, Next, Next then Finish.
You are now done with your Christmas animated tutorial. MERRY CHRISTMAS TO ALL WHO WORK THIS TUTORIAL. May your new year be a blessed one!
Thank you PamelaD for your faithfulness in testing my tutorials. December 2022.
If you are going to use this tutorial for stationery, cards or place the tutorial/tag on another site, I would appreciate you contacting me for permission, giving Arasimages credit for the original tutorial and if possible, a link back to my site. Thank you.
Copyright © Arasimages All Rights Reserved