
For this tutorial you will need the materials in the zip file below.

For a German, Dutch, Spanish, Italian and French translation click on the flags.


Create a folder on your desktop named Solitude. Unzip the materials zip file into this folder. Export the Bokeh_33 brush into your PSP Files/Brushes folder. If you don't have the Sloop Script Three and Segue UI Light in your PSP then install them. Place the MD-mask-418a in your PSP Files/Masks folder. Place the Cherokee-Christmas_Tree.cfg file in your PSP Files/Plugins/Dragonfly/SinedotsII folder. I have used the plugins AAA Frames/Texture Frame and Dragonfly/SinedotsII in this tutorial as well as effects of PSP. I used PSP 2019 for creating. To work this tutorial, it is assumed you have some working knowledge of Paint Shop Pro.
Thanks go to Wieskes and K@rine_dreams for their tubes used in this tutorial .
Use the arrow below to mark your place along the way.

1. In Materials Palette, set the Foreground to color #ffffff, Background color to #831100.
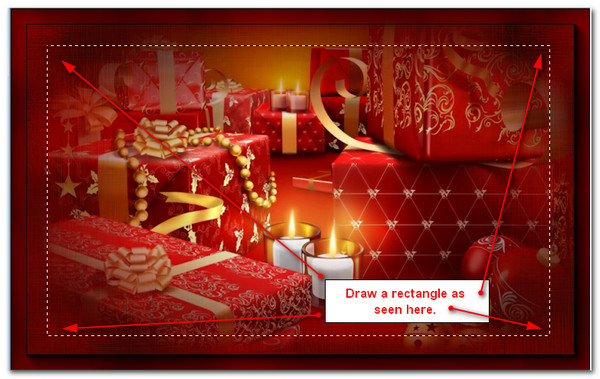
2. Open _k@rine_dreams_Misted_Christmas_2679_Decembre_2013.pspimage. Copy/Paste as New Image. Close original.
3. On New Image draw a rectangle inside the black line as seen below.
4. Adjust/Blur/Gaussian Blur. Radius set to 19.
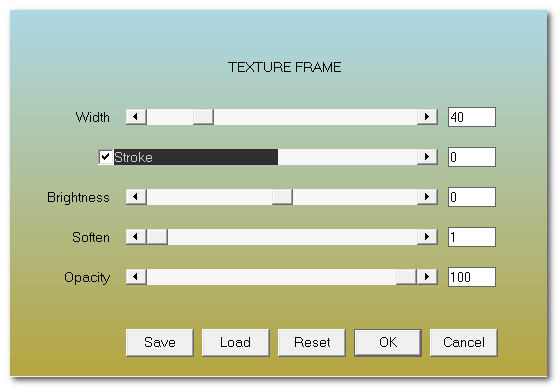
5. Effects/AAA Frames/Texture Frame.
6. Selections/Selections None. Duplicate.
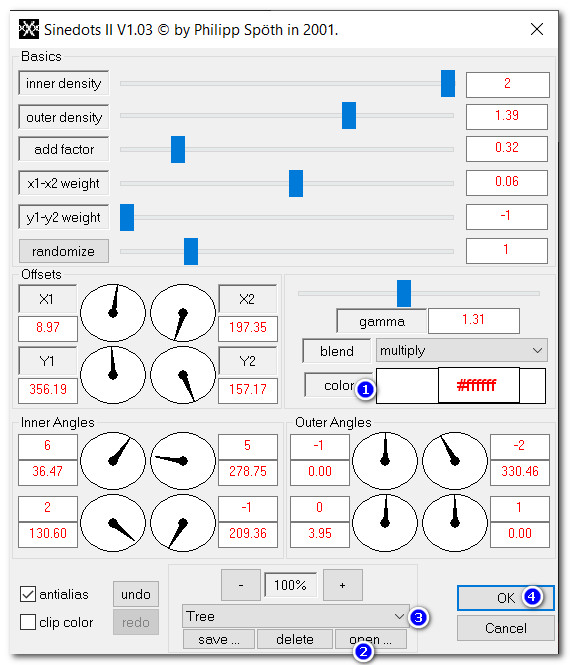
7. Effects/Dragonfly/SinedotsII. Click on Open. Browse to SinedotsII folder/click on Cherokee-Christmas_Tree.cfg file to open. Under drop down arrow select Tree. Click OK.
8. Image/Resize/Resize by 60%/Resize all layers unchecked.
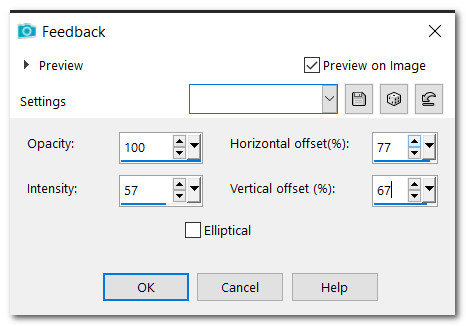
9. Effects/Reflections Effects/Feedback. Adjust placement in right bottom corner if necessary.
10. Layers/New Raster Layer. Flood fill with Background color #831100.
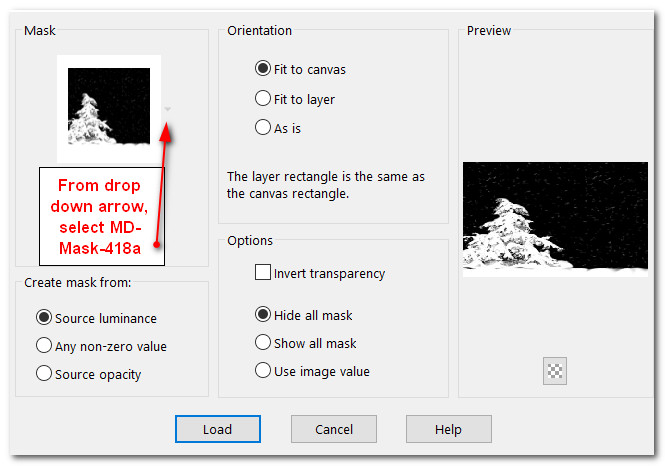
11. Layers/Load/Save Mask. Load Mask from Disk. Find MD-Mask-418a. Load.
12. Merge/Merge Group.
13. Effects/3D Effects/Drop Shadow. Vertical -14, Horizontal -14, Opacity 50, Blur 18, color #000000.
14. Effects/Edge Effects/Enhance.
15. Layers/New Raster Layer.
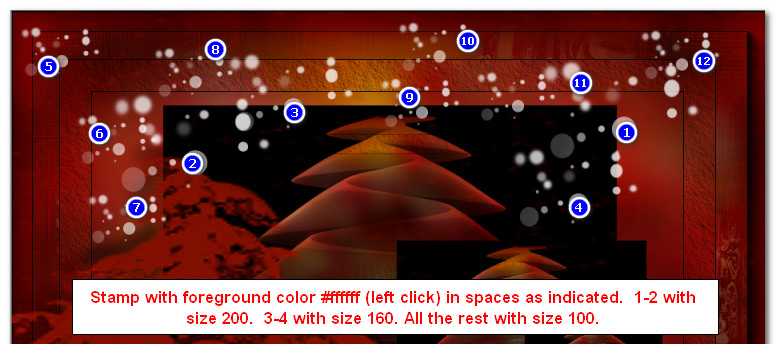
16. From the tool bar select the Paint Brush tool. Find the Bokeh_33 brush, set as seen below. Left click in two places as seen in snapshot below next two steps.
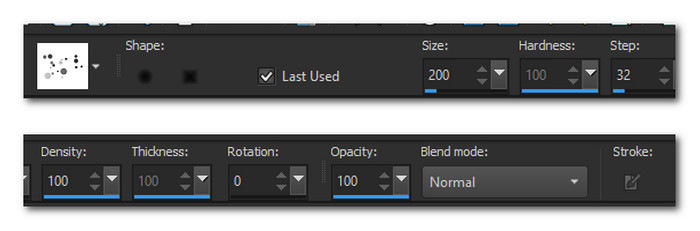
17. Change size of brush to 160, leaving all other settings the same. Left click in two more places as indicated in snapshot below next step.
18. Change size of brush to 100, leaving all other settings the same. Left click in several other places as indicated in snapshot below.
19. Effects/Edge Effects/Enhance.
20. Merge/Merge Visible. Duplicate. Image/Resize/Resize by 36%/Resize all layers unchecked.
21. Using Magic Wand set to Add(Shift), Match mode: None, Tolerance null, Feather 0. Click on resized image to activate.
22. Layers/New Raster Layer. Flood fill with Foreground color #ffffff.
23. Selections/Modify/Contract by 1px, press Delete key, click OK. Deselect.
24. Merge/Merge Down.
25. Move into bottom left corner.
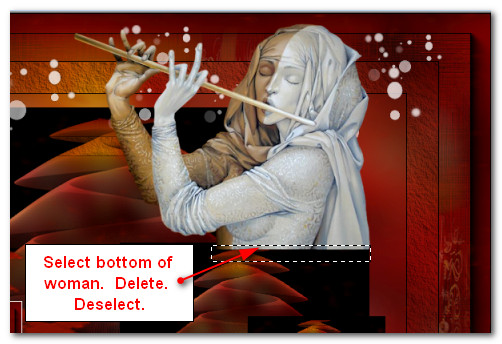
26. Open wieskes tube 158.png. Select Wiesken watermark/Delete/Deselect.
27. Image/Resize/Resize by 69%/Resize all layers unchecked.
28. Copy/go to working image and Paste as New Layer.
29. Move pipe playing lady to upper right corner over feedback of trees.
30. Set her in place over second tree. Using Select tool, select around the bottom excess of woman as seen below. Delete. Deselect.
31. Effects/3D Effects/Drop Shadow. Vertical -14, Horizontal -14, Opacity 50, Blur 18, color #000000.
32. Adjust/Sharpness/Sharpen.
33. Duplicate. Image/Mirror. Mirror Horizontal.
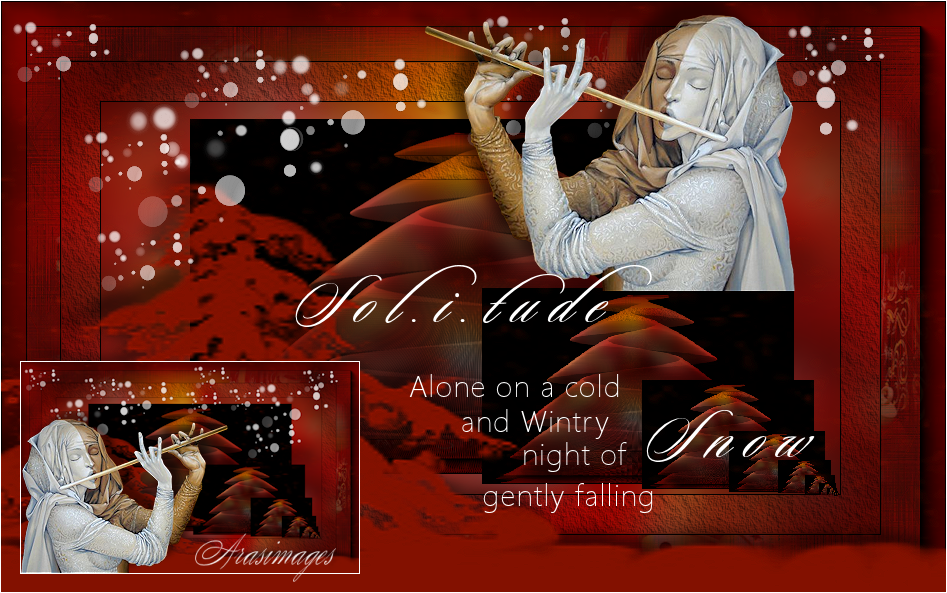
34. Image/Resize by 56%. Place in bottom left corner of rectangle inside white border.
35. Adjust/Sharpness/Sharpen.
36. In Materials Palette, switch Foreground color with Background color by clicking on small double arrows.
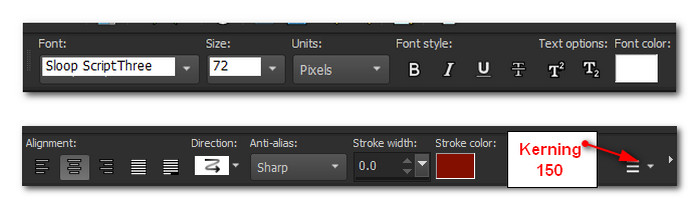
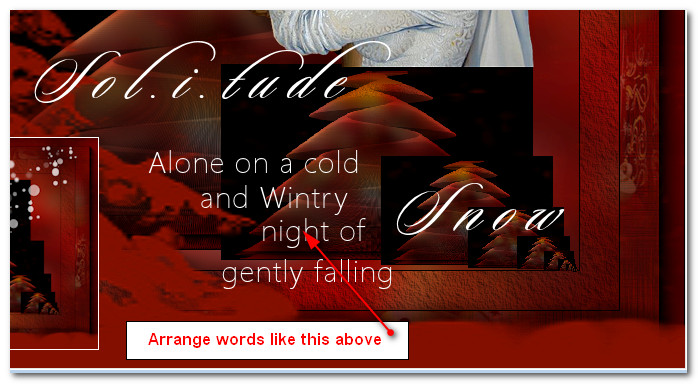
37. From tool bar select the Text tool. Set to Sloop Script Three/Size 72,Stroke width: 0.0, Kerning 150/Color #ffffff.
38. Type out the word "Sol.i.tude". Convert to Raster Layer.
39. Objects/Align/Center of Canvas.
40. Type out the word "Snow". Convert to Raster Layer. Place over bottom two feedback trees.
41. Change Font to Segoe UI Light, size 30, Kerning 25, all other settings remain the same as above.
42. Type out the words "Alone on a cold". Convert to Raster Layer. Place below Sol.i.tude word.

43. Type out the words "and Wintry". Convert to Raster Layer. Place below "Alone on a cold".
44. Type out the words "night of". Convert to Raster Layer. Place below "and Wintry".
45. Type out the words "gently falling". Convert to Raster Layer. Place below "night of". Adjust all words so they appear as seen below.
46. Image/Add Borders/Add Border 1px, Symmetric checked, color #ffffff.
47. Sign your name or place watermark and save as .jpg or .png file.
Thank you PamelaD for your faithfulness in testing my tutorials. December 2022.
If you are going to use this tutorial for stationery, cards or place the tutorial/tag on another site, I would appreciate you contacting me for permission, giving Arasimages credit for the original tutorial and if possible, a link back to my site. Thank you.
Copyright © Arasimages All Rights Reserved