
The Others
For this tutorial you will need the materials in the zip file below.

For an Italian, French, Spanish, German and Dutch translation click on the flags.


Create a folder on your desktop named The Others. Unzip the Materials in to this folder. I have used the plugins AAA Frames/Texture and AlienSkin Xenofex 2/Burned Edges along with effects of PSP. Export the Smoke 143 brush into your PSP Files/Brushes folder. This tutorial was written using PSP2020. To work this tutorial, it is assumed you have some working knowledge of Paint Shop Pro.
Thanks go to Cibi for her lovely tubes. Also thanks to Narah for use of her Mask.
Use the bookmark below to mark your place along the way.

1. In Materials Palette set Foreground to #ffe4a8, Background to #221b13.
2. File/New/New Image 760px by 560px. CTRL+A to select all.
3. Open Sunset_Bianca_CibiBijoux.pspimage. Copy bottom layer (back)/Paste/Paste into Selection on working image. CTRL+D.
4. Effects/AAA Frames/Texture Frame.
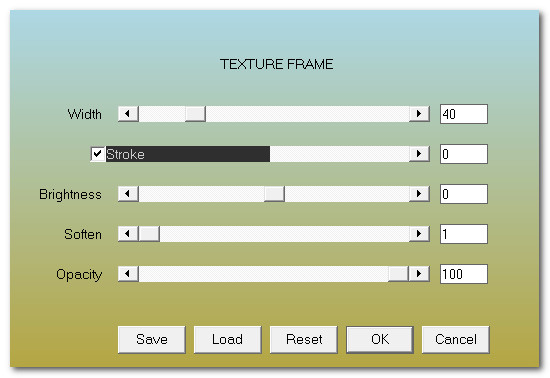
5. Repeat Texture Frame.
6. Image/Mirror. Mirror Horizontal.
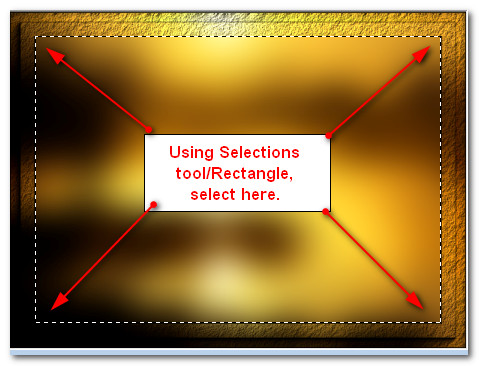
7. From Selections tool choose Selection/Rectangle/Add(Shift)/Feather 0. Draw a selected rectangle within the center lines.
8. Layers/New Raster Layer. Flood fill inside selection with Foreground color #ffe4a8.
9. Drop Opacity down to 50. Layers/New Raster Layer.
10. Using Sunset_Bianca_CibiBijoux.pspimage, copy center layer. Paste/Paste into Selection.
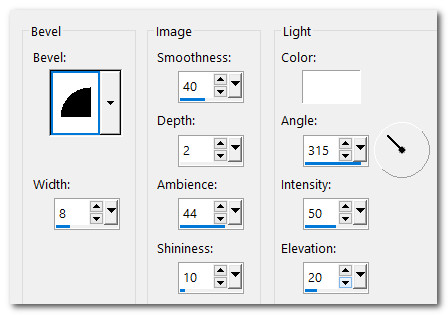
11. Merge/Merge Down. Effects/3D Effects/Inner Bevel.
12. Effects/3D Effects/Drop Shadow. Vertical -15, Horizontal -15, Opacity 48, Blur 36, color #000000.
13. Effects/3D Effects/Drop Shadow. Vertical 15, Horizontal 15, Opacity 48, Blur 36, color #000000.
14. CTRL+D. Layers/New Raster Layer. Flood fill with Foreground #ffe4a8.
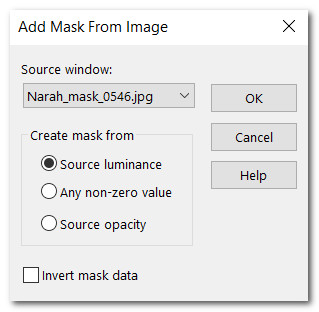
15. Open Narah_mask_0546.jpg and leave open on your desktop.
16. Layers/New Mask Layers/From Image. When the Add Mask From Image box appears, from the drop down arrow select the name of the Mask you have open on your desktop. Click OK.
17. Merge/Merge Group.
18. Effects/Edge Effects/Enhance.
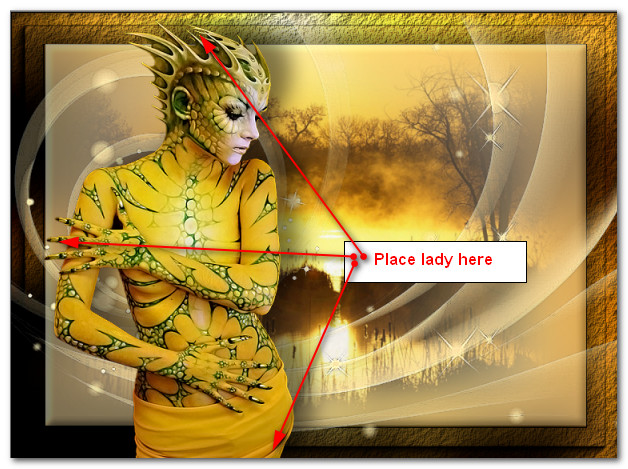
19. Open Beauty_lizard_CibiBijoux.pspimage. Image/Mirror. Mirror Horizontal.
20. Copy/Paste/Paste as New Layer.
21. Image/Resize/Resize by 68%/Resize all layers unchecked.
22. Effects/3D Effects/Drop Shadow. Vertical -15, Horizontal 26, Opacity 48, Blur 36, color #000000.
23. Adjust/Sharpness/Sharpen.
24. Place lady in left side of image.
25. Paste as New Layer again. Image/Resize/Resize by 12%/Resize all layers unchecked.
26. Place resized lady to the left of the trees. Lower Opacity down to 60.
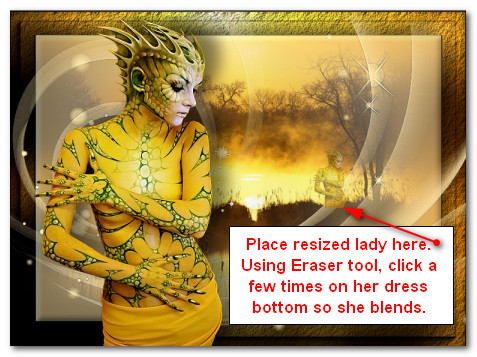
27. Using Eraser tool set to Size 25, click a few times on the bottom of her dress so it blends with weeds.

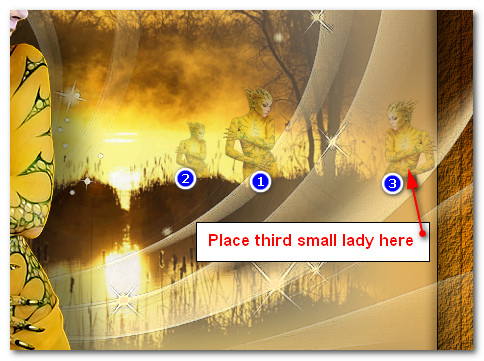
28. Duplicate. Image/Resize/Resize by 60%/Resize all layers unchecked.
29. Lower Opacity down to 48. Place lady to left of first lady.
30. Duplicate Raster 4 lady (lady by trees). Image/Mirror. Mirror Horizontal.
31. Drop Opacity to 48. Place her far to the right as shown here.
32. Image/Add Borders/Add 3px border, Symmetric checked, color #ffe4a8.
33. Image/Add Borders/Add 3px border, Symmetric checked, color #221b13.
34. Image/Add Borders/Add 33px border, Symmetric checked, color #ffe4a8.
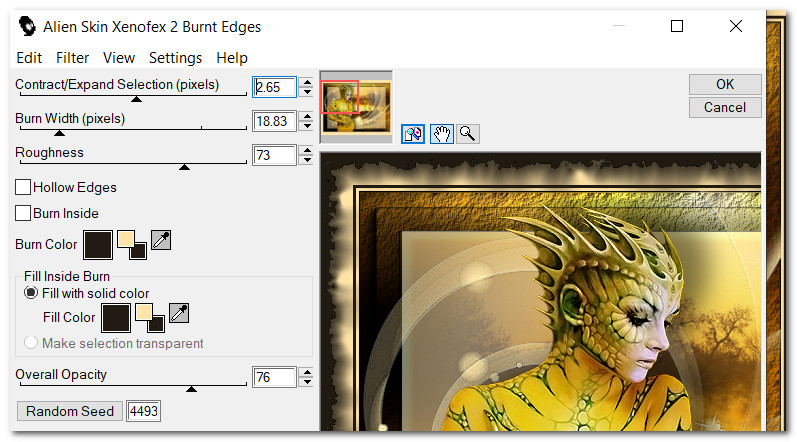
35. Effects/Alien Skin Xenofex 2/Burnt Edges.
36. From the tool bar select the Text Tool. Select Font Classic AltCaps/Size 48/Color #221b13/Stroke width: 0.0/Kerning 25. Type out the words "The Others".

37. Convert to Raster Layer. Move into bottom right corner.
38. Effects/3D Effects/Drop Shadow. Vertical 1, Horizontal 1, Opacity 50, Blur 23, color #221b13.
39. Adjust/Sharpness/Sharpen.
40. Sign your name, Merge/Merge Visible and save as a .jpg file named The Others.
41. Animation directions: Duplicate the image 5 times until you have 6 layers in all. Rename (number) the layers starting at bottom from Raster 1 to Raster 6. Close the eye of all layers except Raster 6.
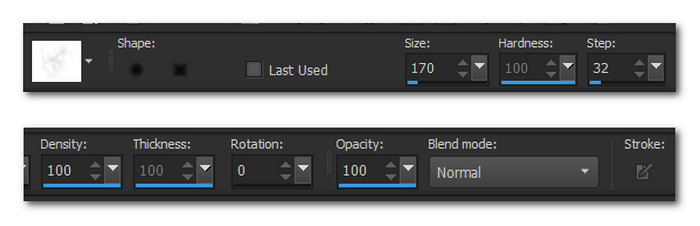
42. From tool bar select Paint Brush tool. Set Foreground color to #ffffff. Find Smoke 143 and set the size to 170. Leave all other settings at default.
43. Working on the top Raster 6 with Smoke set to 170, stamp across the top of the pond a few times, omitting the ladies.
44. Close off top Raster 6. Move down to Raster 5/open eye. Change size of Smoke to 140. Stamp a few times across the top of the pond again.
45. Close off Raster 5. Move down to Raster 4 /open eye. Change size of Smoke to 125. Stamp a few times across the top of the pond again.
46. Close off Raster 4. Move down to Raster 3 /open eye. Change size of Smoke to 100. Stamp a few times across the top of the pond again.
47. Close off Raster 3. Move down to Raster 2 /open eye. Change size of Smoke to 90. Stamp a few times across the top of the pond again.
48. Close off Raster 2. Move down to Raster 1 /open eye. Change size of Smoke to 70. Stamp a few times across the top of the pond again.
49. Open all layers. File/Save As. Save as PSP Animation Shop (*psp).
50. Open Animation Shop. File/Open the PSP Animation Shop file you just saved.
51. Click within first frame. Edit/Select All.
52. From the top tool bar choose Animation/ Frame Properties. Set from 10 to 30.
53. In the top tool bar click on View Animation. Check to see if you like your animation. If not, you can go back to PSP and redo it and try again. If you do like it, then we will now save your work.
54. File/Save As. When the Save As box appears, give your work the name The Others. Designate where it will be saved (your working folder on desktop) and leave the type as (*gif). Click Save.
55. Several boxes will appear. On each one click Next until you come to the last one which says Finish. Click on Finish and your image is now saved in your working folder.
56. All done! I hope you enjoyed creating your own animation on an image.
Thank you dear PamelaD for your faithfulness in testing my tutorials. February 2023
If you are going to use this tutorial for stationery, cards or place the tutorial/tag on another site, I would appreciate you contacting me for permission, giving Arasimages credit for the original tutorial and if possible, a link back to my site. Thank you.
Copyright © Arasimages All Rights Reserved