
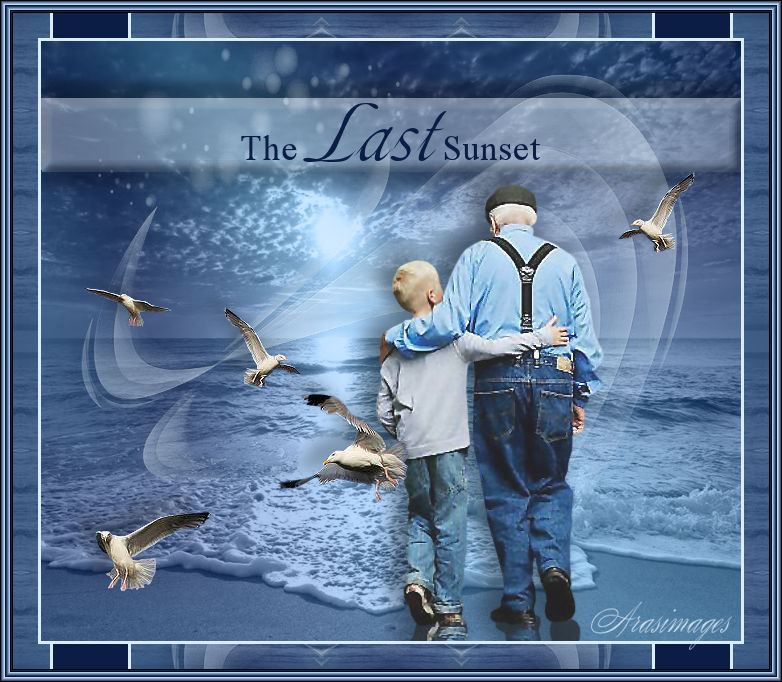
The Last Sunset
For this tutorial you will need the materials in the zip file below.

For a French, Spanish, Italian, German and Dutch translation click on the flags


Create a folder on your desktop named The Last Sunset. Unzip the Materials into this folder. I have used the plugins DSB flux/Radial warp, AAA Frames/Frame Works and DC/Perssian Rug along with effects of PSP. Place the Selection in your PSP Files/Selections folder. Install Font Toots Extended.ttf. *For those who are not used to taking short cuts, I use CTRL+A for Selections/Select All, CTRL+C for Copy, CTRL+V for Paste and CTRL+D for Deselect. I will use some in this tutorial.* This tutorial was written using PSP2019. To work this tutorial, it is assumed you have some working knowledge of Paint Shop Pro.
Thanks go to anna.br and pspcreationart.nl for their lovely tubes. Also thanks to Narah for use of her Mask.
Use the bookmark below to mark your place along the way.

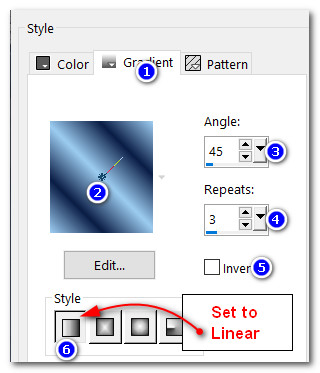
1. In Materials Palette set Foreground to #9cccf1, Background to #0b1d45. Set Foreground to Gradient/Corel_06_029. Set to Linear/Gradient/Angle 45/Repeats 3/Invert unchecked.
2. File/New/New Image 700px by 600px. Flood fill with gradient.
3. Adjust/Blur/Gaussian Blur. Radius set to 33.
4. Effects/DSB Flux/Radial Warp.

5. Layers/New Raster Layer. CTRL+A. (Remember, this selects all).
6. Open 11043427_842966885740134_4274344447563727571_o.png of background. Copy/Paste into Selection. CTRL+D. I used my Clone tool on the upper right corner name. I left it on the original however.
7. Set Blend Mode to Luminance (Legacy), Drop Opacity down to 67.
8. Layers/New Raster Layer. Set Foreground to new color #dcedfa and flood fill new raster layer.
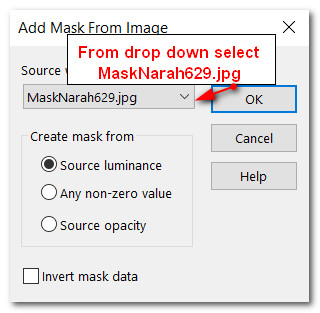
9. Layers/New Mask Layer/From Image. From drop down arrow select MaskNarah629.jpg. Click OK to apply.
10. Merge/Merge Group. Drop Opacity down to 56.
11. Adjust/Sharpness/Sharpen. Move upward a little bit.
12. Layers/New Raster Layer.
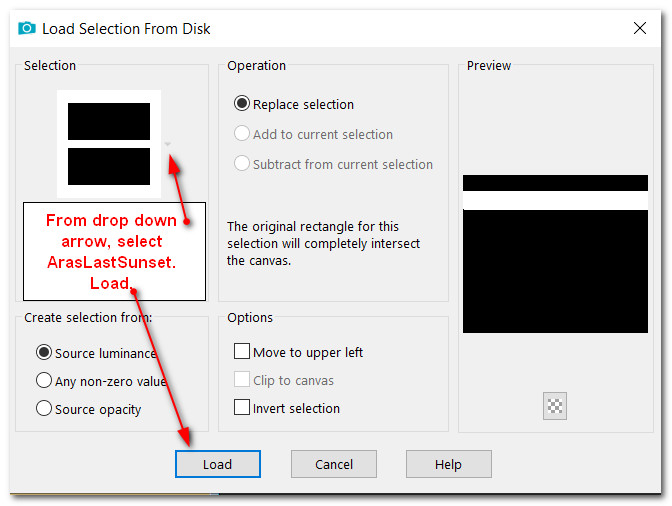
13. Selections/Load/Save Selection. Load Selection from Disk. From drop down arrow select ArasLastSunset selection. Load.
14. Flood fill with Foreground color. Drop Opacity down to 40.
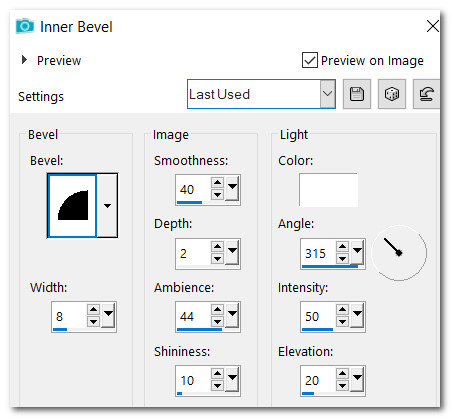
15. Effects/3D Effects/Inner Bevel. Repeat Inner Bevel. CTRL+D.
16. Effects/3D Drop Shadow. Vertical -15, Horizontal 0, Opacity 40, Blur 15, color #000000.
17. Effects/3D Drop Shadow. Vertical 15, Horizontal 0, Opacity 40, Blur 15, color #000000.
18. From tool bar select Text tool. Find font Toots Extended. Set to Size 72. Stroke 0.0/Kerning 25.

19. Change the font to Times New Roman, Size 36. To the left of first word, type out the word "The". Convert to Raster Layer.

20. Using same settings as above and to the right of first word, type out the word "Sunset". Convert to Raster Layer.
21. Try to arrange the words equal distance from each other. Place the words as you see them below. Merge Down Twice.
22. To center them Objects/Align. Horizontal Center.
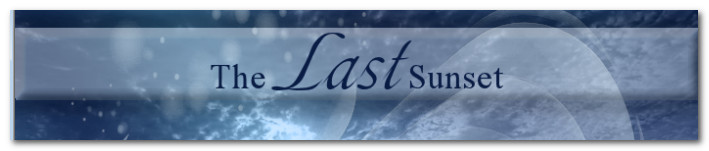
23. Open Elly_jongenenman_116_2020-vi.png of old man and boy. Using Selections tool set to Rectangle, Feather at 0, Mode to Add(Shift), select around the boy and man. Copy. On a blank space on your workspace, Paste as New Image.
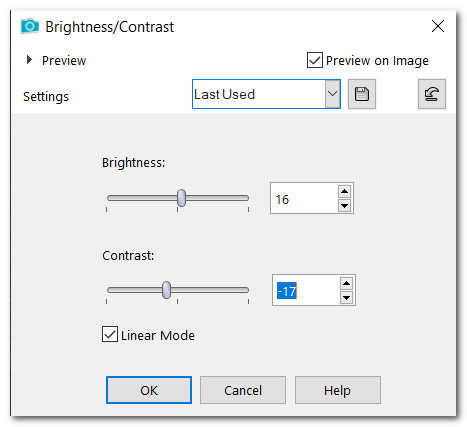
24. To give more clarity to the old man and boy tube, use Adjust/Brightness and Contrast.
25. Working on the old man and boy image, duplicate then apply Image/Mirror. Mirror Vertical.
26. Pull duplicated layer downward until their shoes touch. Drop Opacity down to 75. Merge Down.
27. Effects/3D Effects/Drop Shadow. Vertical -7, Horizontal -15, Opacity 40, Blur 30, color #000000.
28. Copy/Paste as New Layer on the main working image.
29. Place them toward the right side of image as you see here.
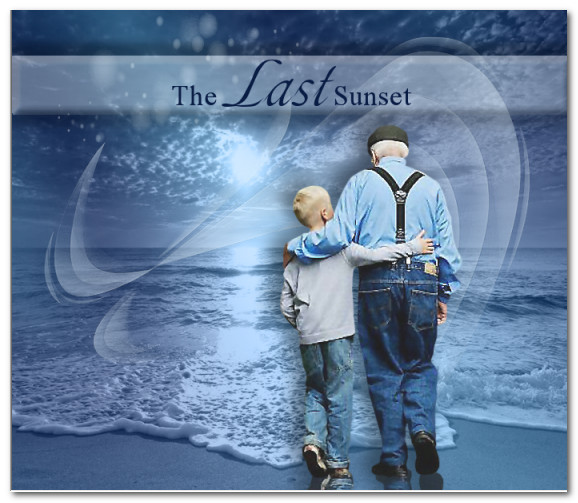
30. Open anna.br-gaivotas-22-10-10.pspimage of Seagulls. Use Selections tool set to Rectangle/Add (Shift)/Feather 0 on all seagulls you will select.

31. Select the first seagull from top left. Copy. (CTRL+D to deselect selection). Go back to main working image/Paste as New Layer.
32. Place first Seagull in bottom left corner.
33. Go back to the seagull tube. Select the top right corner seagull. Copy then CTRL+D. Paste as New Layer on main working image. Place seagull to the left of little boy's shirt bottom.
34. Go back to seagull tube. Select around center top two seagulls. Copy then CTRL+D. Paste as New Layer on Main working image.
35. Pull into right side of working image so only left seagull shows between old man's shoulder and right edge.
36. Duplicate. Image/Mirror. Mirror Horizontal. Place seagulls in center left at horizon of working image.
37. See snapshot below where seagulls should be placed. Merge/Merge Down 3 times so all seagulls are on one layer.
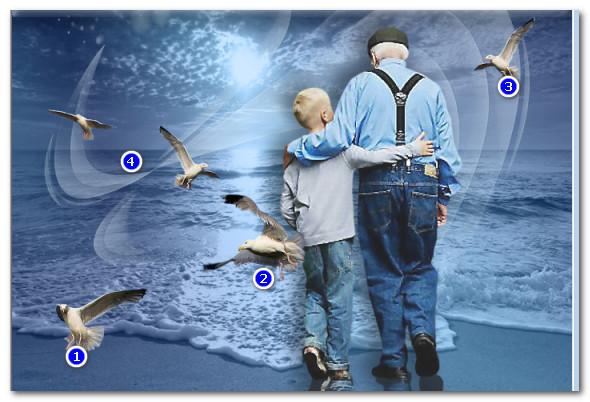
38. Effects/3D Effects/Drop Shadow. Vertical -13, Horizontal -16, Opacity 31, Blur 24, color #000000.
39. Adjust/Sharpness/Sharpen.
40. Image/Add Borders/Add 3px border, Symmetric checked, color #dcedfa.
41. Image/Add Borders/Add 38px border, Symmetric checked, color #0b1d45.
42. Using Magic Wand select 38px border.
43. Effects/DC/PerssianRug. Apply.

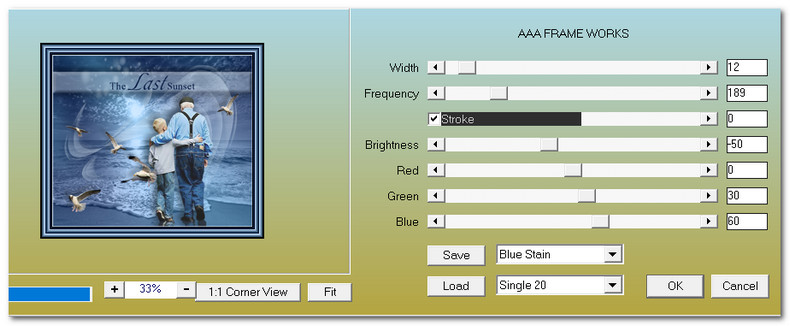
44. Effects/AAA Frames/Frame Works. CTRL+D.
45. Sign your name or leave your watermark. Save/Save as .jpg or .png file.
Thank you dear PamelaD for your faithfulness in testing my tutorials. March 2023
If you are going to use this tutorial for stationery, cards or place the tutorial/tag on another site, I would appreciate you contacting me for permission, giving Arasimages credit for the original tutorial and if possible, a link back to my site. Thank you.
Copyright © Arasimages All Rights Reserved