

African Love
For this tutorial you will need the materials in the zip file below.

For a Spanish, Italian, French, German and Dutch translation click on the flags.


This tutorial was written using PSP 2020 Ultimate. To work this tutorial, it is assumed you have some working knowledge of Paint Shop Pro. Export the Grass7.PspBrush into your Custom Brush Folder. Plugins used are Filter Forge/Filter Forge 6/Techno/Radial Ripples, Nik Software/Color Efex 4 Pro and effects of PSP.
Thanks go to Saphiere_GraphicDream_Tubes_Elephants and Arasimages for grasses. Other tubes used are not identified. If this is your tube, please let me know and I'll be happy to give you credit.
Use the bookmark below to mark your place along the way.

1. In Materials Palette set the Foreground to color #c96e15, Background to color #594329. Create a Gradient using these colors, set to Sunburst, Angle and Repeats to 0, Center and Focal Points all at 50, Invert unchecked and Gradient set to Corel_06_029 foreground-background.

2. File/New/New Image 750px by 660px. Flood fill with Gradient. Duplicate.
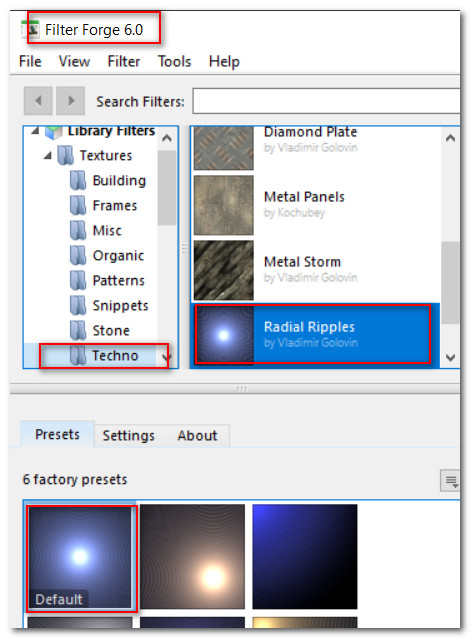
3. Effects/Filter Forge/Filter Forge 6/Techno/Radial Ripples. Apply.
4. Adjust/Blur/Gaussian Blur. Set Radius to 21.
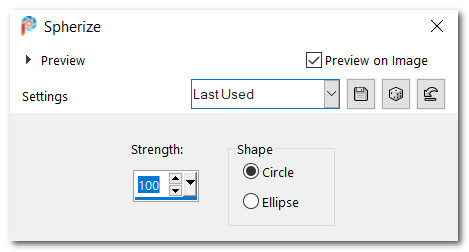
5. Effects/Geometric Effects/Spherize. Repeat.
6. Set Blend Mode to Luminance (L) legacy.
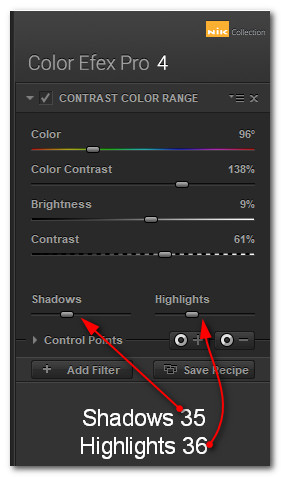
7. Effects/Nik Collection/Color Efex Pro 4. Use Contrast Color Range set to settings below.
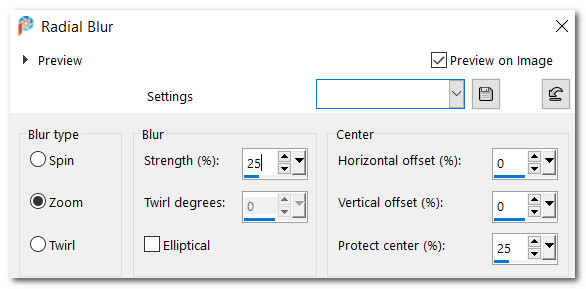
8. Adjust/Blur/Radial Blur.
9. Open FreshGrassesE.pspimage. Copy freshgrasses/Paste as New Layer.
10. Adjust/Hue and Saturation/Hue/Saturation/Lightness. Apply to grasses.

11. Place in bottom right corner. Adjust/Sharpness/Sharpen.
12. Duplicate. Image/Mirror. Mirror Horizontal. Move into left bottom corner.
13. Open slide0045_image094.pspimage. Copy/Paste as New Layer.
14. Move to left side and center of image.
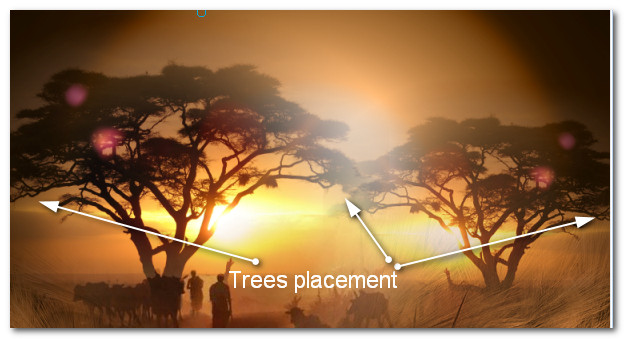
15. Open Tree.pspimage. Copy/Paste as New Layer.
16. Move tree to left side of image.
17. Duplicate. Image/Resize by 78%/Resize all layers unchecked.
18. Image/Mirror. Mirror Horizontal. Move to right side of image.
19. Set Opacity to 70.
20. Adjust/Sharpeness/Sharpen.
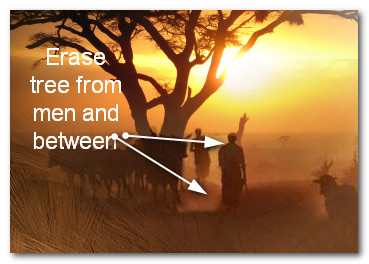
21. Highlight left tree layer. Using Eraser tool, erase tree from on top of men image.
22. Go back to top layer to continue.
23. Layers/New Raster Layer. Flood fill with color #fce7ae.
24. Open masque-511-franiemargot.jpg. Leave open on workspace.
25. Go back to working image. Layers/New Mask Layer/From Image. From drop down select the masque-511. Click OK.
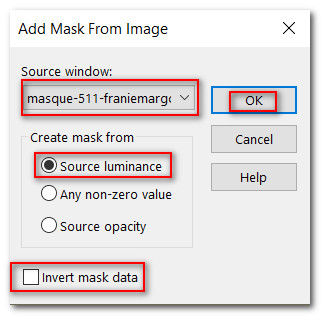
26. Merge/Merge Group.
27. Open Saphiere_GraphicDream_Tubes_Elephants_12.pspimage.
28. Copy/Paste as New Layer.
29. Place elephants at bottom and to the right in image.
30. Adjust/Sharpness/Sharpen.
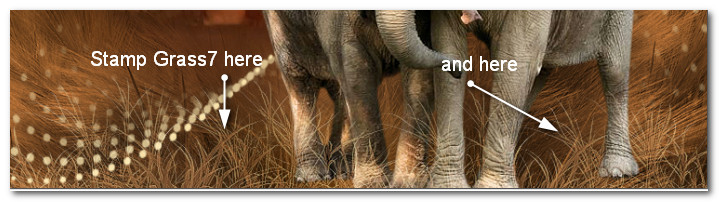
31. Layers/New Raster Layer.
32. From Paint Brush tool select Grass7 brush. Set to settings as seen below. Stamp 2 times using color #b5764f as seen below.

33. Effects/Edge Effects/Enhance.
34. Set Blend Mode to Screen, Opacity to 90.
35. Image/Add Borders/Add Border 3px, Symmetric checked, color #fbe6ad.
36. Image/Add Borders/Add Border 50px, Symmetric checked, color #b5764f.
37. Activate by clicking within the 50px with the Magic Wand. Layers/New Raster Layer.
38. Open BorderBG.png file. Copy/Paste/Paste Into Selection.
39. Effects/Edge Effects/Enhance. Deselect.
40. Image/Flip. Flip Vertical.
41. Image/Add Borders/Add Border 3px, Symmetric checked, color #fbe6ad.
42. Add your watermark or name and save as .jpg or .png.
Thank you PamelaD for checking this tutorial for me. May 2023.
If you are going to use this tutorial for stationery, cards or place the tutorial/tag on another site, I would appreciate you contacting me for permission, giving Arasimages credit for the original tutorial and if possible, a link back to my site. Thank you.
Copyright © Arasimages All Rights Reserved