
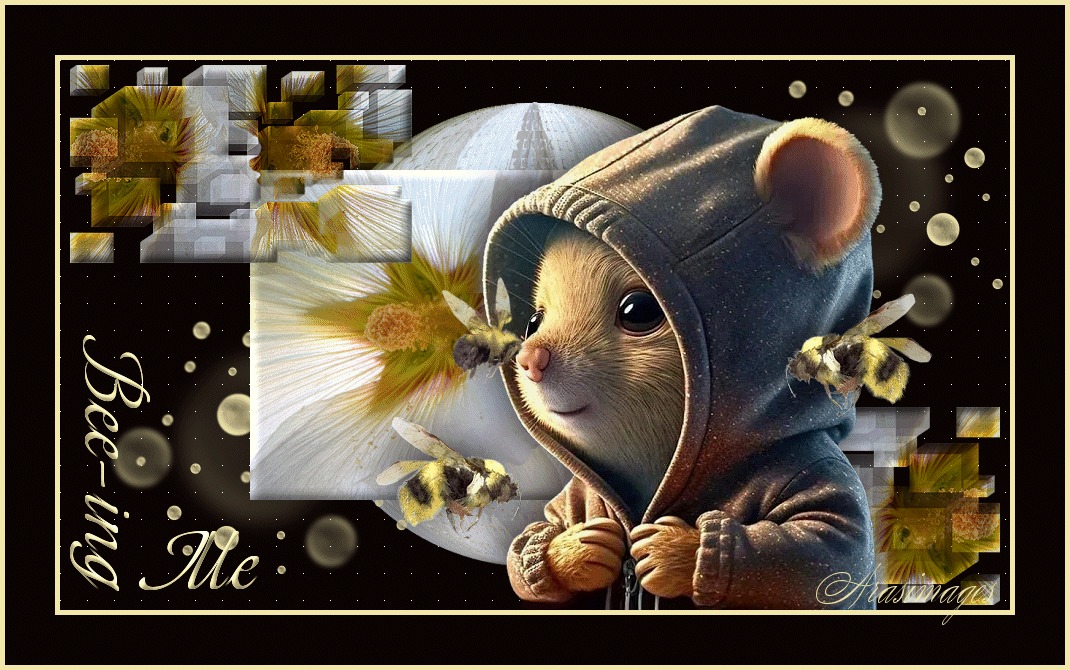
Bee-ing Me
For this tutorial you will need the materials in the zip file below.

For an Italian, French, Spanish, Dutch and German translation click on the flags.


This tutorial was written using PSP 2020 Ultimate. Place the Mask Cubes in your PSP/Masks Folder. Export the brush Bokeh Brushes_16 in your PSP/Brushes folder. Plugins used are Penta/Color Dot and effects of PSP program you use. Use the Font supplied either by leaving it open on your desktop when you use it or installing it into your PSP. It is assumed you have knowledge of PSP to work this tutorial.
Thanks go to Linda Youngblood for her wonderful talent of photography of the Hollyhock image from her garden. The original tube creator/Copyright holder for the Mousey and bees is unknown. If either of these are yours I would be happy to give you credit for them.
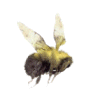
Use the little Bee below to mark your place along the way.
1. In Materials Palette set the Foreground to color #f2e7ab, Background to color #0b0403.
2. Create a New Image 950px by 550px. Flood fill with Background color #0b0403.
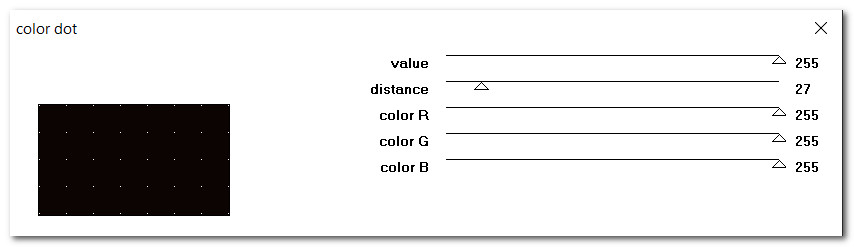
3. Effects/Penta/ColorDot.
4. Layers/New Raster Layer. Selections/Select All.
5. Open 363966579_1469704127120404_8620502763513250176_n.jpg image of white hollyhock. Copy/Paste into Selection. Deselect.
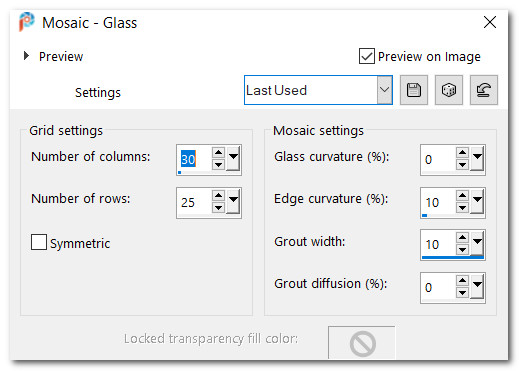
6. Effects/Texture Effects/Textures/Mosiac Glass.
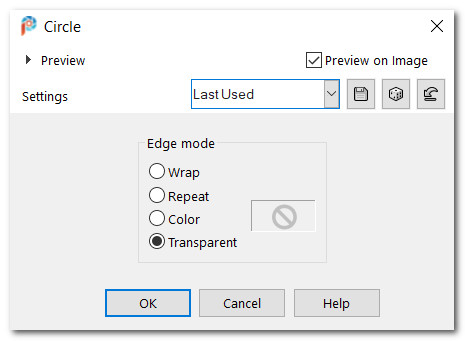
7. Effects/Geometric Effects/Circle.
8. Image/Resize/Resize by 85%/Resize all layers unchecked.
9. Layers/New Raster Layer. Selections/Select All.
10. Paste Into Selection once again the hollyhock.pspimage. Deselect.
11. Image/Resize/Resize by 60%/Resize all layers unchecked.
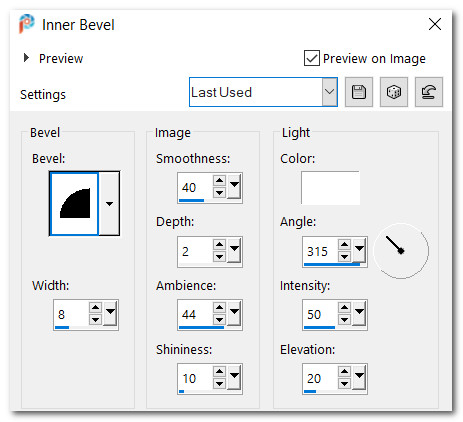
12. Effects/3D Effects/Inner Bevel.
13. Layers/New Raster Layer.
14. From tool bar select the Paint Brush tool. Select Bokeh Brushes_16 brush. Set it to settings below.

15. Left click in bottom left and upper right corners. Pull Bokeh dots layer down one layer. Go back to top layer, highlight.
16. Open hollyhock image again. Copy/Paste as New Layer.
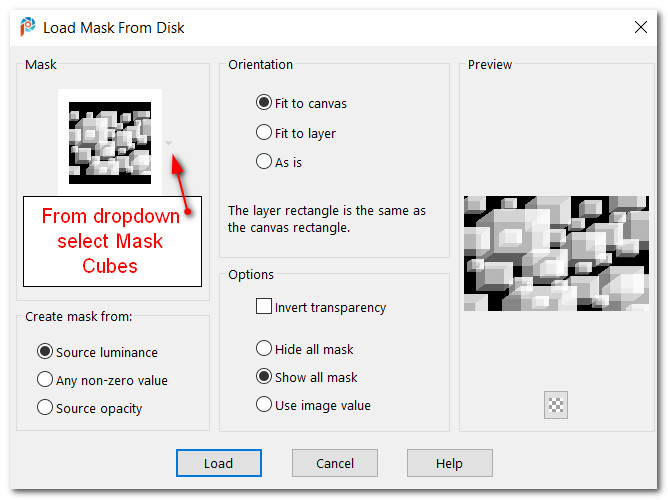
17. Layers/Load/Save Mask. Load Mask from Disk. Select Mask Cubes from Drop Down arrow. Load.
18. Merge/Merge Group. Resize by 60%/Resize all layers unchecked. Repeat.
19. Effects/3D Effects/Inner Bevel. Repeat.
20. Move mask cubes into top left corner.
21. Adjust/Sharpness/Sharpen.
22. Duplicate. Image/Mirror. Mirror Horizontal. Image/Mirror. Mirror Vertical.
23. Open Mousey.pspimage. Copy/Paste as New Layer.
24. Image/Resize/Resize by 73%/Resize all layers unchecked.
25. Move Mousey toward right side of image.
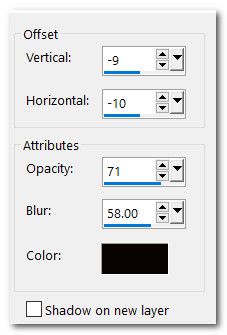
26. Effects/3D Effects/Drop Shadow. Vertical -9, Horizontal -10, Opacity 71, Blur 58, color #000000.
27. Adjust/Sharpness/Sharpen.
28. Open ArasBees.pspimage. Using the Selections tool set to Freehand Selection, Point to Point, Mode: Replace, Feather 0, select around bottom bee. Copy/Paste as New Layer. (Leave open and active as we will use it again soon).
29. Image/Resize/Resize by 73%/Resize all layers unchecked.
30. Adjust/Sharpness/Sharpen.
31. Effects/3D Effects/Drop Shadow. Vertical -9, Horizontal -10, Opacity 71, Blur 58, color #000000.
32. Move Bottom Bee to right side of image over the right side of Mousey's hoodie.
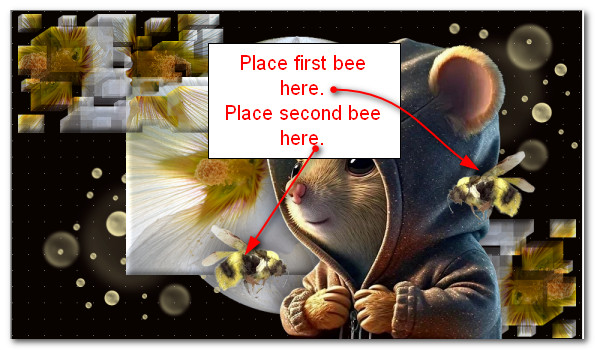
33. Go back to ArasBees.pspimage. Again Copy activated bottom bee. Paste as New Layer on working image.
34. Image/Resize/Resize by 73%/Resize all layers unchecked.
35. Image/Mirror. Mirror Horizontal.
36. Adjust/Sharpness/Sharpen.
37. Effects/3D Effects/Drop Shadow. Vertical -9, Horizontal -10, Opacity 71, Blur 58, color #000000.
38. Move second Bee to bottom of rectangle hollyhock image.
39. See image below for placements.
40. In Materials Palette, switch Foreground with Background color by clicking on the small double arrows.
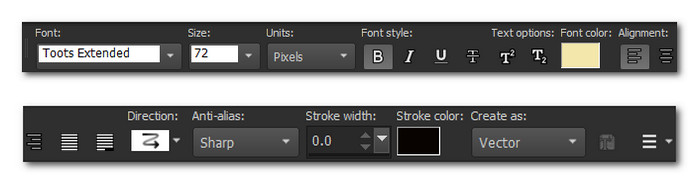
41. From Tool Bar select Text Tool. Select Toots Extended, Size 72. See settings below.
42. Type out the word Bee-ing. Convert to Raster Layer.
43. Selections/Select All. Selections/Float. Selections/Defloat.
44. Effects/3D Effects/Inner Bevel. Repeat.
45. Deselect. Image/Free Rotate. Rotate right by 90 degrees. Place in bottom left corner.
46. Type out the word Me. Convert to Raster Layer.
47. Effects/3D Effects/Inner Bevel. Repeat.
48. Place to the right of Bee-ing in bottom left corner.
49. Image/Add Borders/Add 5px border, Symmetric checked, color #f2e7ab.
50. Image/Add Borders/Add 50px border, Symmetric checked, color #0b0403.
51. Image/Add Borders/Add 5px border, Symmetric checked, color #f2e7ab.
52. Add your name or watermark and save as a .jpg file.
53. Copy image in PSP. Open Animation Shop/Paste as New Animation.
54. Duplicate main image until you have 6 frames in all. Click within first frame/Edit/Select all.
55. Open beeAnimation.mng file. Click within first frame/Edit/Select All. Copy.
56. Go back to main image. Right click within first frame/Paste/Paste into Selected Frame.
57. Hover the bee over the end of the little Mousey's nose and Left click to set into place.
58. Animation/Frame Properties. When the Frame Properties box appears, it will show 10 as Display time. Change to 3, click OK.
59. View Animation from top tool bar to check your animation. If it looks good then we will save it as a .gif file.
60. File/Save As. Save As box will appear. Save in: (the folder you are working with), File name: give it the file name you have chosen. Save as type: leave set to save as .gif file. Click Save.

61. In the next boxes that appear, you will click Next, Next, Next and finally Finish. You have now saved your animation tag in your working folder.
Thank you PamelaD for checking this tutorial for me. July 31, 2023.
If you are going to use this tutorial for stationery, cards or place the tutorial/tag on another site, I would appreciate you contacting me for permission, giving Arasimages credit for the original tutorial and if possible, a link back to my site. Thank you.
Copyright © Arasimages All Rights Reserved