
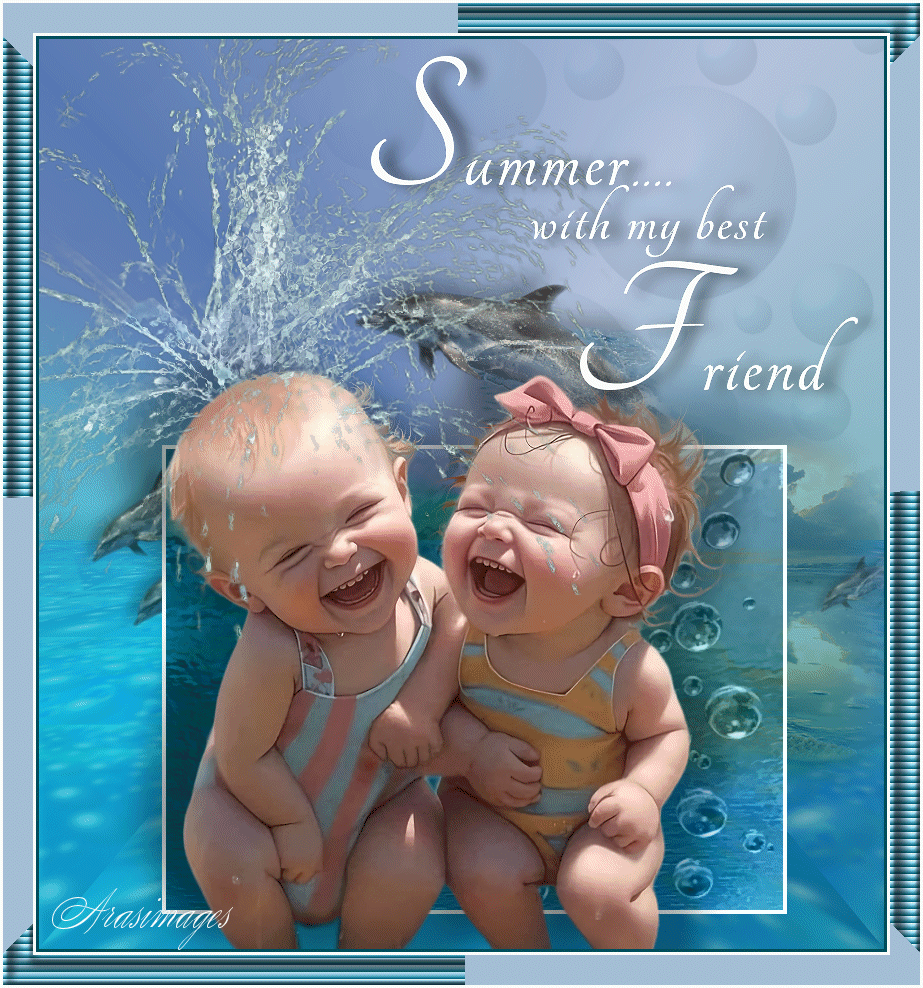
Summer Fun
For this tutorial you will need the materials in the zip file below.

For a French, Italian, Dutch, Spanish and German translation click on the flags.


This tutorial was written using PSP 2020 Ultimate. To work this tutorial, it is assumed you have some working knowledge of Paint Shop Pro. Place the Ocean blues Corel_06 _038 psp Gradient in your PSP Files/Gradient folder. Plugins used are Mura'sMeister/Perspective, Neology/Transparent Pizza, Eye Candy 4000/Jiggle, Redfield/Fine Touch and effects of PSP.
Thanks go to Cherokee Mist & Tubes, Marcio C. from groups.yahoo.com/group/animal_mania/ and to Lin Youngblood for her wonderful tubing of the Baby Cuties. Other tubes used are not identified. If this is your tube, please let me know and I'll be happy to give you credit.
Use the bookmark below to mark your place along the way.

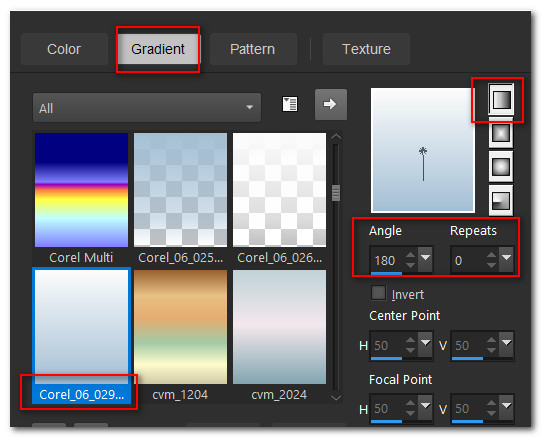
1. In Materials Palette set the Foreground to color #fbfbfb, Background to color #a4bfd4. Create a Gradient using Linear, Angle 180, repeats 0, Invert unchecked, Corel_06_029 Foreground-Background. Center Points/Focal Point Nill.
2. File/New/New Image 845px by 910px.
3. Flood fill with foreground color #fbfbfb.
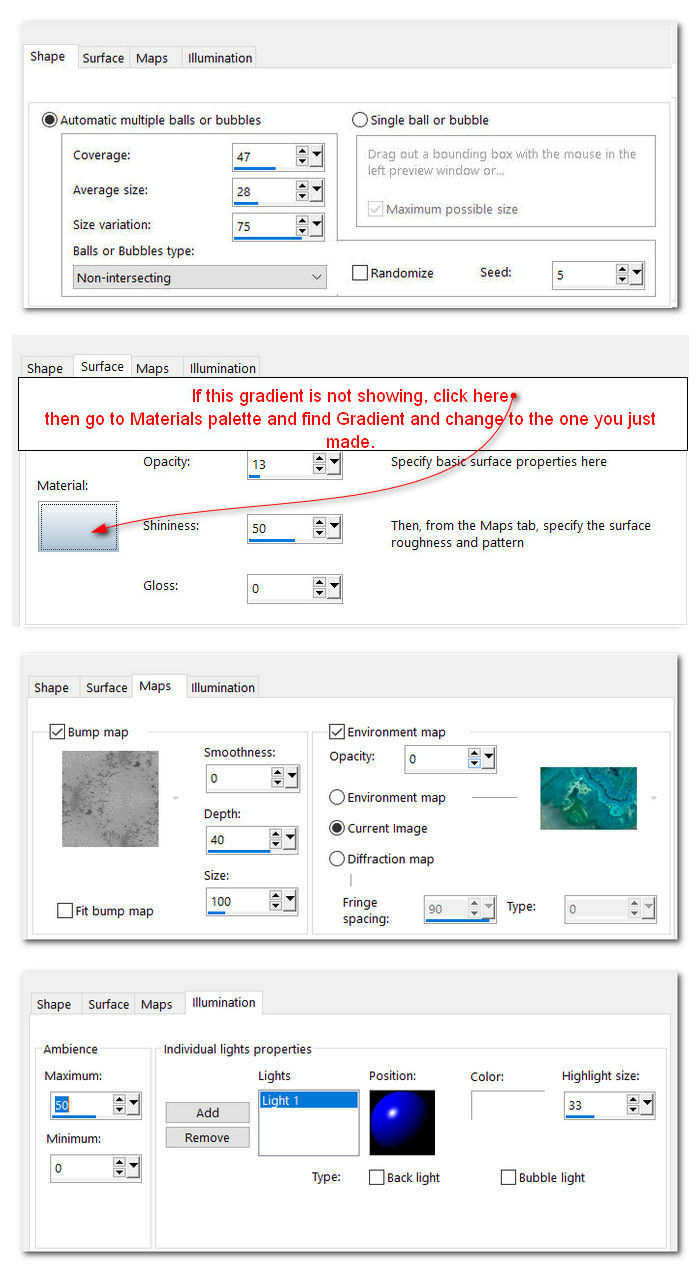
4. Effects/Artistic Effects/Balls and Bubbles.
5. Layers/New Raster Layer. Selections/Select All.
6. Open background.png. Copy/Paste into Selection. Deselect.
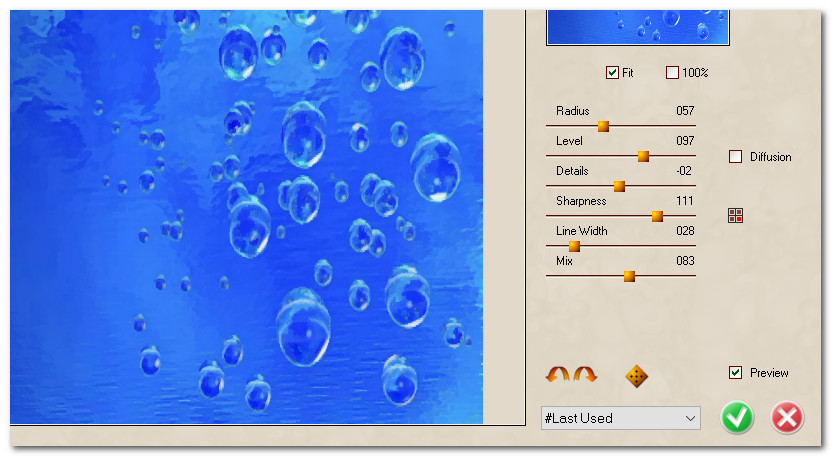
7. Effects/Redfield/Fine Touch. Use settings as seen below.
8. Duplicate-Close eye. Drop down to Raster 2 to continue.
9. Effects/Artistic Effects/Balls and Bubbles.
10. Adjust/Blur/Gaussian Blur. Set Radius to 4.
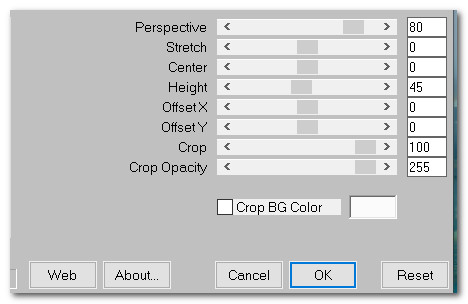
11. Effects/Mura'sMeister/Perspective Tiling.
12. Repeat Steps #10 and ##11.
13. Effects/3D Effects/Drop Shadow. Vertical -21, Horizontal -2, Opacity 40, Blur 27, color #000000.
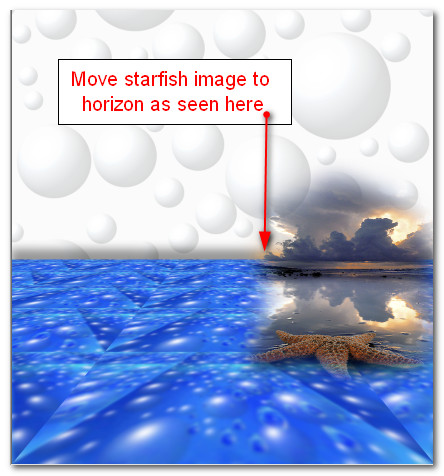
14. Open Cherokee~FBPO_StarfishSunset_artistUNKtome.psp. Copy/Paste as New Layer.
15. Move to right side horizon.
16. Layers/New Raster Layer.
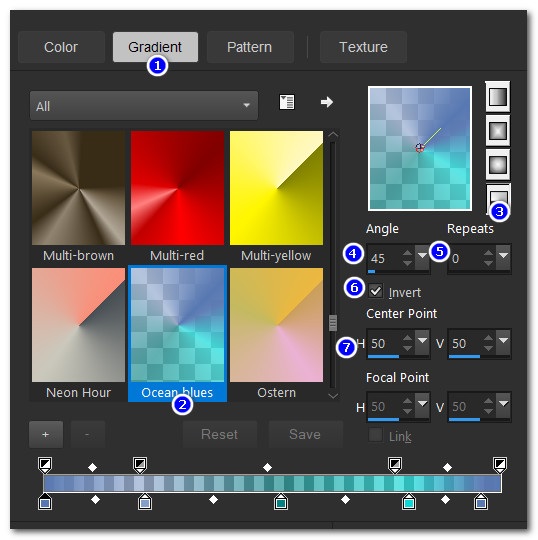
17. In Materials Palette, place the Gradient Ocean blues in Foreground. Set to Radial, Angle 45/Repeats 0, Invert checked, Center Points at 50. Flood fill with Gradient Ocean blues.
18. Image/Mirror. Mirror Horizontal.
19. Move up to Copy of Raster 2. Open eye and highlight to continue to work.
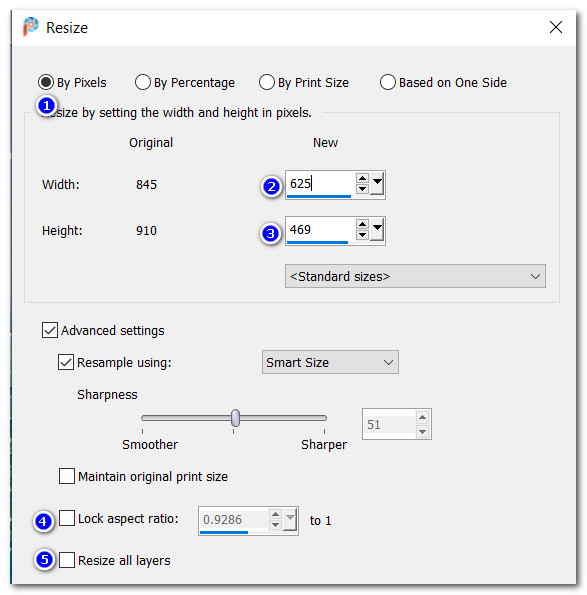
20. Image/Resize/Resize by pixels, Lock aspect ratio unchecked. Width set to 625, Height set to 469, Resize all layers unchecked. OK.
21. Pull downward toward bottom to 870px.
22. Selections/Select All. Selections/Float. Selections/Defloat to activate the rectangle.
23. Layers/New Raster Layer. Flood fill with foreground color #fbfbfb.
24. Selections/Modify/Contract by 4px. Delete. Deselect.
25. Merge/Merge Down.
26. Set Blend Mode to Luminance Legacy.
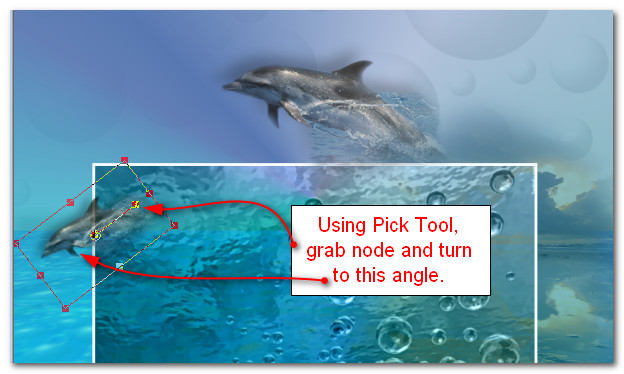
27. Open mc1579.pspimage of Dolphin. Image/Mirror. Mirror Horizontal. Copy/Paste as New Layer.
28. Image/Resize/Resize by 55%/Resize all layers unchecked.
29. Move Dolphin right of center above rectangle. Drop Opacity to 75.
30. Effects/3D Effects/Drop Shadow. Vertical -13, Horizontal -13, Opacity 40, Blur 27, color #000000.
31. Duplicate Dolphin. Image/Resize/Resize by 55%/Resize all layers unchecked.
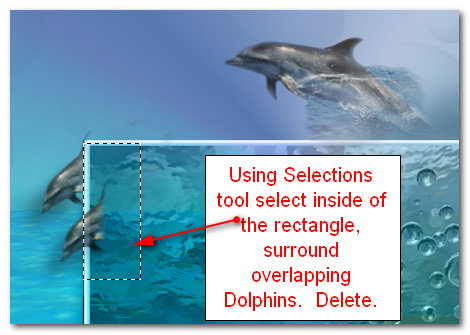
32. Using Pick Tool, grab turn node and turn as seen in example below.
33. Place Dolphin between left top corner of rectangle and border of main image. Set Pick Tool back to Move Tool.
34. Set Opacity to 80. Duplicate. Place second small Dolphin below first.
35. Duplicate. Image/Resize/Resize by 58%/Resize all layers unchecked.
36. Set Opacity to 56, move smallest Dolphin to the right of rectangle between it and main image edge.
37. Merge/Merge Down. Repeat. Using Selections tool set to Rectangle, surround the right side of the Dolphins just inside the rectangle border, Delete. Deselect.
38. Open Baby Cuties.png. Copy/Paste as New Layer.
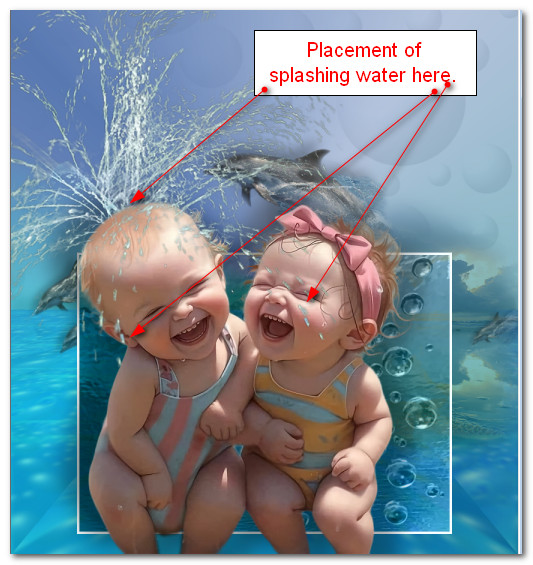
39. Move to bottom of image and to the left a little.
40. Adjust/Sharpness/Sharpen.
41. Effects/3D Effects/Drop Shadow. Vertical -20, Horizontal -46, Opacity 37, Blur 50, color #000000.
42. Effects/3D Effects/Drop Shadow. Vertical 20, Horizontal 40, Opacity 30, Blur 40, color #000000.
43. Open SplashingWater.pspimage. Copy/Paste as New Layer.
44. Place water above little boys head so it fits as seen below.
45. Drop Opacity of water down to 90.
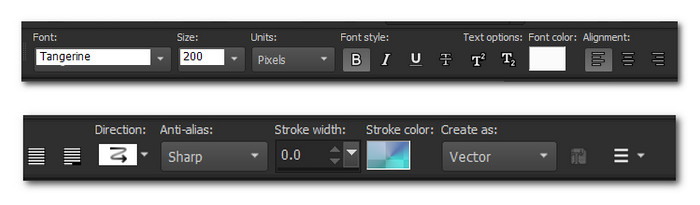
46. Using the Text tool in the Tool bar, Font Tangerine set to Size 96 and 72 for the smaller letters and Size 200 for the capitals. Color #fbfbfb, Stroke width: 0.0, Vector, Kerning at 25. Type out the capital letter "S", change font size to 96 and type out "ummer...". Highlight the four period symbols and change the size to 72. Convert to Raster layer.
47. Change Font size to 72 and type out "with my best". Convert to Raster Layer.
48. Change Font size to 200 and type out the capital letter "F". Change Font Size to 96 and type out the letters "riend". Convert to Raster Layer.
49. Arrange the words so that they read as seen below. Layers/Merge/Merge Down. Repeat.

50. Effects/3D Effects/Drop Shadow. Vertical 2, Horizontal 14, Opacity 60, Blur 20, color #000000.
51. Adjust/Sharpness/Sharpen.
52. Image/Add Borders/Add 3px border, Symetric checked, color #004f5d.
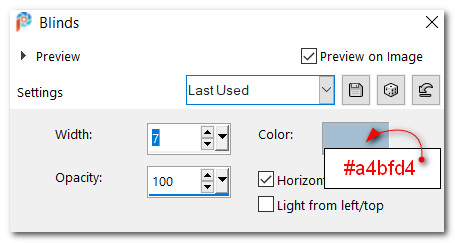
53. Image/Add Borders/Add 3px border, Symetric checked, color #fbfbfb.
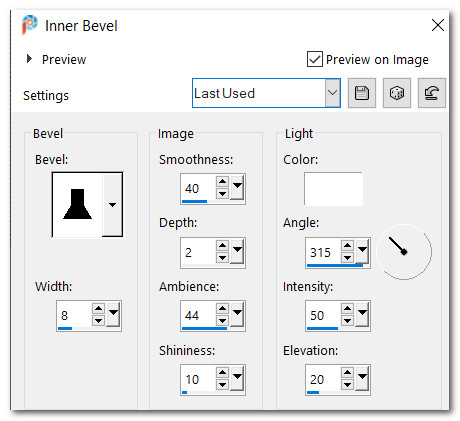
54. Image/Add Borders/Add 30px border, Symmetric checked, color #a4bfd4.
55. Using Magic Wand, click on 30px border to activate it.
56. Layers/New Raster Layer. Flood fill with #004f5d.
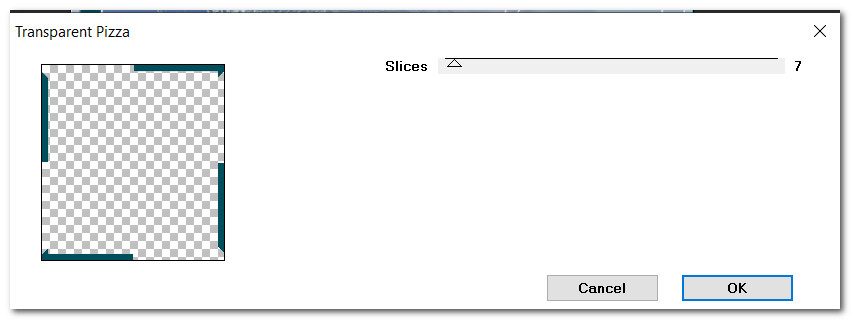
57. Effects/Neology/Transparent pizza, Slices set to 7.
58. Effects/Texture Effects/Blinds.
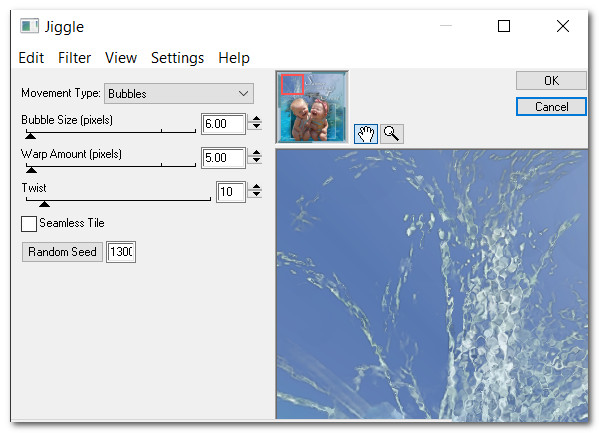
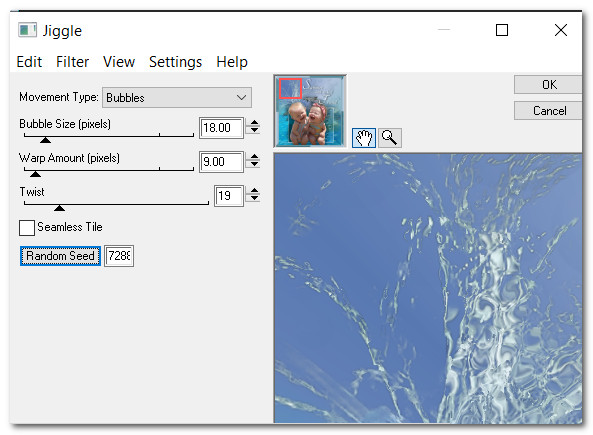
59. Effects/3D Effects/InnerBevel. Deselect.
60. Image/Add Borders/Add 3px border, Symmetric checked, color #fbfbfb.
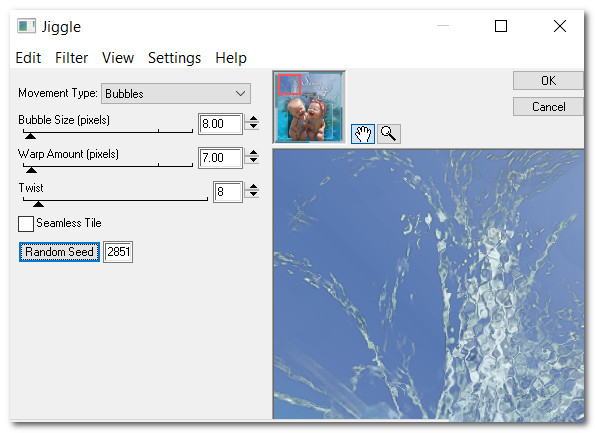
61. Add your name or watermark.
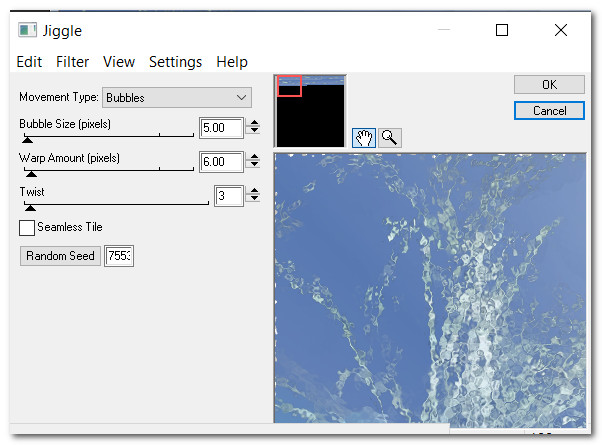
62. We will now do the animation of the water. Using the Magic Wand set to Add (Shift), RGB Value, Tolerance 20, Contiguous, Feather 0, Anti-alias unticked, select the water droplets and spray, staying clear of the border!! Click here and there on the water to activate where you want the water to move. This is time consuming so expect to enlargen your image and do a lot of clicking.
63. Leave activated. Duplicate image 3 times, having 4 layers in all. Close off all layers except for the top one.
64. Effects/Eye Candy 4000/Jiggle. Set to Bubbles and the following numbers, then click on Random Seed, OK. on each layer. Follow steps below for each layer.
65. Open first layer and set to these settings clicking on Random Seed then OK.
66. Close off first layer, go down one layer and open/highlight it. Apply the settings below.
67. Close off second layer, go down one layer and open/highlight it. Apply the settings below.
68. Close off third layer, go down to bottom layer and open/highlight it. Apply the settings below.
69. Open all layers then SaveAs PSP Animation Shop (*psp) file naming it Summer Fun.
70. Open Animation Shop and File/Open the animated file you just saved named Summer Fun.
71. Edit/Select All. Click on the View Animation button in top tool bar to check your animation. If you want the water to animate slower, go to Animation Shop/Frame Properties and set to higher number, i.e. 12. Check again to see if this is what you like. If so, we will now save our work.
72. File/Save As. Save As box appears and you will give a name of where to place your work, name your work Summer Fun and leave it set to save as a .gif file. Click Save. As the boxes appear, you will click on Next, Next, Next and finally Finish. Your work is now saved in a folder or wherever you named. Congratulations! This was a long tutorial to accomplish. Thanks for sticking in here with me.
Thank you PamelaD for checking this tutorial for me. August 2023.
If you are going to use this tutorial for stationery, cards or place the tutorial/tag on another site, I would appreciate you contacting me for permission, giving Arasimages credit for the original tutorial and if possible, a link back to my site. Thank you.
Copyright © Arasimages All Rights Reserved