
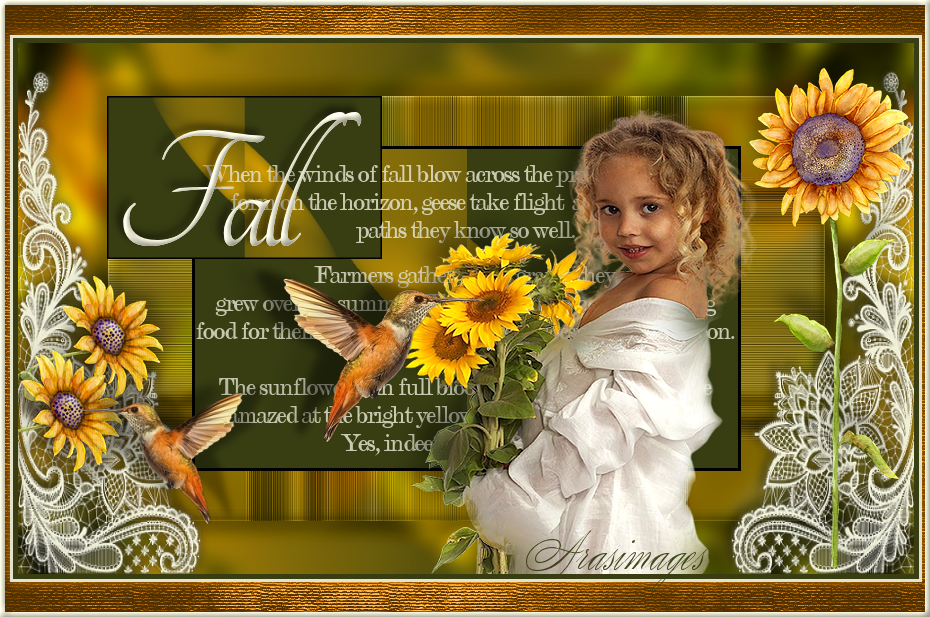
Fall
For this tutorial you will need the materials in the zip file below.

For an Italian, Spanish, French and German translation click on the flags.


This tutorial was written using PSP Pro2020 Ultimate. The plugins used are AP01 [Innovations]/Mirror-Reflections, Redfield/Fine Touch, Graphics Plus/Cross Shadow, Texture/Texturizer, Two Moon/FadeSpot and effects of the program itself. Place the Pattern in your PSP Patterns folder. Open the Font Tangerine on your workspace and leave open to use or install it to your PSP. To work this tutorial, it is assumed you have some working knowledge of Paint Shop Pro.
Thanks go to the unknown tubers of the elements used, i.e., sunflowers and little girl and lace.If any of these are yours, let me know and I will be happy to give you credit. I do wish to give credit to Lin Youngblood, an amazing photographer for her Hummingbird which I gleaned from one of her photos.
Use the bookmark below to mark your place along the way.

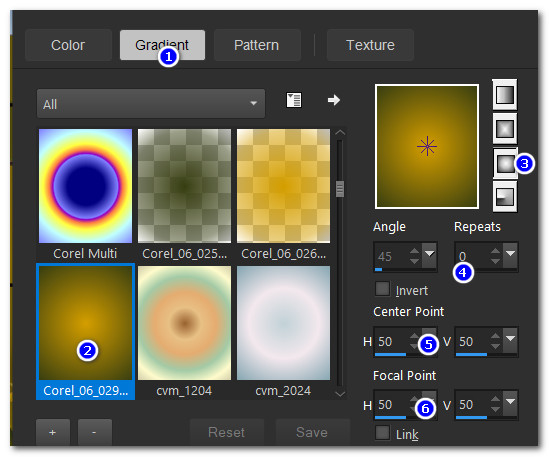
1. In the Materials Palette, set to Foreground to color #d49e00, Background color to #383e12. Set to Gradient, Corel_06_029 foreground-background, Sunburst, Angle/Repeats at 0, Center Points/Focal Points set to 50 each, Invert unchecked.
2. New/New Image 896px by 531px. Flood fill with Gradient.
3. CTRL+A. Open AD-Sunflower-Summer-14.png. Copy/Paste into Selection. Select None.
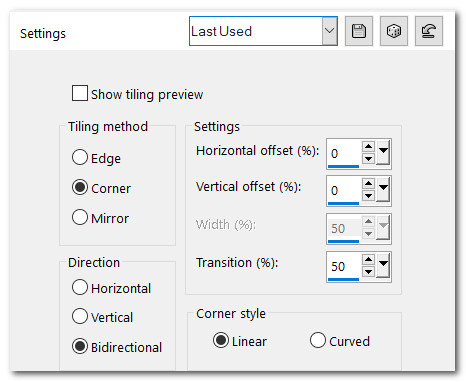
4. Effects/Image Effects/Seamless Tiling.
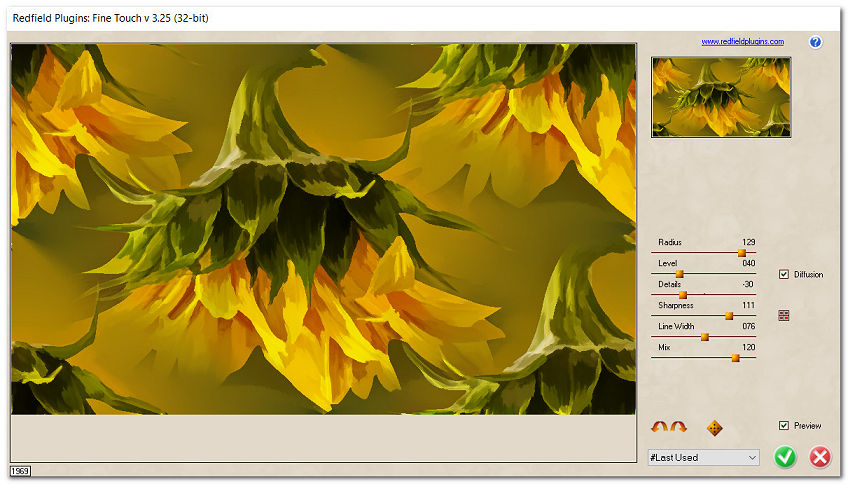
5. Effects/Redfield/Fine Touch.
6. Adjust/Blur/Gaussian Blur. Radius set to 10.
7. Duplicate. Close off bottom layer.
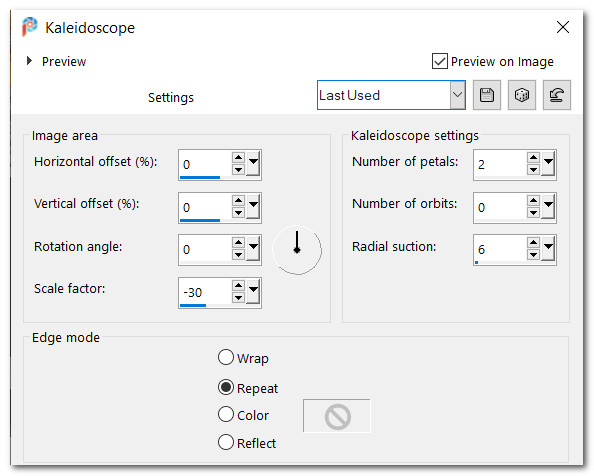
8. Effects/Reflection Effects/Kaleidoscope.
9. Effects/Edge Effects/Enhance. Effects/Edge Effects/Enhance More.
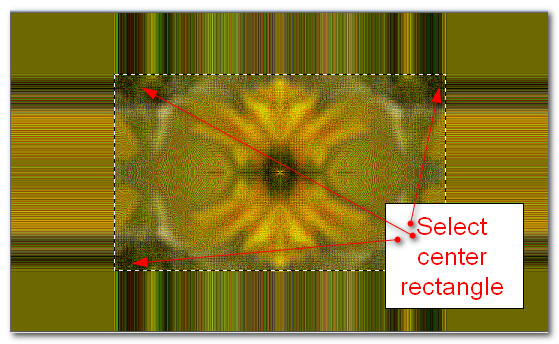
10. Using Selections tool set to Rectangle, Mode Add (Shift), Feather 0, select the center rectangle. Delete center.
11. Layers/New Raster Layer. Flood fill selection with Gradient.
12.Copy/Paste as New Image on workspace. The next few steps will be done using this new image.
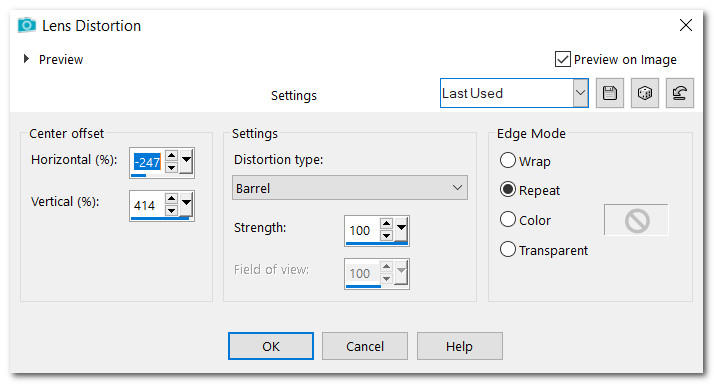
13. On workspace layer apply Effects/Distortion Effects/Lens Distortion.
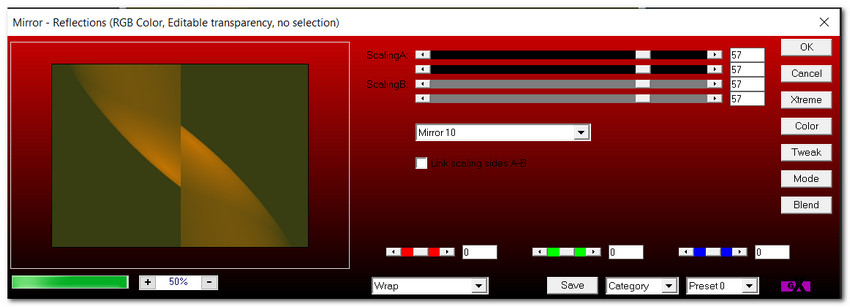
14. On the workspace layer apply Effects/AP01-[Innovations]/Mirror-Reflections.
15. Layers/New Raster Layer. Selections/Select All. Flood fill with color #000000.
16. Selections/Modify/Contract by 3px. Delete. Deselect.
17. Merge/Merge Down. Copy/Paste into Selection of main image where it is selected. Deselect. (You are now finished with the workspace image. Close it).
18. On main image Duplicate rectangle. Resize/Resize by 50%/Resize all layers unchecked.
19. Place the resized rectangle over the top left corner of the larger rectangle.
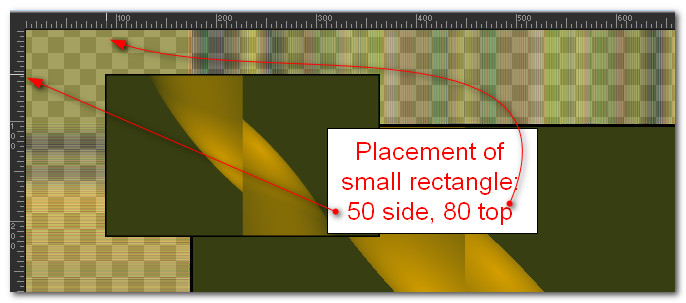
20. Drop down to Copy of Raster 1. Set Blend Mode to Luminance (L), Opacity to 62.
21. Image/Resize/Resize by 80%/Resize all layers unchecked.
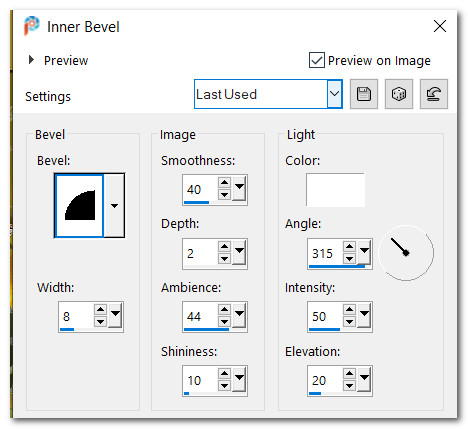
22. Effects/3D Effects/Inner Bevel.
23. Effects/3D Effects/Drop Shadow. Vertical -12, Horizontal -12, Opacity 50, Blur 20, Color #000000.
24. Effects/3D Effects/Drop Shadow. Vertical 12, Horizontal 12, Opacity 50, Blur 20, Color #000000.
25. Adjust/Sharpness/Sharpen. Adjust/Sharpness/Sharpen More.
26. Open bottom layer. Go back to top layer to continue.
27. Open Fall text.pspimage. Copy middle layer/Paste as New layer. Lower Opacity to 85%.
28. Place in center of middle rectangle.
29. From tool bar select the font Tangerine, set size to 180, Font color #e3e2ce, Stroke width 1, Kerning -25, Stroke color checked to null under Foreground color, type out the word "Fall". Convert to Raster Layer. Place inside the small rectangle.
30. Selections/Select All. Selections/Float. Selections Defloat to activate the Fall text.
31. Effects/3D Effects/Inner Bevel. Deselect.
32. Effects/3D Effects/Drop Shadow. Vertical -5, Horizontal -5, Opacity 34, Blur 10, color #000000.
33. Open Corner Lace.png. Copy/Paste as New Layer.
34. If lace has a space at the bottom click your down arrow key a few times to set in proper place.
35. Adjust/Sharpness/Sharpen.
36. Open 0-77f89-bc59e8fd-X5-L.png. Copy/Paste as New Layer. Move to right side of image.
37. Effects/3D Effects/Drop Shadow. Vertical -21, Horizontal -2, Opacity 40, Blur 27, color #000000.
38. Open 0-77f8a-3be3f049-X5-L.png. Copy/Paste as New Layer.
39. Image/Resize/Resize by 80%/Resize all layers unchecked.
40. Place into lace on left bottom side of image. Duplicate. Place duplicate flower below first. (See snapshot below for placement).
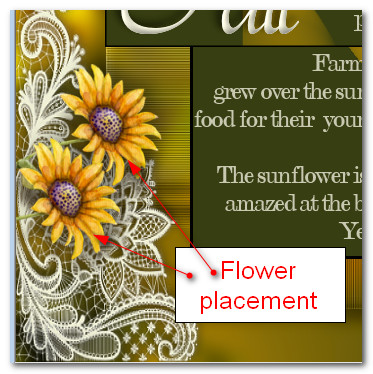
41. Merge/Merge Down. Adjust/Sharpness/Sharpen.
42. Effects/3D Effects/Drop Shadow. Vertical -21, Horizontal -2, Opacity 40, Blur 27, color #000000.
43. Open 0-6c657-503d848e-L.pspimage of little girl. Image/Mirror. Mirror Horizontal. Copy/Paste as New Layer.
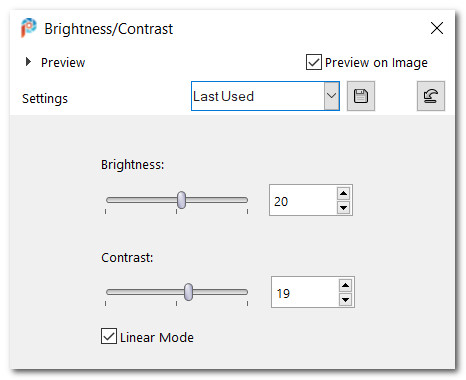
44. Adjust/Brightness/Contrast.
45. Place little girl on bottom right side. Drop down to text layer. Using Eraser tool set to Size 20, all other settings at default, erase words from little girl's shoulder area.
46. Back to top layer to continue.
47. Effects/3D Effects/Drop Shadow. Vertical -12, Horizontal -12, Opacity 40, Blur 27, color #000000.
48. Adjust/Sharpness/Sharpen.
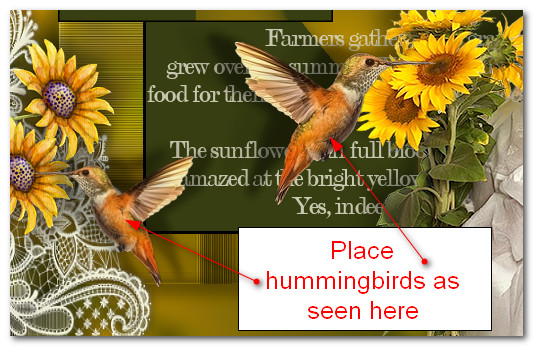
49. Open Hummingbird.png. Copy/Paste as New Layer.
50. Image/Resize/Resize by 66%/Resize all layers unchecked.
51. Effects/3D Effects/Drop Shadow. Vertical -12, Horizontal -12, Opacity 40, Blur 27, color #000000.
52. Adjust/Sharpness/Sharpen.
53. Duplicate. Image/Mirror. Mirror Horizontal.
54. Image/Resize/Resize by 80%/Resize all layers unchecked. Place hummingbirds as seen below.
55. Effects/3D Effects/Drop Shadow. Vertical -12, Horizontal -12, Opacity 40, Blur 27, color #000000.
56. Image/Add Borders/Add 5px border, Symmetric checked, color #383e12.
57. Image/Add Borders/Add 3px border, Symmetric checked, color #e3e2ce.
58. Image/Add Borders/Add 5px both sides, 30px border top and bottom, Symmetric Unchecked, color #c57604.
59. Using Magic Wand select the larger border.
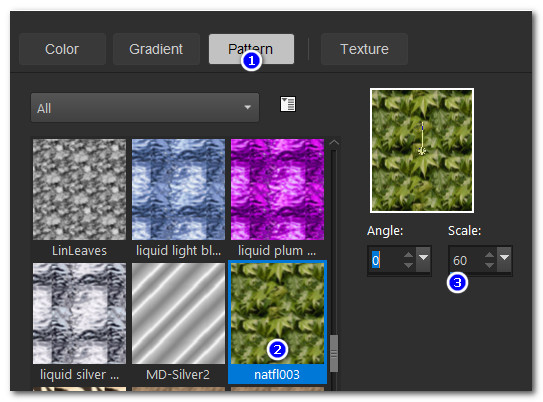
60. In Materials Palette change to Pattern. Select Pattern natfl003.
61. Layers/New Raster Layer. Flood fill with leaves Pattern.
62. Adjust/Blur/Gaussian Blur. Radius set to 6.
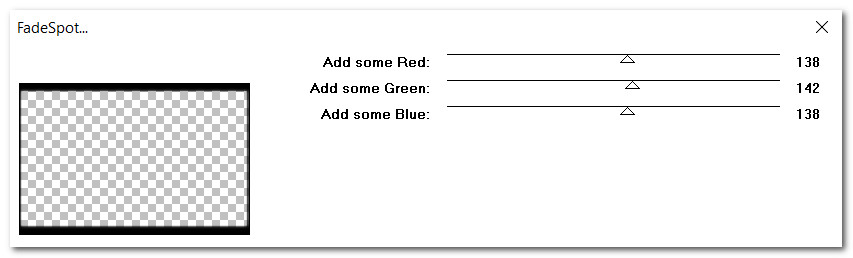
63. Effects/Two Moon/FadeSpot.
64. Set Blend Mode to Luminance(L), Opacity to 60.
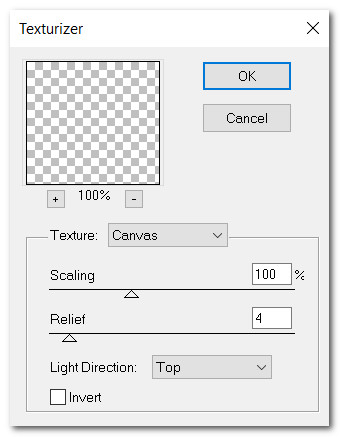
65. Effects/Texture/Texturizer.
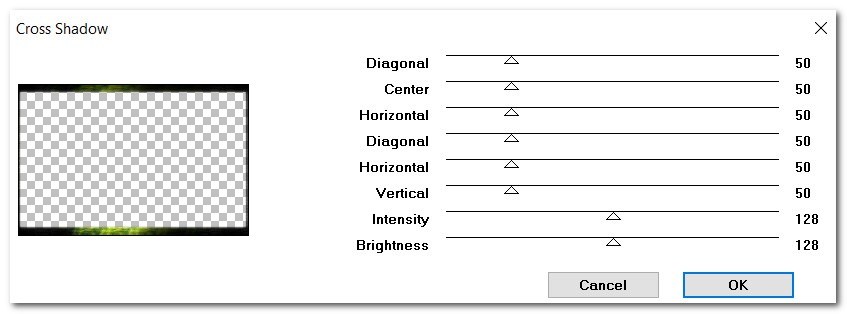
66. Effects/Graphics Plus/Cross Shadow.
67. Effects/Edge Effects/Enhance. Deselect.
68. Image/Add Borders/Add 5px border, Symmetric checked, color #e3e2ce.
69. Using Magic Wand select the 5px border to activate it.
70. Effects/3D Effects/Inner Bevel. Deselect.
71. Sign your name or leave a watermark. Save as Fall.jpg.
Thanks to my friend and faithful tester, PamelaD. September 9-28-2023.
If you are going to use this tutorial for stationery, cards or place the tutorial/tag on another site, I would appreciate you contacting me for permission, giving Arasimages credit for the original tutorial and if possible, a link back to my site. Thank you.
Copyright © Arasimages All Rights Reserved