

Moments in my Heart
For this tutorial you will need the materials in the zip file below.

For an Italian, French, Spanish and German translation click on the flags.


This tutorial was written using PSP Pro2020 Ultimate. The plugins used are Xenofex1.1/ Stain and effects of the program itself. Place the Nara_0878 Mask in your PSP Mask folder. To work this tutorial, it is assumed you have some working knowledge of Paint Shop Pro.
Thanks go to Nikita for the lady tube and to Narah for her Mask. The tubers of the leaves are unknown; if either of these is yours please let me know and I'll be happy to give you credit.
Use the bookmark below to mark your place along the way.

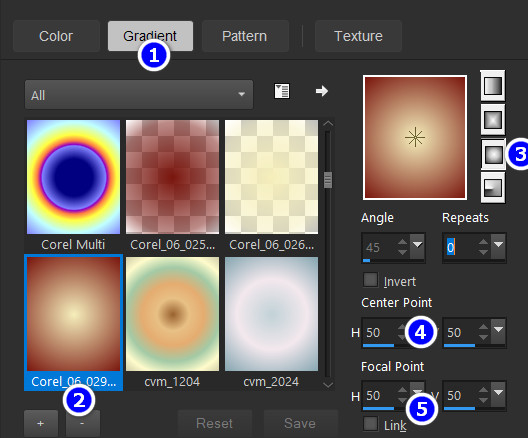
1. In the Materials Palette, set to Foreground to color #f5eebb, Background color to #79160e. Set to Gradient, Corel_06_029 foreground-background, Sunburst, Angle/Repeats at 0, Center Points/Focal Points set to 50 each, Invert unchecked.
2. New/New Image 900px by 760px. Flood fill with Gradient.
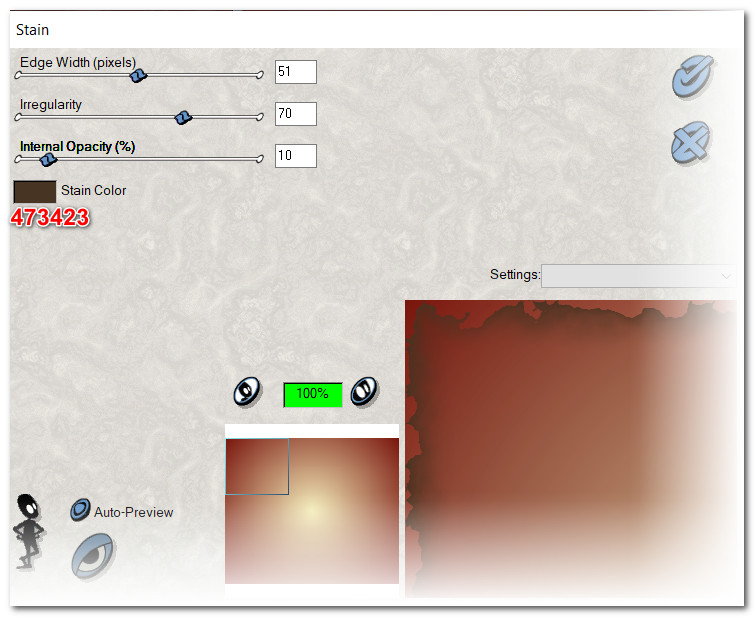
3. Effects/Xenofex1.1/Stain.
4. Effects/Edge Effects/Enhance. Effects/Edge Effects/Enhance More.
5. Layers/New Raster Layer. Flood fill layer with Background color #79160e.
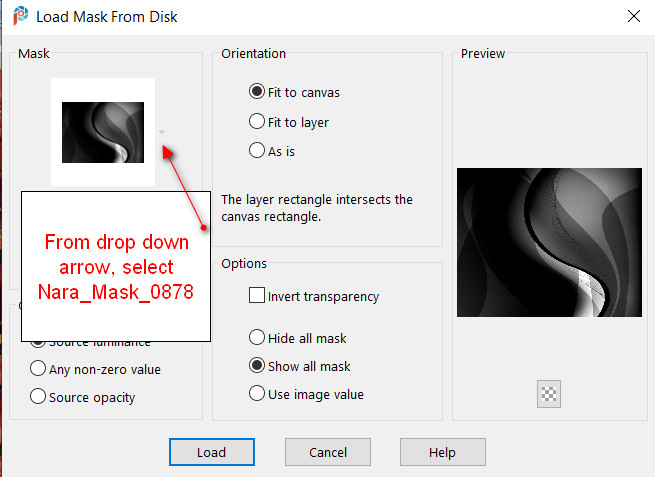
6. Layers/Load/Save Mask/Load Mask from Disk. Choose Nara_Mask_0878 from drop down arrow. Load.
7. Merge/Merge Group.
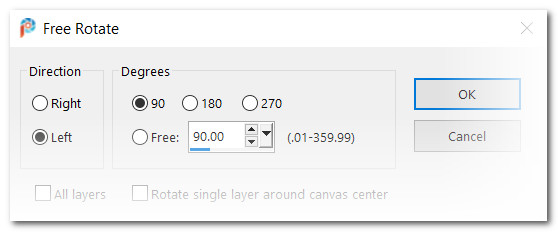
8. Image/Free Rotate. Rotate left by 90 degrees.
9. Using Pick tool and nodes, stretch out to each side to fit image. Press M key to deselect Pick Tool.
10. Effects/Edge Effects/Enhance.
11. Duplicate. Image/Flip. Flip Vertical.
12. Open wWO5Njw8OzxaXxsxd_9vEL2k7tw@500x608.png gold leaves. Copy/Paste as New Layer.
13. Image/Resize/Resize by 80%/Resize all layers unchecked.
14. Duplicate. Image/Mirror. Mirror Horizontal. Place one set of leaves in each top corner.
15. Merge/Merge Down. Drop Opacity down to 80%.
16. Using the Color Changer tool, left click on leaves to change to lighter yellow.
17. Effects/Edge Effects/Enhance.
18. Effects/3D Effects/Drop Shadow. Vertical 22, Horizontal -17, Opacity 40, Blur 9, color #763310.
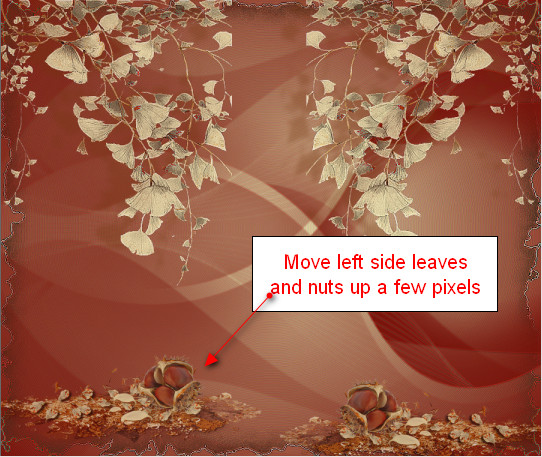
19. Open moc_article37881596_4f2522c45c19a.png of leaves and nuts. Copy/Paste as New Layer.
20. Using the Color Changer tool, left click on leaves to change to lighter yellow #f5eebb.
21. Lower Opacity to 67. Move leaves and nuts into bottom right corner.
22. Duplicate. Image Mirror. Mirror Horizontal. Move upward a few pixels.
23. Merge/Merge Down. Adjust/Sharpness/Sharpen.
24. Open 13458167253_femmes_nikita.png. Copy/Paste as New Layer.
25. Image/Mirror. Mirror Horizontal.
26. Select Nikita's watermark using Select tool set to Rectangle/Add (Shift)/Feather 0. Delete. Deselect.
27. Effects/3D Effects/Drop Shadow. Vertical -11, Horizontal -41, Opacity 50, Blur 11, color #763310.
28. Place woman in center of image.
29. Open 0_77e6c_ec3e601_XL.pspimage of text. Copy/Paste as New Layer.
30. Image/Resize/Resize by 46%/Resize all layers unchecked. Using Color Changer left click on text to change it to Foreground color #f5eebb.
31. Place text to left of woman.

32. Selections/Select All. Selections/Float. Selections/Defloat.
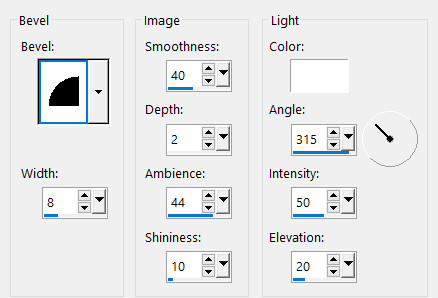
33. Effects/3D Effects/Inner Bevel. Apply and Deselect.
34. Open 0_10a806_67126318_XL.pspimage of bird.
35. Image/Resize/Resize by 30%/Resize all layers unchecked.
36. Image/Mirror. Mirror Horizontal. Copy/Paste as New Layer.
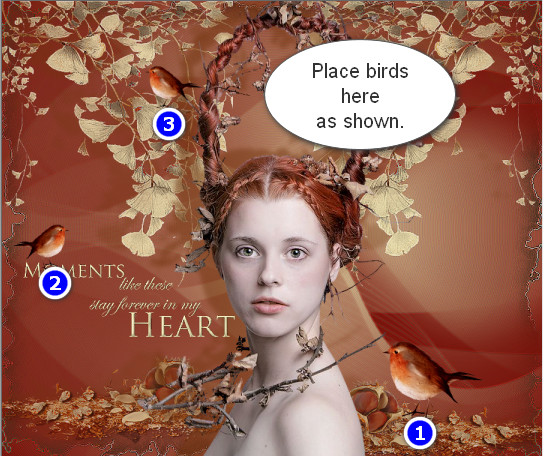
37. Place bird on leaves near woman's back.
38. Undo resizing and mirroring of bird.
39. On original image of bird, Image/Resize/Resize by 17%/Resize all layers unchecked.
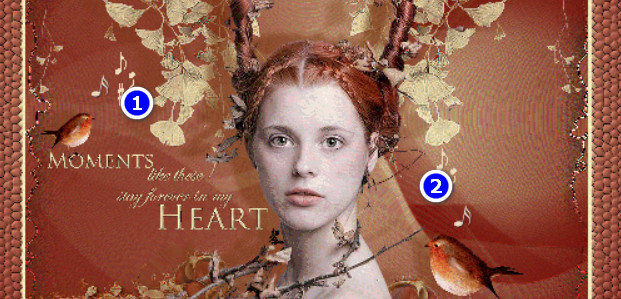
40. Place smaller bird on top of text over the "O" in Moments on left side.
41. Duplicate. Image/Mirror. Mirror Horizontal. Place small duplicated bird on leaves at the top left side of image. See snapshot for birds placement.
42. Merge/Merge Down twice so birds are all on one layer.
43. Effects/3D Effects/Drop Shadow. Vertical -4, Horizontal -26, Opacity 40, Blur 12, color #763310.
44. Adjust/Sharpness/Sharpen.
45. Image/Add Borders/Add 5px border, Symmetric checked, color #f5eebb.
46. Image/Add Borders/Add 50px border, Symmetric checked, color #79160e.
47. Using Magic Wand set to Mode: Add (Shift)/Match Mode: RGB Value, Tolerance 41, Feather 0, select the 50px border .
48. Flood fill 50px border with Gradient.
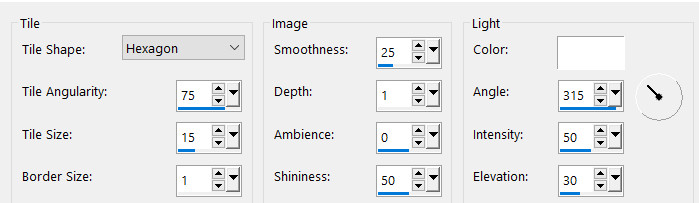
49. Effects/Texture Effects/Tiles.
50. Image/Add Borders/Add 5px border, Symmetric checked, color #f5eebb.
51. Deselect. Add your watermark at this point. Save as .jpg image.
52. Animation directions: In PSP Copy the image/go to Amimation Shop. In the workspace Paste as New Animation.
53. Using the method of your choice to duplicate, duplicate the main image 25 times, having 26 frames in all. One easy way to duplicate is to hold down the CTRL key while pressing the letter L for each frame you wish to duplicate.
54. Edit/Select All.
55. File/Open SimoneAni345-SmallNote.mng file. Click in the first frame and Edit/Select All. Copy.
56. Go back to the main image. Right click within the first frame. Paste/Into Selected Frame. Hover the note where you want it to go and left click in place. Place a note by each bird.

57. File/Open SimoneAni328Gold.mng file. Click in the first frame and Edit/Select All. Copy.
58. Go back to main image. Right click within the first frame. Paste/Into Selected Frame. Left click to set notes in place.
59. Clicking on the View Animation icon in the top tool bar, see how your animation is working. If you like it you can save it now. If not, use the undo arrow and try again then test until you are satisfied, then save doing the following.
60. File/SaveAs. When the Save As box appears, designate where it will be saved (your working folder for instance), give it a name (Moments in my Heart) and leave it to save as a .gif file. Save.
61. As the boxes change, click on Next, Next, Next and Finish. Your animation is now saved!
Thanks to my friend and faithful tester, PamelaD. October 24-2023.
If you are going to use this tutorial for stationery, cards or place the tutorial/tag on another site, I would appreciate you contacting me for permission, giving Arasimages credit for the original tutorial and if possible, a link back to my site. Thank you.
Copyright © Arasimages All Rights Reserved