
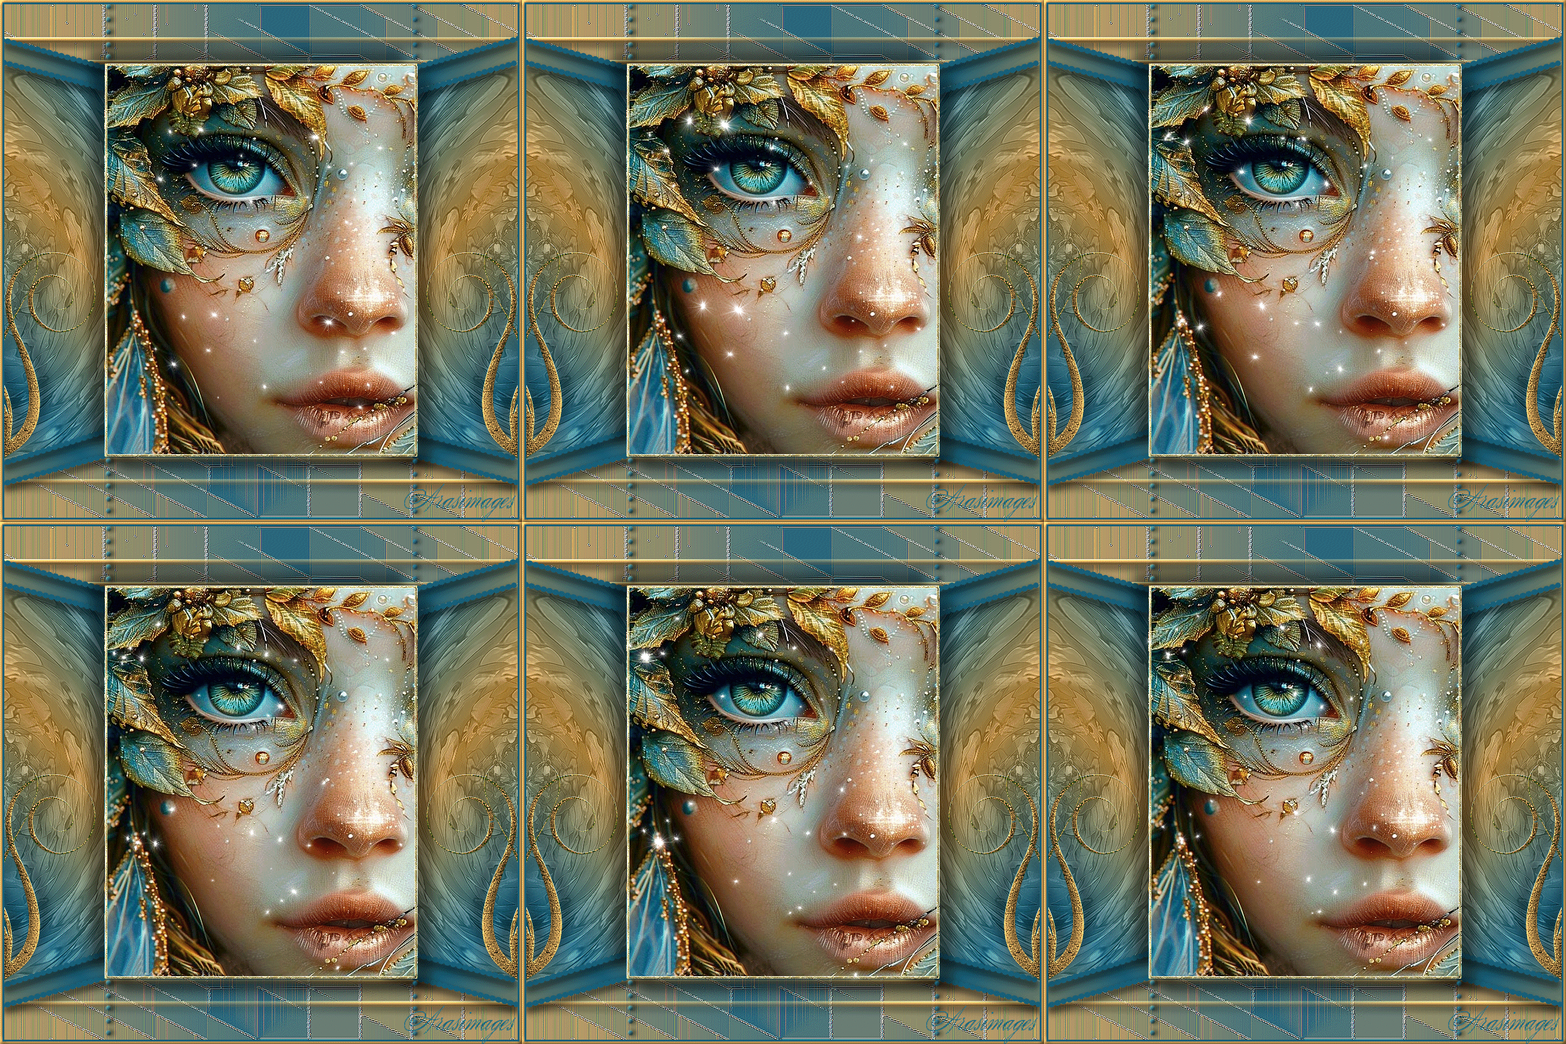
Eye Love Fairies
For this tutorial you will need the materials in the zip file below.
For an Italian, French, German, Spanish and Dutch translation click on the flags.


This tutorial was written using Paint Shop Pro 2020 Ultimate. Plugins used in this tutorial are Xero/Cubism and Andromeda/Perspective, also effects of PSP itself. Place the Mask in your PSP Files/Mask folder. Export the ArasimagesFiveDots brush into your PSP Files/Brushes folder. Place the Glitter.bmp in the PSP Files/Patterns folder. Place the EyeLoveFairies.pfp Preset 2201lt in the Andromeda/02Full Canvas/22Side Walls folder. Place the krisbigdot.sld styled line into the PSP Files/Styled Lines folder. The program Animation Shop is used for the animation. Unzip the Materials in a folder you make on your desktop called Eye Love Fairies. Duplicate the tubes and use the duplicates to work with. Close out the originals to keep them from getting deleted. Save your work often! To work this tutorial, it is helpful if you have some working knowledge of Paint Shop Pro.
I found this beautiful fairie on Facebook/Images. The name on it was not legible or I would give the creator credit. The background is an AI created image by unknown artist.
Use the bookmark below to mark your place along the way.

1. In Materials Palette, set the Foreground to color #175f78, Background color to #cb9e57.
2. Using these colors set Materials Palette to Gradient: Angle at 45/Repeats 3, Invert checked, Corel 06_029_Foreground-background.
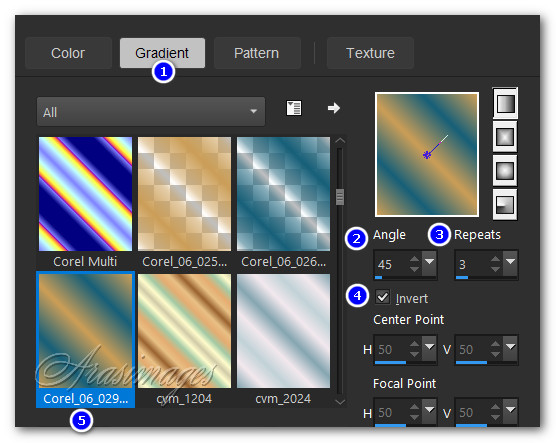
3. Open a New Layer 832px by 832px. Flood fill with Gradient.
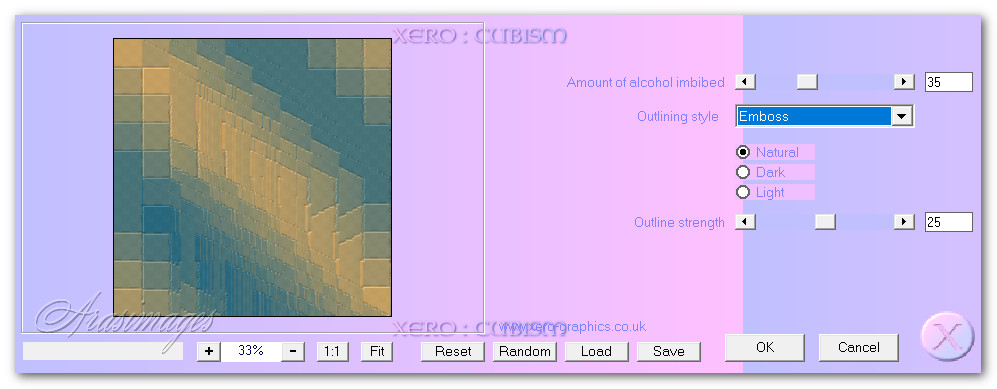
4. Effects/Xero/Cubism.
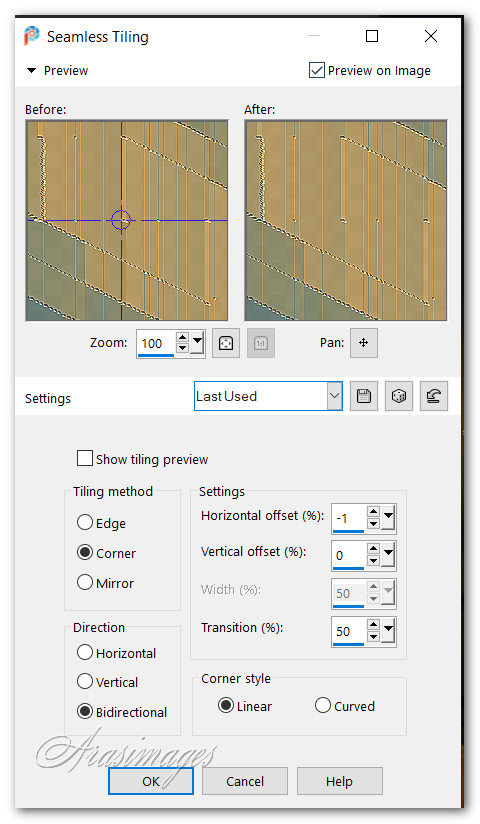
5. Effects/Image Effects/Seamless Tiling.
6. Effects/Edge Effects/Enhance. Repeat.
7. Layers/New Raster Layer. Flood fill with Background color #cb9e57.
8. Layers/Load/Save Mask. Load Mask From Disk. From drop down arrow, find the BJ3.PspMask and use the settings as I have marked below. Load.

9. Right click in Layers palette/Merge/Merge Group.
10. Using Magic Wand click on each of the 8 gold lines to activate them.
11. Effects/3D Effects/Inner Bevel. Apply twice. (This Inner Bevel will be the default inner bevel for this turorial).
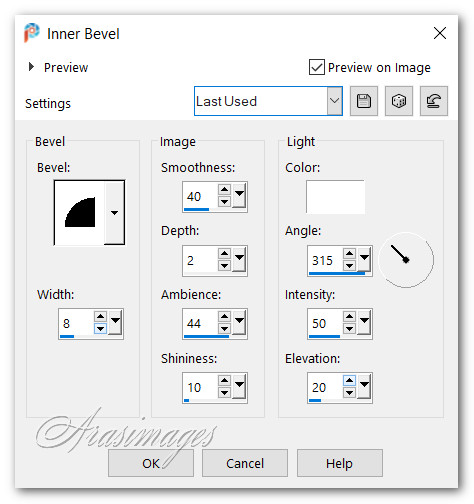
12. Duplicate. Merge/Merge Down.
13. Selections/Select None.
14. Effects/Edge Effects/Enhance.
15. Effects/3D Effects/Drop Shadow. Vertical 7, Horizontal 0, Opacity 50, Blur 15, color #000000.

16. Layers/New Raster Layer. Flood fill with Gradient.
17. Effects/Andromeda/Perspective. Follow directions as seen below and see snapshot of where to place it.

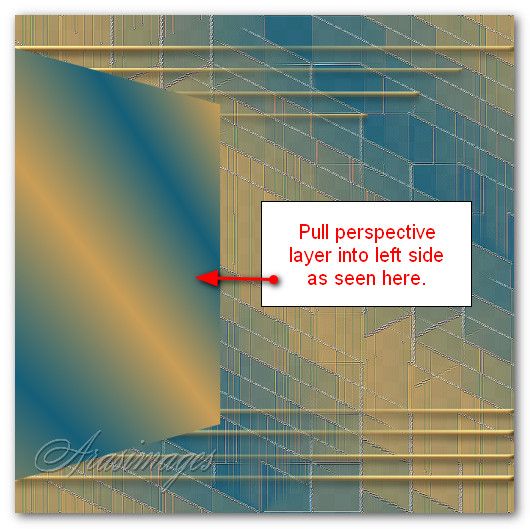
18. Layers/New Raster Layer. Selections/Select All.
19. Open Alcohol_Ink_underwater.pspimage.
20. Effects/Image Effects/Seamless Tiling.
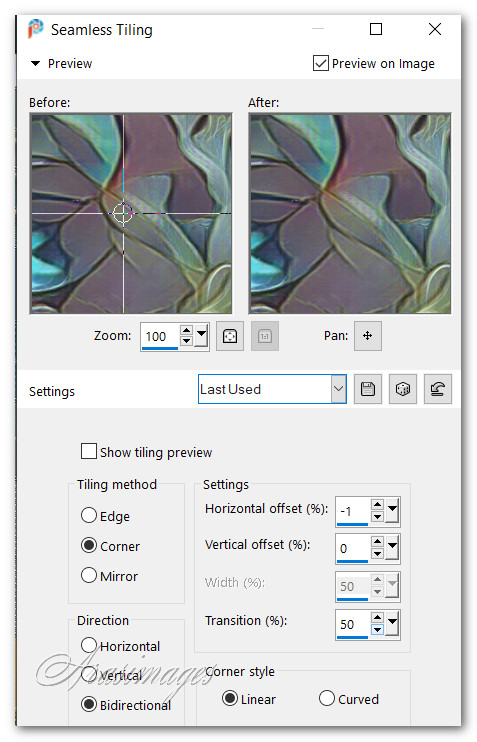
21. Copy/Paste/Paste Into Selection. Deselect.
22. Effects/Distortion Effects/Polar Coordinates.
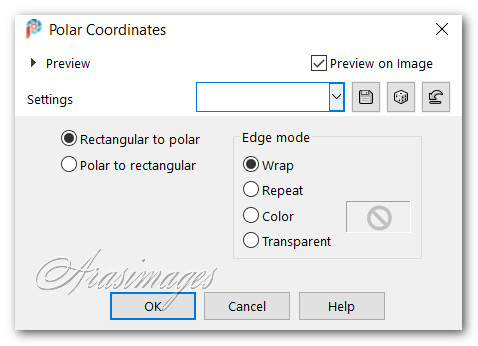
23. Effects/Edge Effects/Enhance.
24 . Effects/Andromeda/Perspective. Use the same settings as you did in the gradient perspective. It will still be in memory of Andromeda.

25. Set to Luminance (L), Opacity at 45. Place over gradient perspective as seen in Step 31 below.
26. Layers/Merge/Merge Down.
27. Duplicate. Image/Mirror. Mirror Horizontal.
28. Layers/New Raster Layer.
29. Make sure the top foreground color is set to #175f78 to use Pen Tool making dotted lines.
30. Select from Tool bar the Pen tool. Set to Styled Lines krisbigdot, size 5. See below for other settings.

31. To make lines of dots, using Pen Tool left click on edge of perspectives, draw across and left click, then right click choosing Apply. Repeat this motion on all four perspective layers.

32. Effects/3D Effects/Drop Shadow. Vertical 7, Horizontal 0, Opacity 50, Blur 15, color #000000. Apply again.
33. Duplicate to make darker lines.
34. Open 457496956_817930083845291_1208627845014325970_n.pspimage of fairie. Copy/Paste as New Layer.
35. Use the Clone tool or smudge/smear, your choice to eliminate the copyright. Leave Copyright on original.
36. Adjust/Sharpness/Sharpen.
37. Draw a line around the fairie image using the Selections/Rectangle/Add (Shift)/Feather 0 tool.
38. Layers/New Raster Layer. Flood fill with color #cb9e57.
39. Selections/Modify/Contrast by 4px. Delete.
40. Selections/Modify/Select Selection Borders. Using 4px border width, Outside/Anti-alias, click OK.
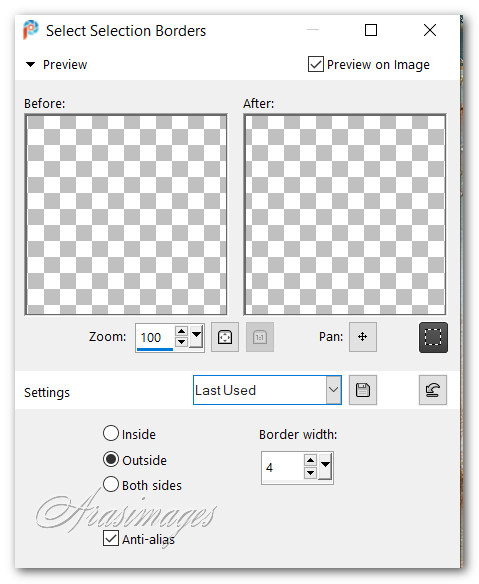
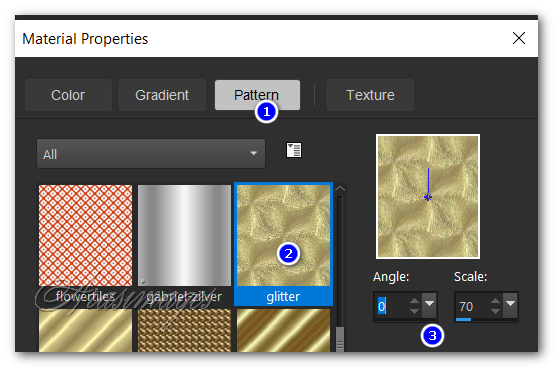
41. In Materials Palette, choose under Pattern Glitter.bmp. Flood fill the 4px border.
42. Effects/3D Effects/Inner Bevel. Same settings as in Step #11 and used throughout tutorial. Repeat Inner Bevel.
43. Adjust/Sharpness/Sharpen. Sharpen More. Merge/Merge Down. Deselect.
44. Effects/3D Effects/Drop Shadow. Vertical 23, Horizontal 23, Opacity 46, Blur 26, color #000000.
45. Effects/3D Effects/Drop Shadow. Vertical -23, Horizontal -23, Opacity 46, Blur 26, color #000000.
46. Open Swirl.png. Copy/Paste as New Layer. Move to right as in main image.
47. Adjust/Sharpness/Sharpen.
48. Effects/3D Effects/Inner Bevel. Use same Inner Bevel settings as before.
49. Effects/3D Effects/Drop Shadow. Vertical -14, Horizontal -14, Opacity 45, Blur 25, color #000000.
50. Effects/3D Effects/Drop Shadow. Vertical 14, Horizontal 14, Opacity 45, Blur 25, color #000000.
51. Adjust/Sharpness/Sharpen More.
52. Duplicate. Image/Mirror. Mirror-Horizontal.
53. Layers/New Raster Layer.
54. From tool bar select Paint Brush tool. Choose Custom ArasimagesFiveDots.

55. Having the color #175f78 in top background/foreground settings, left click dots over and under each corner of picture of lady.
56. Effects/3D Inner Bevel as before. Repeat Inner Bevel.
57. Effects/3D Drop Shadow. Vertical 0, Horizontal 4, Opacity 86, Blur 12, color #000000.
58. Image/Add Borders/Add 3px border, Symmetric checked, color #175f78.
59. Image/Add Borders/Add 5px border, Symmetric checked, color #cb9e57.
60. Select with Magic Wand the 5px gold border. Apply twice an Inner Bevel as before. Deselect.
61. Sign your name or leave watermark. Save as a .jpg image.
62. Copy. Open Animation Shop. Paste As New Animation in open workspace.
63. Open SimoneAni515-MNG.mng file. Left click in first frame. Edit/Select All. Right click on top bar/Copy.
64. Go to the main image and duplicate 17 times, having 18 frames in all. Left click in first frame/Edit/Select All.
65. Right click in the first frame/Paste/Paste Into Selection. Hover over the spot you wish to have animation and left click in place. Here we place animation in top half first, then repeat Paste Into Selection in bottom half. Try to keep animation within the frame of fairie.
66. To check your animation click on the Animation icon at the top. If you like what you see and need no corrections, we will save.
67. File/Save As. Save As box appears and here you Save in: (folder you created named EyeLoveFairies). Give your file a name under File Name: and Save as type remains as a (*gif). Click Save.
68. As the boxes change click Next, Next, Next then Finish.
Thank you Pam for checking this tutorial for me. I appreciate all of your PSP work you help me with. September 8, 2024.
If you are going to use this tutorial for stationery, cards or place the tutorial/tag on another site, I would appreciate you contacting me for permission, giving Arasimages credit for the original tutorial and if possible, a link back to my site. Thank you.
Copyright © Arasimages All Rights Reserved