

My Love is in my Dreams
For this tutorial you will need the materials in the zip file below.

For an Italian, French, Spanish and German translation click on the flags.


This tutorial was written using Paint Shop Pro 2020 Ultimate. I used NO outside plugins in this tutorial. Just Animation Shop for the animation. Unzip the Materials in a folder you make on your desktop called My Love. I have inlcuded the Font Copper Alt Caps Expert in case you don't have it. Duplicate the tubes and use the duplicates to work with. Close out the originals to keep them from getting deleted. Save your work often! To work this tutorial, it is helpful if you have some working knowledge of Paint Shop Pro.
Tubes by Silvie and Kara. Animation by Arasimages. Thank you ladies for your beautiful work. Source of the element is unknown.
Use the PointingFinger below to mark your place along the way.

1. In Materials Palette, set the Foreground to color #c59d9d, Background color to #465a73.
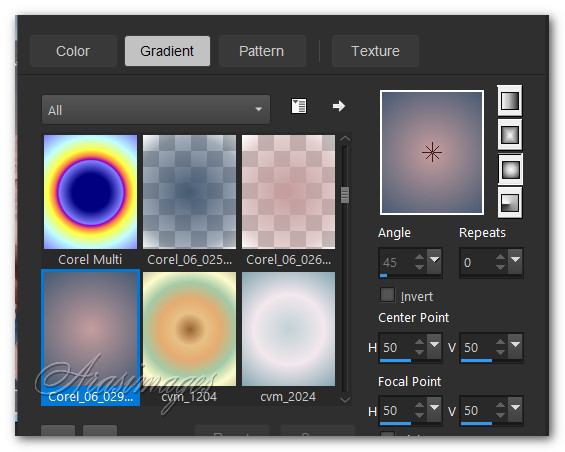
2. Using these colors, set Materials Palette to Gradient, Sunburst, Angle 0/Repeats 0, Invert unchecked, Corel 06_029 foreground-background, Center and Focal Points H and V at 50.
3. Open a New Image 950px by 650px. Flood fill with Gradient.
4. Layers/New Raster Layer. CTRL+A to select all.
5. Open Lost.jpg. Copy/Paste into Selection. CTRL+D to deselect.
6. Set Blend Mode to Screen.
7. Effects/Edge Effects/Enhance.
8. Open KaraT3139.psp. Copy/Paste as New Layer.
9. Move to bottom left corner.
10. Drop Opacity down to 64.
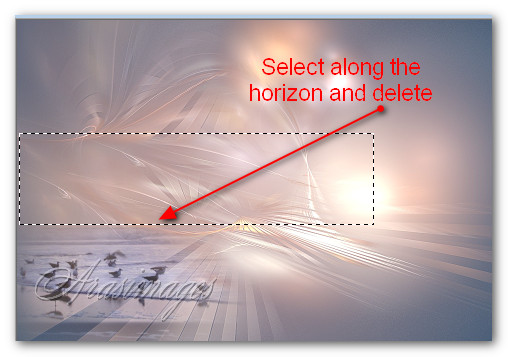
11. Using Selections tool/Selection set to Rectangle, Mode: Add (Shift), Feather 0, draw along horizon of birds image. Delete. CTRL_D.
12. Open man.pspimage. Copy/Paste as New Layer.
13. Image/Resize/Resize by 95%/Resize all layers unchecked.
14. Place man in upper left corner. Lower Opacity down to 50.
15. Set Blend Mode to Overlay.
16. Open Beauty_Lady_sleeping5TR_Silvie_07.09.2023.pspimage.
17. Image/Rotate Left. Copy the Tube layer. Paste as New Layer on working image.
18. Image/Resize/Resize by 70%/Resize all layers unchecked.
19. Layers/New Raster Layer.
20. From the Tool Bar select the Clone Brush. See settings below.

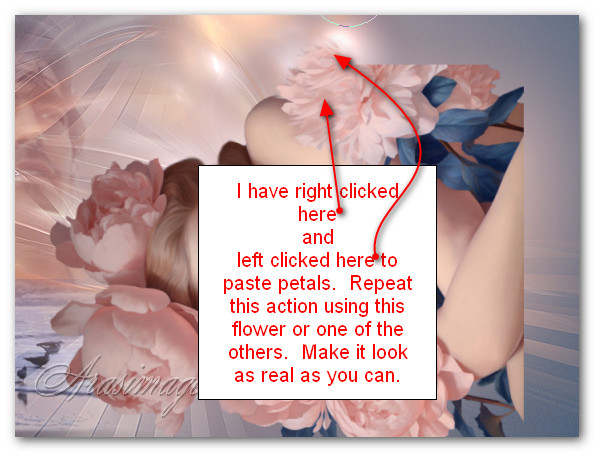
21. We are now going to fill in the top of the two flowers where they are missing petals. Activate the woman layer to right click, go to New Raster Layer to left stamp. Go back to the highlighted woman layer to right click then back to the top layer to stamp. Repeat these steps.
22. Right click the circle on a section of a flower and then place the circle where you want to fill in. Left click or drag to fill in. If you need to use a smaller circle, change the Size lower than 88. Use any flower you want to create the top of your two flowers. Try to make them look natural. Hint: Use additional layers to stamp on and use the Pick tool to rotate them. Merge/Merge Down flowers and woman layers together.
23. Effects/3D Effects/Drop Shadow. Vertical 24, Horizontal -40, Opacity 45, Blur 54, color #354457.
24. Move lady into bottom right corner of image to make her fit just outside the edges.25. Adjust/Sharpness/Sharpen.
26. Change background color in Materials Palette to #354457 , from Tool Bar select the Text tool. Have settings as seen below.

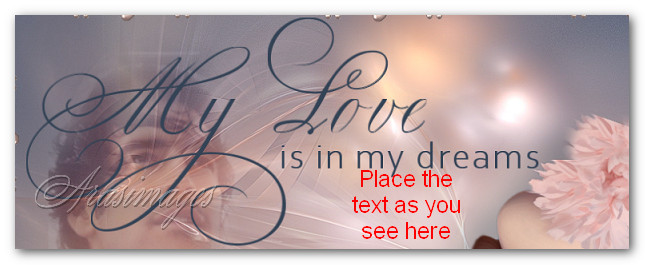
27. Find the Font Copper Alt Caps Expert, set to Size 96, Bold, Kerning 25, color #354457. Type out the words "My Love". Convert to Raster layer.
28. Place words in upper left corner over man.
29. Using the settings below, change the Font to Corbel Light/Size 48.

30. Type out the words "is in my dreams". Convert to Raster Layer.
31. Place the words below the first larger words and to the right a bit. See example below.
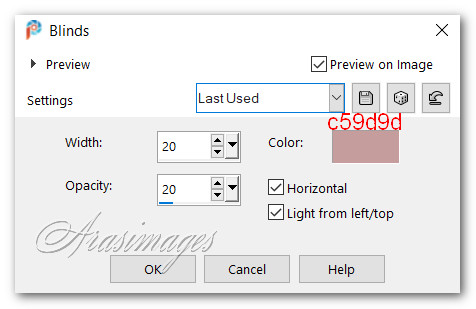
32. Image/Add Borders/Add 40px border, Symmetric checked, color #000000.
33. With Magic Wand select the 40px border.
34. Layers/New Raster Layer.
35. In Materials Palette change the background color back to #465a73. Flood fill with Gradient.
36. Effects/Texture Effects/Blinds. CTRL+D.
37. Effects/Edge Effects/Enhance. Merge/Merge Down.
38. Open deco.4.png. Copy/Paste as New Layer.
39. Place along inside border on left side from bottom to middle. Duplicate. Image/Mirror. Mirror Vertical.
40. Merge/Merge Down. Duplicate. Image/Mirror. Mirror Horizontal.
41. Paste as New Layer. (Deco.4 still in memory).
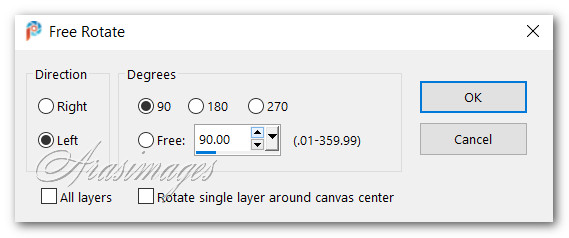
42. Image/Free Rotate/Rotate 90 degrees left.
43. Position along bottom inner border. Objects/Align/Horizontal Center.
44. Duplicate. Place to the left of the center deco, matching up the dots. If need be, use Move tool on bottom left deco and move so the dots match up at corner. Use the Eraser tool set to Size 15 to clean up corner where dots meet.
45. Duplicate. Image/Mirror. Mirror Horizontal.
46. Merge/Merge Down twice so the three bottom decors are one layer.
47. Duplicate the three in one layer. Image/Mirror. Mirror Vertical.
48. Adjust if need be so line goes along inner border.
49. Merge down on all of the deco layers so you have one layer.
50. Image/Add Borders/Add 4px border, Symmetric checked, color #c59d9d.
51. Layers/New Raster Layer. Sign your name or leave watermark. Merge/Merge Down.
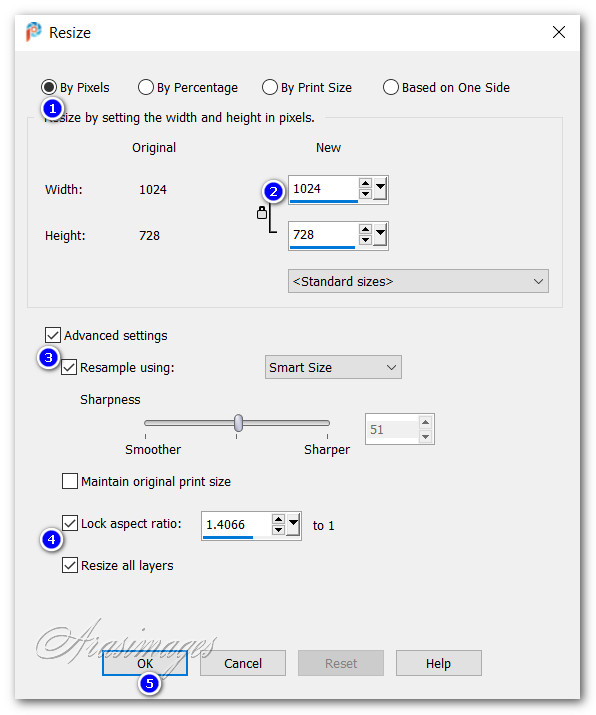
52. Image/Resize/Resize by pixels/1024px width. Resize all layers checked.
53. Adjust/Sharpness/Sharpen. Save as a .jpg image.
54. For Animation, continue with tutorial. Copy the image in PSP.
55. Open Animation Shop. Paste as New Animation in workspace of Animation Shop.
56. Duplicate image 7 times, having 8 frames in all. Left click in first frame/Edit/Select All.
57. Open the BeatingHeartAnimation.mng file. Click in first frame/Edit/Select All. Copy.
58. Go back to your main image. Right click in first frame/Paste/Into Selected Frame. Place the heart over the ladies' chest. Left click in place.
59. Click on the View Animation icon in top tool bar. See if your heart is beating as you would like. I have my Animation/Frame Properties set to 10. A higher number makes the heart beat slower. Choose a different speed if you like.
60. Now that we have our image as we like, we will save our work.
61. File/Save As. When the Save As box appears, name where it will be saved, give your file a name and leave Save as type as (*gif). Click on Save.
62. As the boxes change, click on Next, Next, Next and Finish.
Thank you Pam for checking this tutorial for me. I appreciate all of your PSP work you help me with. January 24, 2025.
If you are going to use this tutorial for stationery, cards or place the tutorial/tag on another site, I would appreciate you contacting me for permission, giving Arasimages credit for the original tutorial and if possible, a link back to my site. Thank you.
Copyright © Arasimages All Rights Reserved