

The Magic Globe
For Italian, Spanish and French translations click on the flags.


For this tutorial you will need the materials in the zip file below.

This tutorial was written using PSP2020. Create a working folder on your desktop named The Magic Globe. Unzip the Materials in to it. Duplicate the tubes and use those to work with so you will not lose the originals. Place Nara_Mask_1170 in your PSP Mask folder. Plugins used were AAA Frames and those of PSP itself. Also used was Animation Shop. To work this tutorial, it is assumed you have some working knowledge of Paint Shop Pro.
Thanks go to PamelaD for her assistance with globe animation. Thanks go to Lin Youngblood for her gorgeous AI Tube of the little boy and the lovely AI generated fall leaves. Arasimages generated the background in an AI generator.
Use the bookmark below to mark your place along the way.

1. In the Materials Palette, set the Foreground to #d7af5a, Background to #000000.
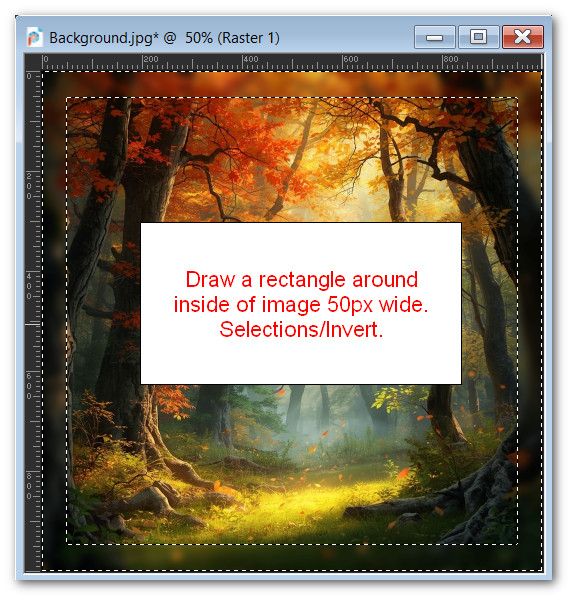
2. Open the Background.jpg file. Right click/Promote Background Layer.
3. Using the Selections tool set to Rectangle/Add(Shift)/Feather 0, draw a rectangle within the image about 50px wide. Selections/Invert.
4. Adjust/Blur. Gaussian Blur. Radius set at 8.
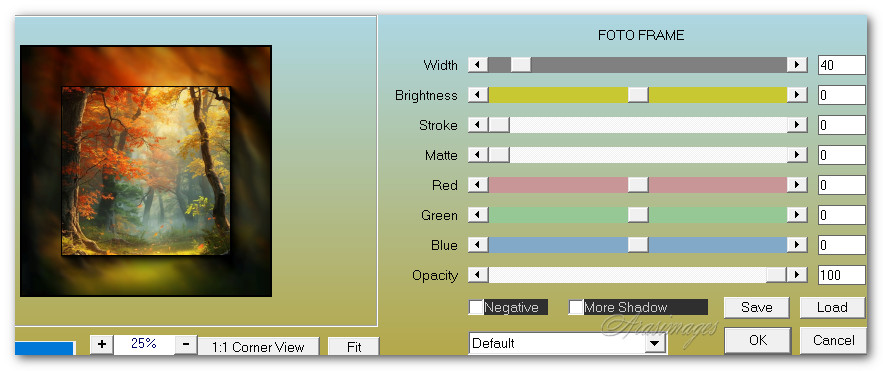
5. Effects/AAA Frames/Foto Frame.
6. Image/Flip. Flip Vertical.
7. Selections/Invert.
8. Layers/New Raster Layer. Flood fill with color #d7af5a.
9. Selections/Modify/Contract. Contract by 3px. Delete. Deselect.
10. Layers/New Raster Layer. Flood fill with color #fde8d3.
11. Layers/Load/Save Mask from Disk. Load Mask from Disk. From the drop down arrow on left, select Nara_Mask_1170. Load.

12. Merge/Merge Group.
13. Image/Add Borders/Add 3px border. Symmetric checked, color foreground #d7af5a.
14. Image/Add Borders/Add 5px border. Symmetric checked, color foreground #000000.
15. Image/Add Borders/Add 3px border. Symmetric checked, color foreground #d7af5a.
16. Open BoyForAnimation.pspimage. Copy/Paste as New Layer.
17. Place little boy at center bottom of image so he is sitting on small line of border.
18. Open Leaves4.png. Copy/Paste as New Layer.
19. Image/Resize/Resize by 50%/Resize all layers unchecked.
20. Image/Mirror. Mirror Horizontal.
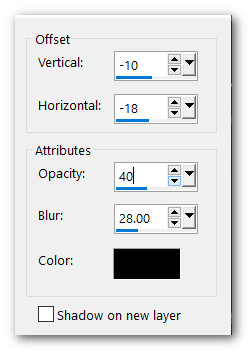
21. Effects/3D Effects/Drop Shadow. Vertical -10, Horizontal -18, Opacity 40, Blur 28. Color #000000.
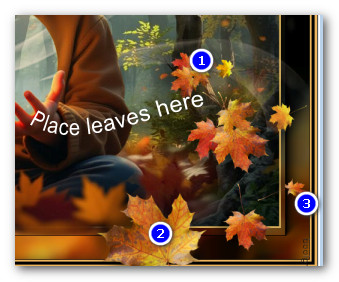
22. Place leaves in bottom right corner.
23. Leaves/Duplicate.
24. Image/Mirror. Mirror Horizontal.
25. Pull leaves upward toward top so large leaf still shows. Using the Selections tool set to Freehand Selection, select around large leaf, delete. Deselect.
26. Finish leaves placement in upper left corner.
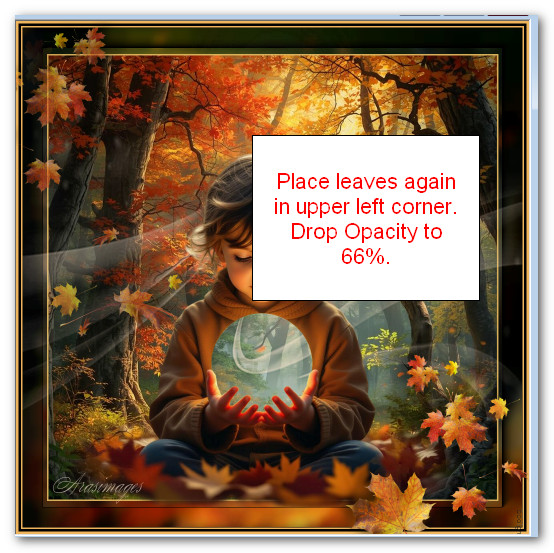
27. Lower Opacity down to 66%.
28. Sign your name or leave your watermark.
29. Close off the bottom layer. Merge/Merge Visible the two leaf layers and little boy and save as PSP Animation Shop (*psp) file. Name it BoyAndLeaves.
30. Open bottom layer and Save As WorkingBackground.jpg file.
31. Open Animation Shop. Once open go to File/Open/Globe you will find in your materials.
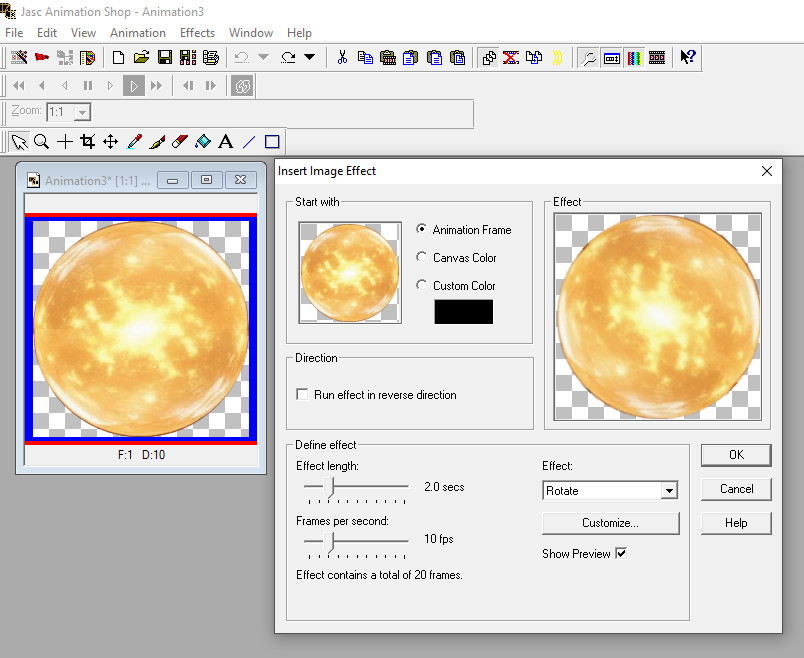
32. Effects/Insert Image Effect. Select Rotate using settings as seen below.
33. Pull slider to Frame 1, click within first frame. Edit/Select All. Right click on top bar/Copy.
34. File/Open WorkingBackground.jpg. Duplicate this until you have 21 frames to match the 21 frames of the rotating globe.
35. Click within first frame. Edit/Select All.
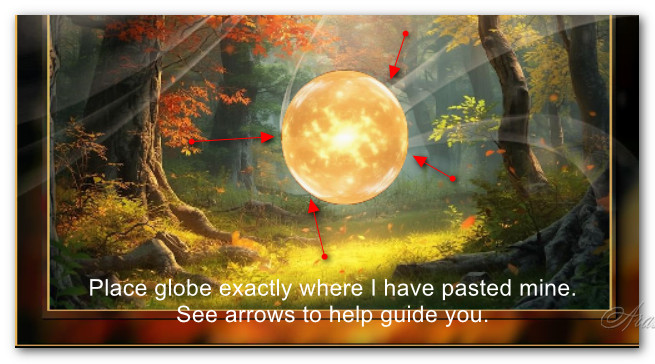
36. Right click within first frame of WorkingBackground. Paste/Into Selected Frame. Carefully place it where I have mine placed. Left click to set in place.
37. File/Open/BoyAndLeaves.psp file. Edit/Copy. Edit/Propagate Paste.
38. Right click into first frame of WorkingBackground, Paste/Into Selected Frame, carefully setting the boy and leaves over the globe to fit. Left click in place.
39. Check to make sure the globe and little boy fit together nicely by clicking on View Animation. If all looks good, we will now save your work.
40. File/Save As. When the Save As box appears give your file a name. Name it The Magic Globe, Save as type leave as .gif and Save in your working folder.
41. Click Save. As the new boxes appear, each time click Next (three times) then Finish. Your work is now complete and you have created an animated tutorial!
Thank you PamelaD for your help with the animation and for testing this tutorial. October 8, 2025
If you are going to use this tutorial for stationery, cards or place the tutorial/tag on another site, I would appreciate you contacting me for permission, giving Arasimages credit for the original tutorial and if possible, a link back to my site. Thank you.
Copyright © Arasimages All Rights Reserved