
African Dancer
For this tutorial you will need the materials in the zip file below.

For a Spanish, Italian, German and French translation click on the flags.


This tutorial was written using Paint Shop Pro 2020 Ultimate. There are no outside Plugins used in this tutorial. Place the two Masks in your PSP Files/Mask folder. Export the Stalks4 brush into your PSP Files/Brushes folder. Unzip the Materials in a folder you make on your desktop called African Dancer. Duplicate the tubes and use the duplicates to work with. Close out the originals to keep them from getting deleted. Save your work often! To work this tutorial, it is helpful if you have some working knowledge of Paint Shop Pro. There is a Video Tutorial on how to make the woman's dress ruffle if you want to watch it before attempting to follow my directions for animation. It is under my Videos on right side of main page of my website.
The lady tube used in this tutorial I have made in an AI generator. (There are hundreds of new AI tubes in my PSP tubes/AI section; please feel free to use these any way you wish).
Use the bookmark below to mark your place along the way.

1. In Materials Palette, set the Foreground to color #edac3b, Background color to #5b204e.
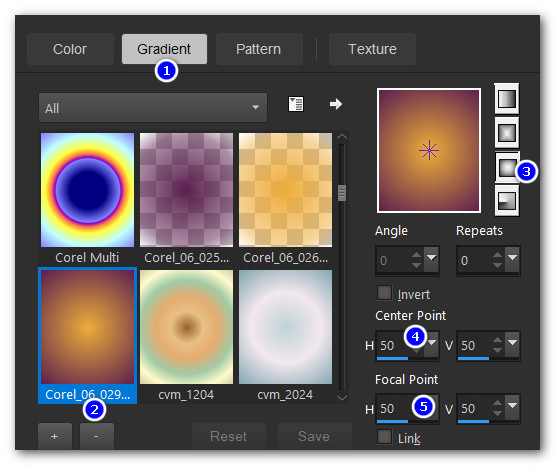
2. In Materials Palette create a Gradient Corel-06-029 foreground-background, Sunburst, Angle/Repeats 0, Invert null, Center point and Focal Point all set to 50.
3. New/New Image. 768px by 768px. Flood fill with Gradient.
4. Open LadyBG.jpg. Copy/Paste as New Layer.
5. Set to Luminance (L).
6. Layers/New Raster Layer. Flood fill with background color #5b204e.
7. Layers/Load/Save Mask. Load Mask From Disk. From drop down arrow, select Nara_mask_0485. Load.

8. Layers/Merge/Merge Group.
9. Effects/Edge Effects/Enhance More.
10. Layers/New Raster Layer. Flood fill with foreground color #edac3b.
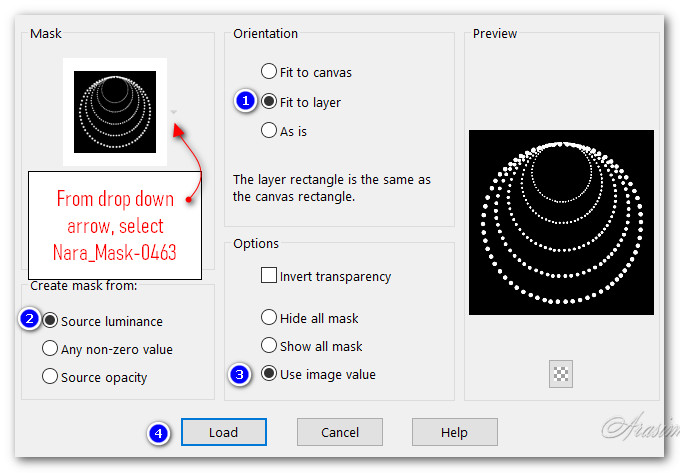
11. Layers/Load/Save Mask. Load Mask From Disk. From drop down arrow, select Nara_mask-0463. Load.
12. Layers/Merge/Merge Group.
13. Selections/Select All. Float/Defloat to select all dots.
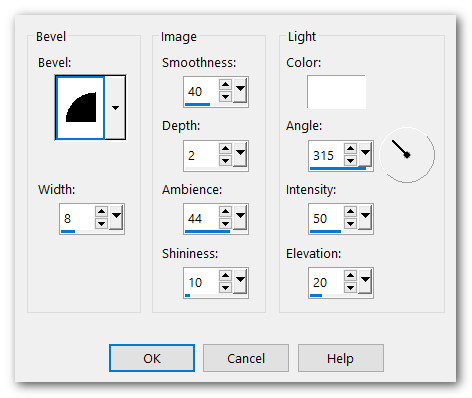
14. Effects/3D Effects/Inner Bevel.
15. Selections/Select None.
16. Effects/3D Effects/Drop Shadow. Vertical 2, Horizontal 2, Opacity 50, Blur 2, color #000000.
17. Using the Selections tool set to Rectangle/Add (Shift)/Feather 0, select around left half of circle of dots. Delete. Selects/Select None.
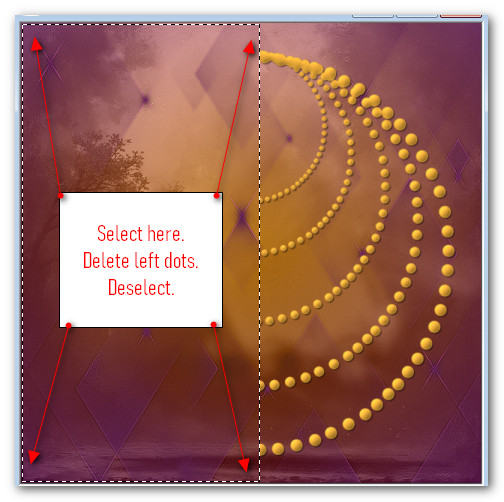
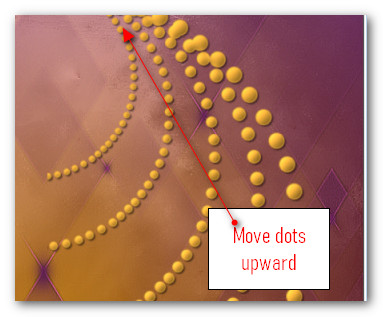
18. Using Move tool pull circle of dots into top as seen in snapshot below.
19. Layers/New Raster Layer.
20. From Tool bar select the Brush Stalks4. Set Size to 300.

21. Left stamp as seen below.

22. Right stamp as seen below on top of left stamp.

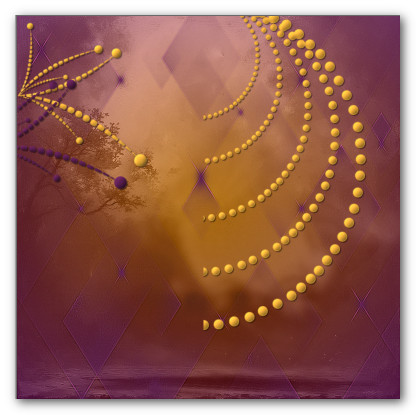
23. Effects/3D Effects/Inner Bevel.
24. Effects/3D Effects/Drop Shadow. Vertical 2, Horizontal 2, Opacity 50, Blur 2, color #000000.
25. Layers/New Raster Layer.
26. Right stamp in bottom right corner. Left stamp over right stamp in bottom right corner as seen below.
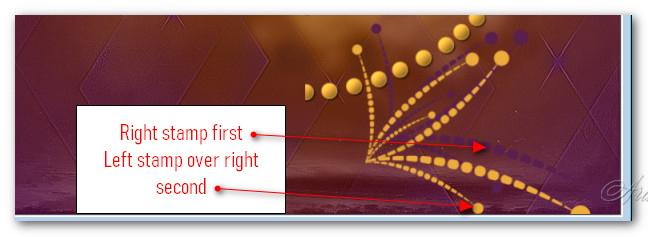
27. Effects/3D Effects/Inner Bevel. (Same as Step 23).
28. Effects/3D Effects/Drop Shadow. Vertical 2, Horizontal 2, Opacity 50, Blur 2, color #000000.
29. Image/Add Borders/Add 3px Border. Symmetric checked, color #edac3b.
30. Add your watermark or signature. Minimize in PSP for now; it will be used later in Animation Shop.
31. New/New Layer 768px by 768px.
32. Open African Dancer.pspimage. Copy Tube Layer/Paste as New Layer.
33. Delete empty Raster 1.
34. Effects/3D Effects/Drop Shadow. Vertical -22, Horizontal -80, Opacity 51, Blur 0, color #5b204e.
35.Objects/Align/Center In Canvas.
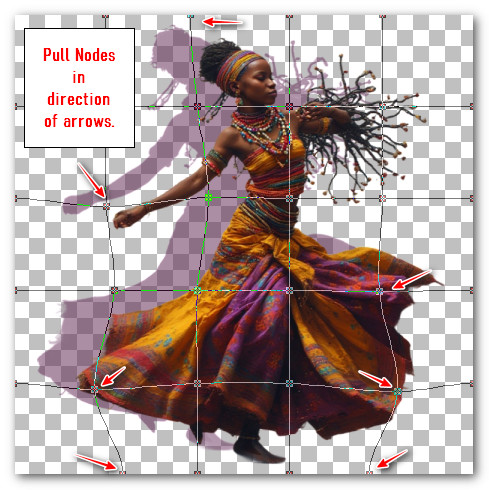
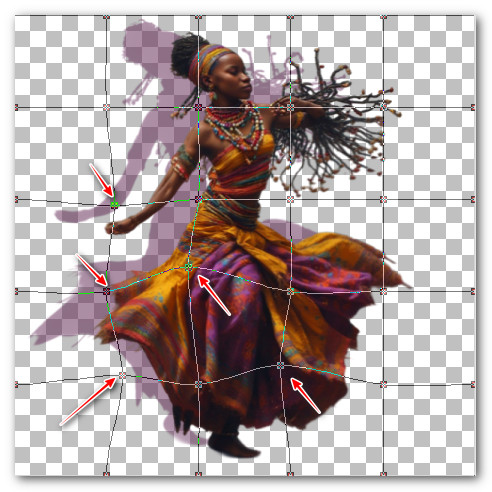
36. From Tool bar select Mesh Warp tool. You will see lines both horizontal and vertical and Nodes at corners of each one. We will be using these Nodes to move the woman and her skirt on duplicated layers to make our animation.
37. Using the image below as a guide, grab the nodes with your cursor and either pull in or push out as you see arrows are on the image.
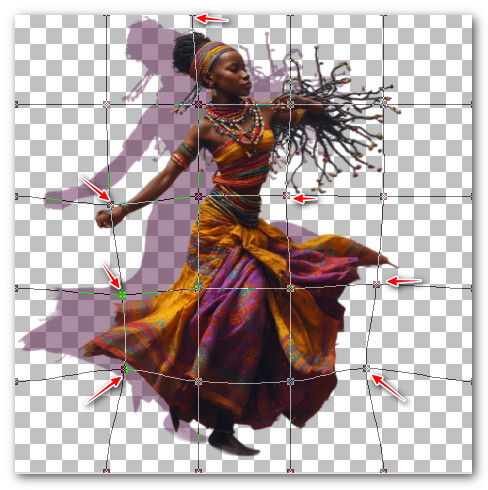
38. When you have all of the Nodes moved that you are going to, click on the Apply arrow at the top tool bar. Duplicate lady. Close off bottom layer and move up to next layer to continue.

39. Move the Nodes again as you did the first time. See my movement below for second layer. Apply. Duplicate lady. Close off layer and move up to lady on next layer to continue.
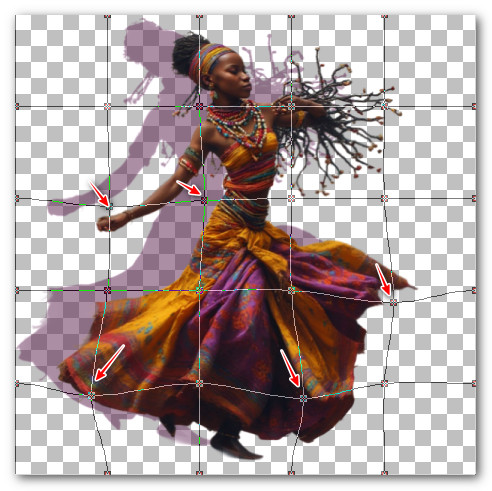
40. Move the Nodes again as you did the second time. See my example below for third layer. Apply. Duplicate lady. Close off layer and move up to lady on next layer to continue.
41.Move the Nodes again as you did the third time. See my example below for fourth layer. Apply. Duplicate lady. Close off layer and move up to lady on next layer to continue.
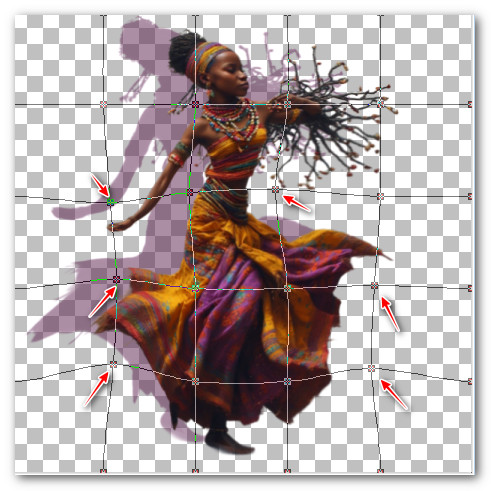
42. Move the Nodes again as you did the fourth time. See my example below for fifth layer. Apply. Open all layers.
43. File/Save As. File name: Lady Animation/Save as type: Animation Shop (*.psp). Save in your working folder.
44. Open Animation Shop. File/Open/Lady Animation.psp file. Scroll with the bottom arrow to check to see if you have 5 frames.
45. Left click in first frame. Edit/Select All. Copy. Go to Frame 5 and left click so only that frame is highlighted.
46. Right click in Frame 5. Paste/Paste After Current Frame. Repeat with the 5 frames in the 10th frame. You will now have 15 frames.
47. Go back to PSP and maximize the Merged image background you created earlier. Undo the Warp tool if it is still active. Copy. Go back to Animation Shop and Paste as New Animation in an empty space.
48. Duplicate the merged background 10 times, having 15 frames in all.
49. Left click inside the first frame. Edit/Select All.
50. Go to the Lady Animation. Left click within first frame/Edit/Select All. Copy.
51. Go back to the main background. Right click in first frame/Paste/Into Selected Frame.
52. Hover the lady in left center with foot near bottom and left click into place.
53. Make sure all 15 layers are highlighted. Animation/Frame Properties. Set from 10 to 20. The higher the number the slower the movement.
54. Check your animation by clicking on View Animation. If you want to change any speed of movement or placement, now is when to do it.
55. File/Save As. When the Save As box appears, designate where to save your work (working folder), File name (African Dancer) and leave the Save as type at (*.gif). Save.
56. As the boxes continue to change and show Next, click on Next three times then Finish.
Thank you Pam for checking this tutorial for me. I appreciate all of your PSP work you help me with. December 31, 2025.
If you are going to use this tutorial for stationery, cards or place the tutorial/tag on another site, I would appreciate you contacting me for permission, giving Arasimages credit for the original tutorial and if possible, a link back to my site. Thank you.
Copyright © Arasimages All Rights Reserved