
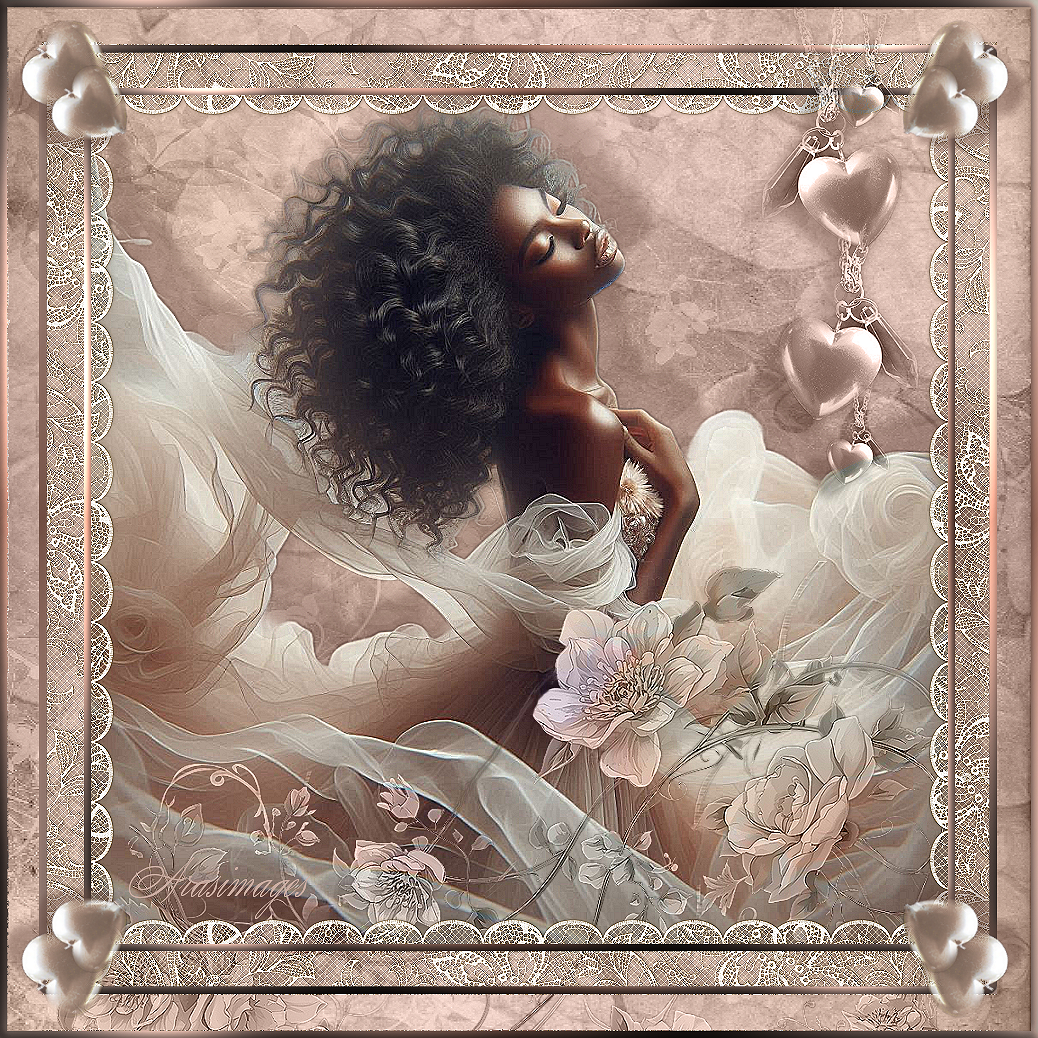
Elegance In Chiffon
For this tutorial you will need the materials in the zip file below.

For an Italian, Spanish, French and German translation click on the flags.


This tutorial was written using Paint Shop Pro 2020 Ultimate 32 bit. Plugins used in this tutorial are Graphic Plus/Cross Shadow, Simple/Top Left Mirror and effects of PSP itself. Unzip the Materials in a folder you make on your desktop called Elegance In Chiffon. Duplicate the tubes and use the duplicates to work with. Close out the originals to keep them from getting deleted. I will be using CTRL+C for copy and CTRL+D for deselect throughout this tutorial. Save your work often! To work this tutorial, it is helpful if you have some working knowledge of Paint Shop Pro.
The tube used in this tutorial I have made in an AI generator. (There are hundreds of new AI tubes in my PSP tubes/AI section; please feel free to use these any way you wish). Thank you to the tubers of the various old elements used.
Use the bookmark below to mark your place along the way.

1. In Materials Palette, set the Foreground to color #b29584, Background color to #64463c.
2. Create a Gradient in the Materials Palette using Corel_06_029 foreground/background, Linear set to Angle 45/Repeats 3, Invert unchecked, Center Point/Focal Points all null.

3. File/New. New Image 1024px by 1024px. Flood fill with Gradient.
4. Layers/New Raster Layer. CTRL+A to activate image .
5. Open SL_HydrangPaper3Sabre.jpg. Copy.
6. Paste/Paste into Selection. CTRL+D to deselect.
7. Set Blend Mode to Luminance (Legacy).
8. Effects/Edge Effects/Enhance.
9. Open ChiffonEleganceWoman.png. Copy/Paste as New Layer.
10. Image/Resize/Resize by 85%/Resize all layers unchecked.
11. Adjust/Sharpness/Sharpen.
12. Effects/3D Effects/Drop Shadow. Vertical -39, Horizontal 26, Opacity 35, Blur 11, color background color #64463c.
13. Adjust/Sharpness/Sharpen More.
14. Change Materials palette to new Gradient using Foreground color #ccaea3, leave other settings as is.
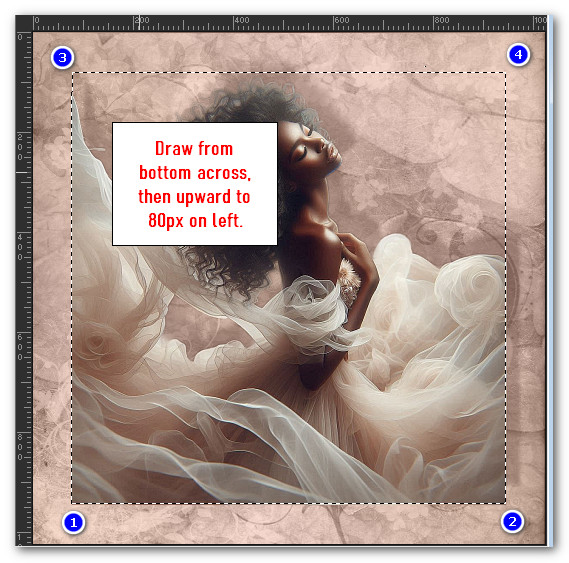
15. Using the Selections tool set to Rectangle/Add (Shift)/Feather 0, draw a rectangle around the woman starting at bottom going to top, using the View/Rulers setting for numbers, have the top left corner set to 800px. See snapshot below.
16. Layers/New Raster Layer.
17. Flood fill the layer with the Gradient.
18. Selections/Modify/Contract by 7px. Delete.
19. Selections/Modify/Select Selection Borders. Both sides/Border width 7, Anti-alias checked.

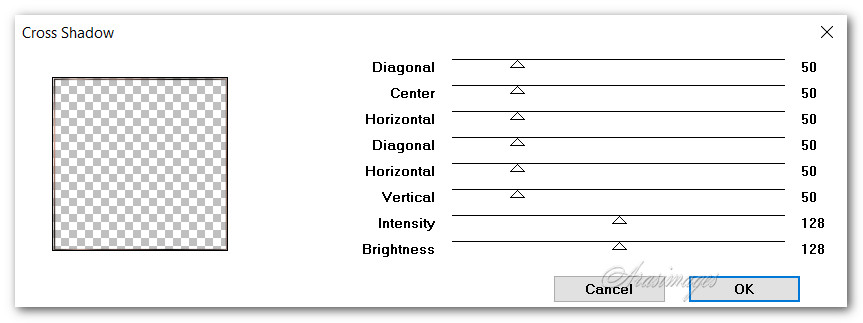
20. Effects/Graphic Plus/Cross Shadow.
21. CTRL+D to deselect.
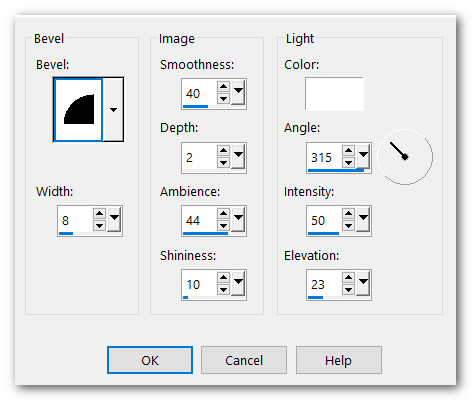
22. Effects/3D Effects/Inner Bevel.
23. Duplicate. Image/Resize/Resize by 110%/Resize all layers unchecked.
24. Image/Mirror. Mirror Horizontal. Merge/Merge Down.
25. Effects/3D Effects/Inner Bevel using same settings as in Step 22.
26. Open PeachFlower.png. Remove watermark. Copy/Paste as New Layer.
27. Move flower downward as you see in snapshot below.

28. Set the Blend Mode to Luminance (Legacy). Move flower layer below rectangles layer.
29. Move back to and highlight rectangle layer to continue.
30. Open encaje.pspimage of lace. Copy/Paste as New Layer.
31. Place lace at top so scallop points are at inside rectangle. (See image below for top, bottom and sides of each piece of lace.)

32. Go back to lace image. Copy/Paste as New Layer (unless it is still in memory).
33. Image/Flip. Flip Vertical. Pull to the bottom as you did with top lace.
34. Paste as New Layer again for side. Image/Free Rotate. Rotate Left by 90 degrees. Pull lace so scallops are along inside rectangle.
35. Repeat Step 34 for other side with exception Rotate Right by 90 degrees.
36. Layers/Merge Merge Down on first 3 layers of lace with 4th layer. Lace is all on one layer now.
37. Adjust/Sharpness/Sharpen.
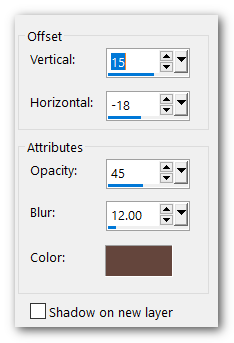
38. Move lace layer below rectangles layer. Highlight rectangles layer and continue.
39. Open romantic_tube_columbe.pspimage. Copy/Paste as New Layer.
40. Image/Resize/Resize by 85%/Resize all layers unchecked.
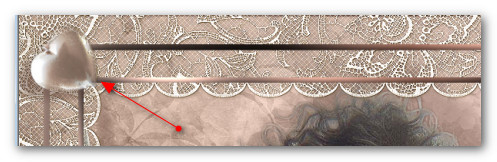
41. Blend Mode set to Lumanence (Legacy). Move to top right corner.
42. Adjust/Sharpness/Sharpen.
43. Effects/3D Effects/Drop Shadow. Vertical 15, Horizontal-18, Opacity 45, Blur 12, Color #64463c.
44. Open SingleHeart.png. Copy/Paste as New Layer.
45. Image/Resize/Resize by 86%/Resize all layers unchecked.
46. Using Pick tool and Nodes, move heart into upper right corner. Turn heart on an angle as seen below.
47. Adjust/Sharpness/Sharpen.
48. Effects/3D Effects/Drop Shadow. Vertical 15, Horizontal-18, Opacity 45, Blur 12, Color #64463c.
49. Duplicate. Resize again by 86% and place over first heart.
50. Image/Merge/Merge Down.
51. Effects/Simple/Top Left Mirror.

52. Go back to Lace layer and highlight it. Using Selections tool set to Rectangle/Add(Shift)/Feather 0, surround the area outside of the rectangle at the top, bottom and sides of the image, delete those areas. CTRL+D.
53. Image/Add Borders/Add 7px border. Symmetric checked. Color #ffffff.
54. Select the 7px border with Magic Wand to activate it. Flood fill with Gradient.
55. Effects/3D Effects/Inner Bevel.
56. Image/Free Rotate/Rotate Right by 90%.
57. Effects/Graphics Plus/Cross Shadow.
58. Sign your name or leave your watermark if you wish.
Thank you Pam for checking this tutorial for me. I appreciate all of your PSP work you help me with. January 21, 2026.
If you are going to use this tutorial for stationery, cards or place the tutorial/tag on another site, I would appreciate you contacting me for permission, giving Arasimages credit for the original tutorial and if possible, a link back to my site. Thank you.
Copyright © Arasimages All Rights Reserved