
Feathered Fantasy
For this tutorial you will need the materials in the zip file below.

For an Italian, German, French and Spanish translation click on the flags.


This tutorial was written using Paint Shop Pro 2020 Ultimate 32 bit. Plugins used in this tutorial are Alien Skin Snap Art/Oil Paint, Simple/Top Left Mirror and effects of PSP itself. Animation Shop is also used. Unzip the Materials in a folder you make on your desktop called Feather Fantasy. Duplicate the tubes and use the duplicates to work with. Close out the originals to keep them from getting deleted. Save your work often! To work this tutorial, it is helpful if you have some working knowledge of Paint Shop Pro.
The tubes used in this tutorial I have made in an AI generator. (There are hundreds of new AI tubes in my PSP tubes/AI section; please feel free to use these any way you wish).
Use the bookmark below to mark your place along the way.

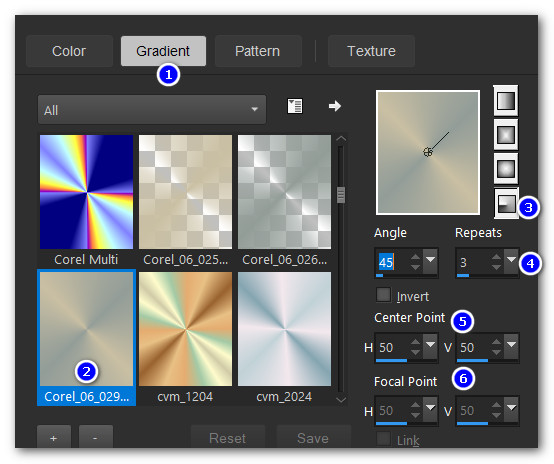
1. In Materials Palette, set the Foreground to color #939d98, Background color to #c9bfa3. Create a gradient using these colors, Corel_06_29 foreground/background, Angle 45/Repeats3, Radial, Center Point H and V set to 50, Focal Point H and V null.
2. File/New. New Image 1024px by 800px. Flood fill with gradient.
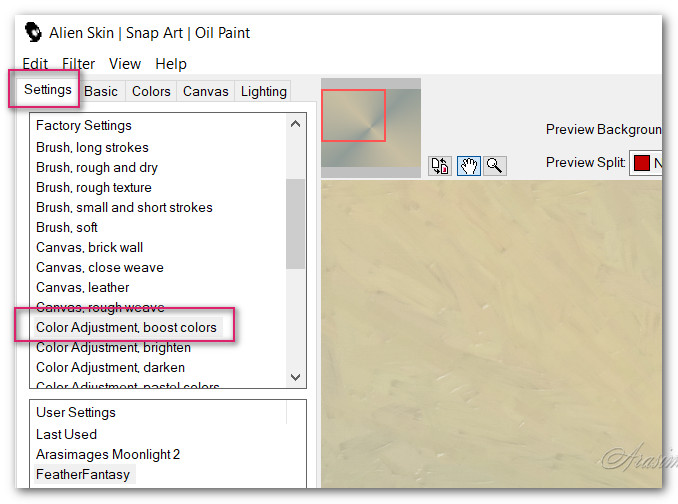
3. Effects/Alien Skin Snap Art/Oil Paint. Select Color Adjustment, boost colors.
4. Image/Mirror. Mirror Horizontal.
5. Effects/Edge Effects/Enhance.
6. Open FeatherWoman.png. Copy/Paste as New Layer.
7. Image/Resize/Resize by 80%/Resize all layers unchecked.
8. Effects/3D Effects/Drop Shadow. Vertical -15, Horizontal -15, Opacity 30, Blur 36, color #000000.
9. Move lady to right side of image, aligning her bottom along bottom edge of image, right feather into right edge.
10. Adjust/Sharpness/Sharpen. Adjust/Sharpness/Sharpen More.
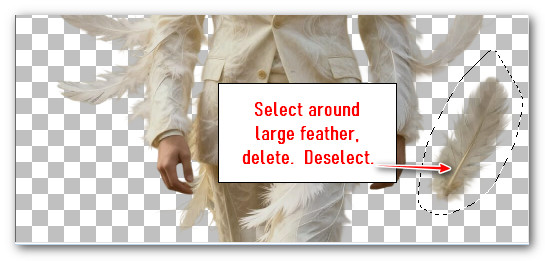
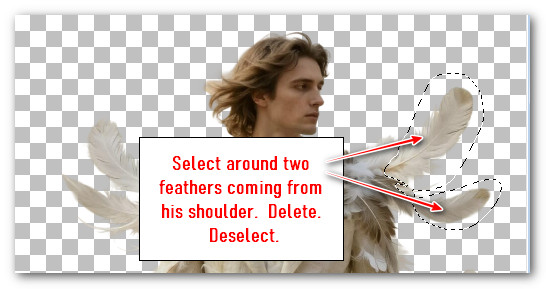
11. Open FeatherMan.png. Using Selections tool set to Selection/Freehand Selection, Point to point, Add(Shift), Feather 0, select around the right bottom large feather and delete. Deselect.
12. Select around the large two feathers on the right side coming from his shoulder. Delete. Deselect.
13. Copy/Paste as New Layer.
14. Image/Resize/Resize by 80%/Resize all layers unchecked.
15. Adjust/Sharpness/Sharpen. Adjust/Sharpness/Sharpen More.
16. Effects/3D Effects/Drop Shadow. Vertical -15, Horizontal -15, Opacity 30, Blur 36, color #000000.
17. Move man to left side of image having feathers going out beyond left edge of image, bottom of man aligned with bottom of image.
18. Merge/Merge Visible. Duplicate.
19. Image/Resize/Resize by 88%, Resize all layers unchecked.
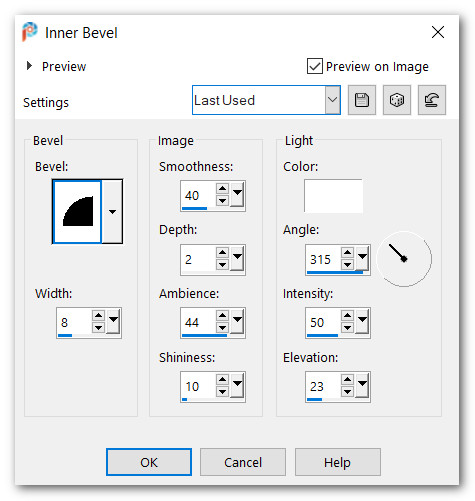
20. Effects/3D Effects/Inner Bevel.
21. Drop down to Merged (first) layer.
22. Adjust/Blur/Gaussian Blur. Radius 24.
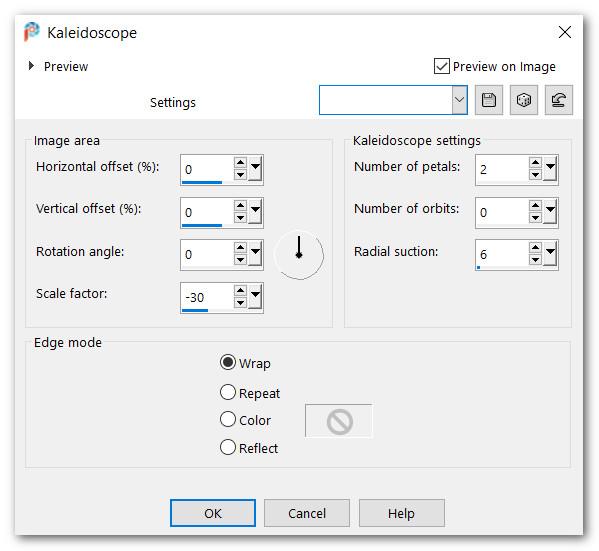
23. Effects/Reflection Effects/Kaleidoscope.

24. Open Background.png. Copy/Paste as New Layer.
25. Effects/Reflection Effects/Kaleidoscope set to Wrap.
26. Effects/Edge Effects/Enhance More.
27. Lower Opacity down to 40%. Go back to top layer of man/woman.
28. Open SmallDot.png. Copy/Paste as New Layer.
29. Place in upper left corner of inner image.
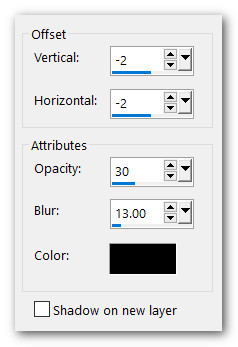
30. Effects/3D Effects/Drop Shadow. Vertical -2, Horizontal -2, Opacity 30, Blur 13, color #000000.
31. Effects/Simple/Left Top Mirror.
32. Image/Add Borders/Add 3px border, Symmetric checked, color #939d98.
33. Image/Add Borders/Add 3px border, Symmetric checked, color #c9bfa3.
34. Effects/3D Effects/Inner Bevel.
35. Layers/New Raster Layer. Leave your watermark or name. Merge/Merge Visible.
36. Save as Feather Fantasy.jpg file. Copy.
37. Open Animation Shop. Paste as New Animation.
38. In Animation Shop, duplicate Feather Fantasy 22 times, having 23 frames in all (to match the feather animation frames).
39. File/Open/ArasimagesFallingFeathers.psp.
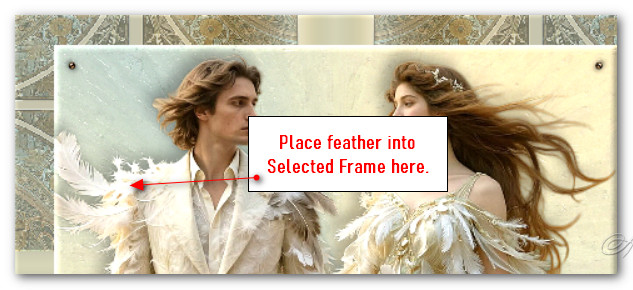
40. Left click in first frame. Edit/Select All. Copy.
41. Go to Feather Fantasy file with 23 frames. Left click in first frame. Edit/Select All. Right click in first frame/Paste Into Selected Frame, hover the cursor to direct the feather you see to set on man's shoulder.
42. Left click to set in place.
43. File/Open/GooseWithDS.psp. Right click in frame/Copy.
44. Edit/Propagate Paste.
45. Right click in first frame of Feather Fantasy. Paste/Into Selected Frame. Hover the cursor guiding the goose to right of man's hand and set it place by left click.
46. To slow down the fall of the feather, go to Animation/Frame Properties and change the number from 10 to 14.
47. We will now save the animation. File/Save As. When the Save As box appears, give your work a name (Feather Fantasy), name where it will be saved and leave it set to save as a .gif file. Save.
48. As the boxes appear, click on Next, Next, Next three times, then the last box will offer you to Finish. Click on Finish and your animation is now saved.
Thank you Pam for checking this tutorial for me. I appreciate all of your PSP work you help me with. February 12, 2026.
If you are going to use this tutorial for stationery, cards or place the tutorial/tag on another site, I would appreciate you contacting me for permission, giving Arasimages credit for the original tutorial and if possible, a link back to my site. Thank you.
Copyright © Arasimages All Rights Reserved