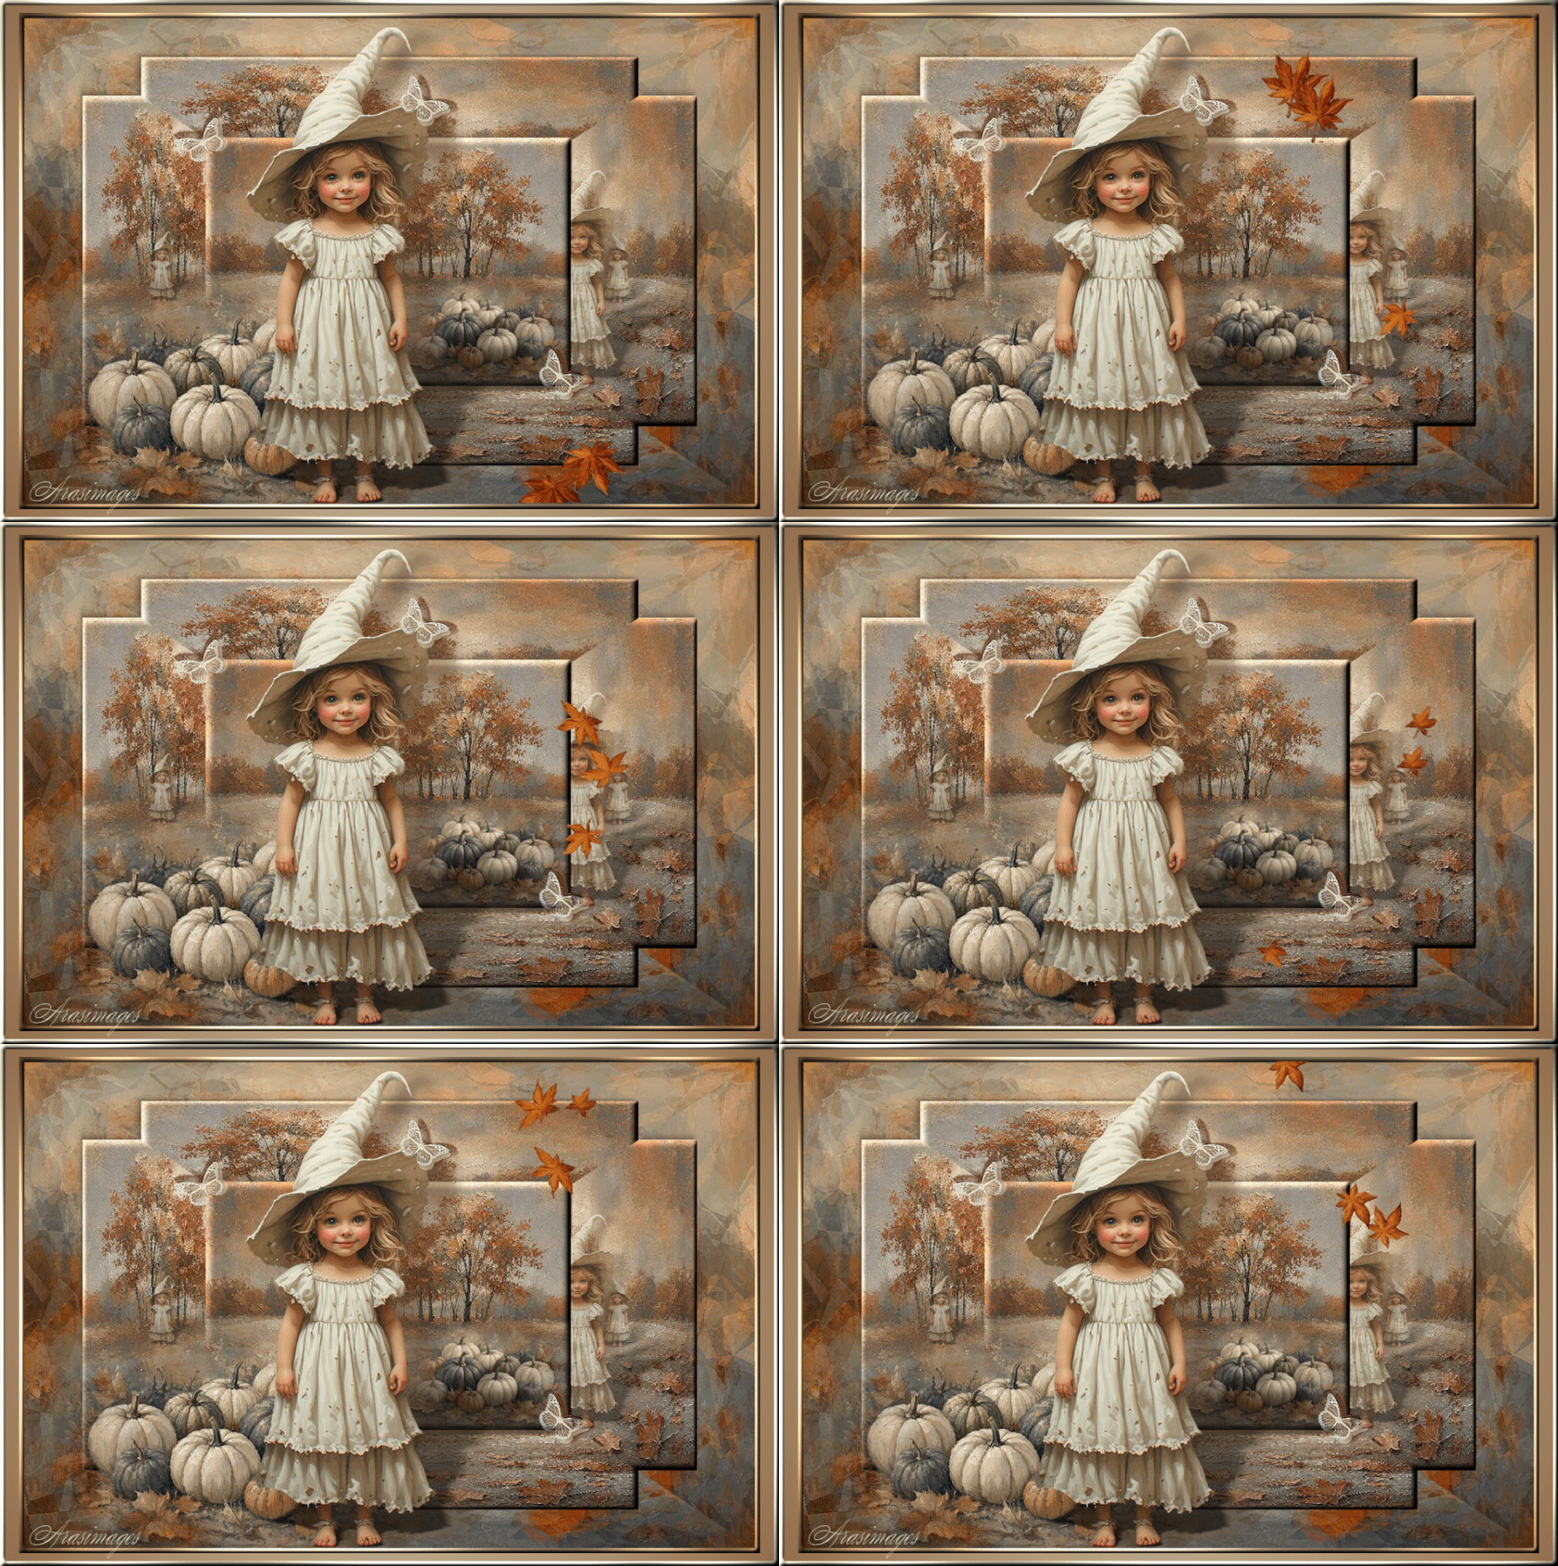
Pumpkin Princess
For this tutorial you will need the materials in the zip file below.

This tutorial was written using PSP2020 Ultimate. To work this tutorial, it is assumed you have some working knowledge of Paint Shop Pro. Create a folder on your desktop named PumpkinPrincess and open the materials in that folder. Plugins used are Graphics Plus/Cross Shadow, Filters Unlimited 2/MirBevl and Alien Skin Eye Candy 5: Impact/Backlight. Place conte.PspMask in your PSP Masks folder. Some of the effects are those of PSP itself. Export the Butterfly Brush into your PSP Files/Brushes folder. Click on the PumpkinPrincess.f1s file and it automatically goes into your EC5 file folder.
The images used are those I have created and tubed in an AI generator. You may keep these and use for your own use if you wish. However, please don't claim them as your own. They are not in my AI tubes section.
Use the genericfollow.png below to mark your place along the way.

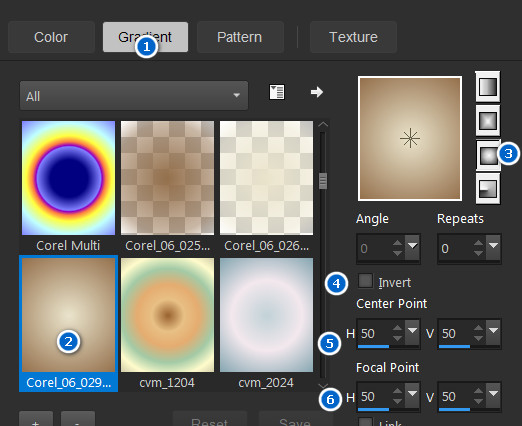
1. In materials Palette, set Foreground to color #eae4cc, Background color #94704c. Create a gradient using Corel-06-029, Style Sunburst, Angle/Repeats both 0, Invert unchecked, Center Point H50/V50, Focal Points H50/V50.
2. New/New Image 1248px by 832px. Flood New Image with Gradient.
3. Open OIGBackground.png. Copy/Paste as New Layer.
4. Open OIG3.qe.png. Copy/Paste as New Layer.
5. Image/Mirror. Mirror Horizontal.
6. Image/Resize/Resize by 68%/Resize all layers unchecked.
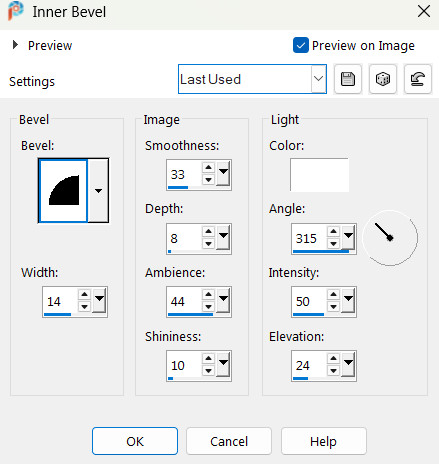
7. Effects/3D Effects/Inner Bevel.
8. Effects/3D Effects/Drop Shadow. Horizontal -5, Vertical -5, Opacity 45, Blur 15, color #000000.
9. Adjust/Sharpeness/Sharpen.
10. Merge/Merge Down.
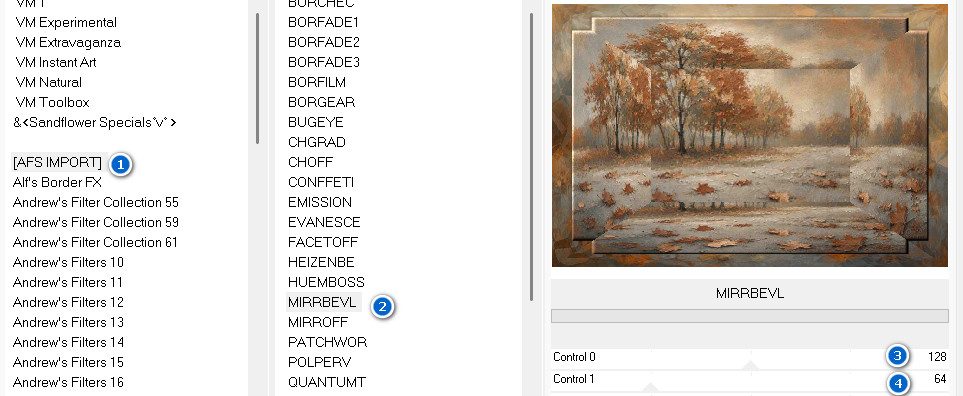
11. Effects/Filters Unlimited 2/AFS IMPORT/MIRRBEVL.
12. Select around center rectangle. Open OIGBackground1.png. Copy/Paste into Selection.
13. Adjust/Sharpeness/Sharpen.
14. Repeat Inner Bevel and Drop Shadow as in Steps 7 and 8. Deselect.
15. Open Pumpkins.png. Layers/Load/Save Mask. Load Mask from Disk. Select the conte mask from drop down arrow. Load.
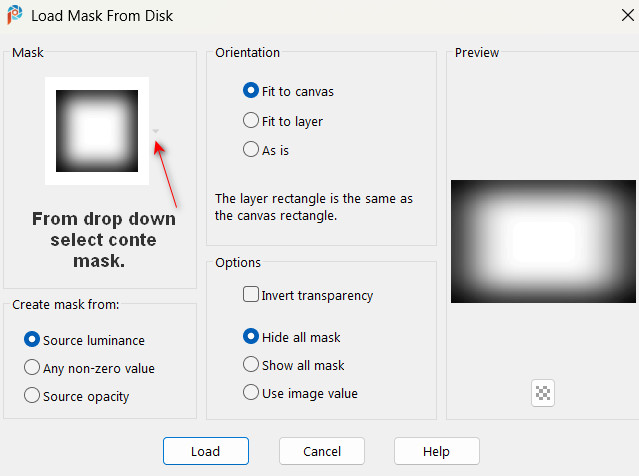
16. Merge/Merge Group.
17. Image/Resize/Resize by 50%/Resize all layers unchecked.
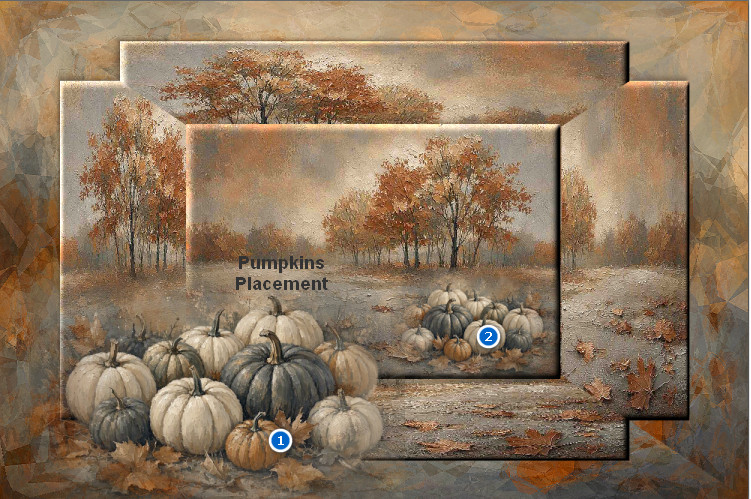
18. Copy Pumpkins.png/Paste as New Layer.
19. Place in bottom left corner.
20. Highlight Raster 2 of background. Using Eraser tool, erase the dark marks from pumpkins. Move back to top layer (pumpkins).
21. Adjust/Sharpness/Sharpen.
22. Duplicate Pumpkins. Image/Resize/Resize by 45%/Resize all layers unchecked.
23. Image/Mirror. Mirror Horizontal. Move pumpkins to bottom right corner of center rectangle.
24. Open PumpkinPrincessOne.png. Copy/Paste as New Layer.
25. Image/Resize/Resize by 115%/Resize all layers unchecked.
26. Move little princess to the left a little bit over pumpkins.
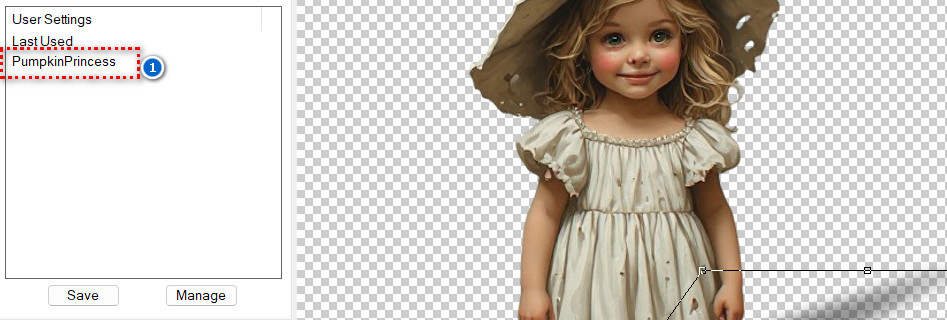
27. Effects/Alien Skin Eye Candy:5 Impact/Perspective Shadow. Click on PumpkinPrincess in box on bottom left corner. OK.
28. Effects/3D Effects/Drop Shadow. Vertical 10, Horizontal 49, Opacity 45, Blur 29, color #000000.
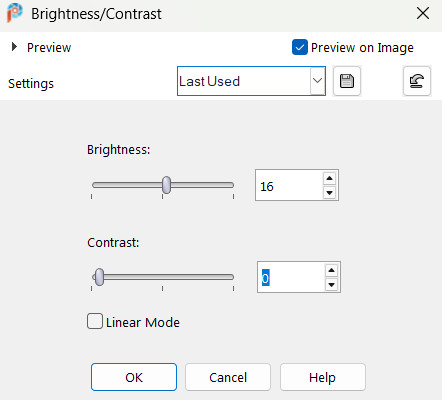
29. Adjust/Brightness and Contrast. Brightness/Contrast.
30. Adjust/Sharpness/Sharpen.
31. Duplicate little girl. Resize by 45%. Place her on right side of middle rectangle. Select as seen below using Selection tool set to Rectangle/Add Shift/Feather 0. Delete. Deselect.
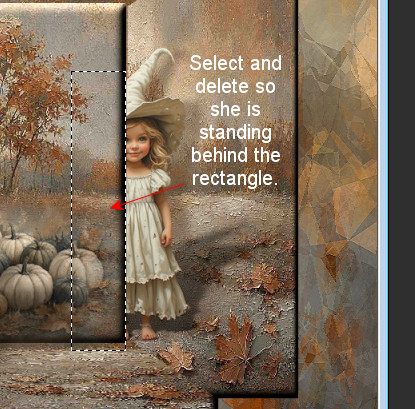
32. Lower Opacity by 80%. Adjust/Sharpness/Sharpen.
33. Duplicate main image of little girl. Resize by 15%. Place her to left of middle rectangle by trees. Lower opacity to 60.
34. Adjust/Sharpness/Sharpen.
35. Duplicate her and Image/Mirror. Mirror Horizontal.
36. Place a Perspective Shadow on the little girl as you did in Step 27. Move her a bit to the right of other little girl.
37. From Tool bar select the Paint Brush Butterfly1-pk4 001. Set the size to 100.

38. Layers/New Raster Layer. Change background color to #5f3b25, stamp two butterflies as seen below. One on her hat, one on bottom right corner of center rectangle. Then change the Rotation to 290 and stamp third butterfly on left top of center rectangle.
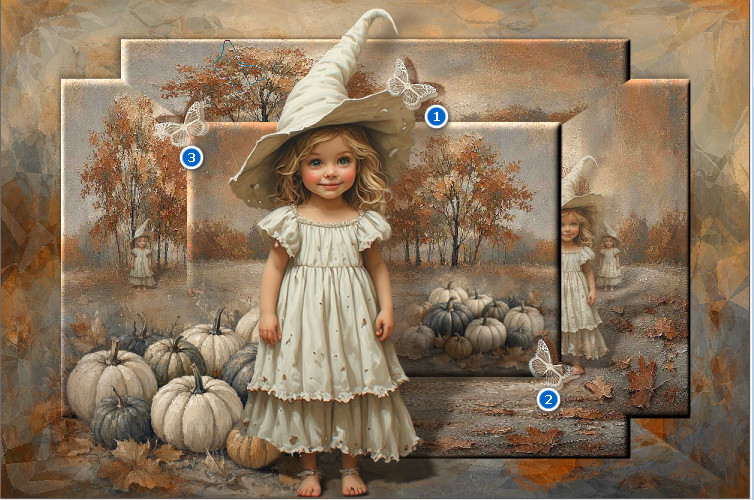
39. Change Foreground color to #eae4cc. Stamp the same as the first time using the Foreground color #eae4cc. Stamp just a little bit to the side of the first stamping so the dark brown will show behind the foreground color.
40. Effects/Edge Effects/Enhance.
41. Close off the first layer (Gradient Raster 1). Merge/Merge Visible.
42. Image/Resize/Resize by 95%/Resize all layers unchecked.
43. Effects/3D Effects/Chisel.
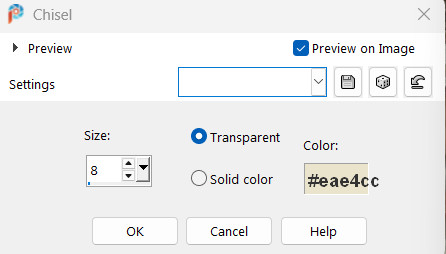
44. Using Magic Wand, select the 8px created around outer edge from applying Chisel. Look closely as it may be hard to see.
45. Change Background color to #94704c. Set the Foreground color to Gradient you have been using. Flood fill 8px border with Gradient.
46. Effects/Graphics Plus/Cross Shadow.
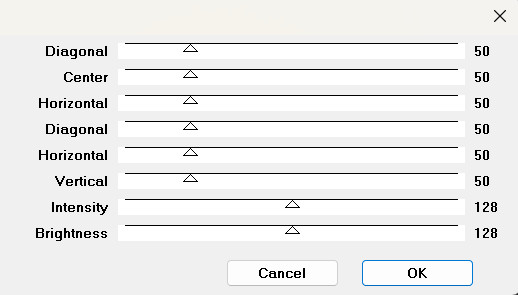
47. Effects/3D Effects/Inner Bevel.
48. Deselect. Open bottom layer.
49. Image/Add Borders. Add 8px border, Symmetric checked, color #eae4cc.
50. Using Magic Wand, select 8px border.
51. Effects/Graphics Plus/Cross Shadow as in Step 46.
52. Image/Mirror. Mirror Horizontal.
53. Effects/3D Effects/Inner Bevel as in #47. Deselect.
54. Sign your name or place desired watermark. Save as Pumpkin Princess.jpg.
55. If you wish to make this an animated tutorial, COPY image.
56. Open Animation Shop. File/Open Pumpkin Princess.jpg. Using the Duplicate icon in top tool bar, (or your own means of duplication), duplicate the frames until you have 12 frames in all.
57. Scroll to first frame. Edit/Select All.
58. Open LeavesAnimation3.gif. Scroll to the first frame. Edit/Select All. Right click on blue top frame and Copy.
59. Go back to the main PumpkinPrincess image. Right click in first frame. Hover the leaves until they are within the beveled 8px frame, approximately where you see mine, and left click into place.
60. Each frame should have the animation in it. Test by clicking on the View Animation icon in top tool bar. If they are not placed properly, click on the back arrow and redo step 59.
61. The leaves may be dropping too fast so you can slow them down by setting the Animation/Frame Properties to a higher number. I changed mine to 20.
62. We will now save our work. File/Save As. When the Save As box appears, designate where your work will save, give it a name (Pumpkin Princess) and leave the Save as type set to .gif. Save.
63. As the boxes change, click on Next, Next, Next and Finish. Your work should now be saved where you directed. (I resized my image by 90% so it would better fit in my tutorial page.)
64. Thank you PamelaD for checking this tutorial for me. Thank you for being part of Arasimages for these many years. From 2009 to September 9, 2026
If you are going to use this tutorial for stationery, cards or place the tutorial/tag on another site, I would appreciate you contacting me for permission, giving Arasimages credit for the original tutorial and if possible, a link back to my site. Thank you.
Copyright © Arasimages All Rights Reserved